
| Carpentry for Vocational Schools - A Teacher's handbook (GTZ, 252 p.) | ||||
| 14. WINDOWS | ||||
| (introduction...) | ||||
| 14.1. Parts of a window frame | ||||
| 14.2. Calculating of a window opening | ||||
| 14.3. Joining a window frame | ||||
| 14.4. Fixing a window frame | ||||
|
| |||||||||||||||||||||||||||||||||||
TOPIC: 14. WINDOWS
INTRODUCTION: This section teaches students the names of the parts of a window frame, calculation of an opening for a window frame and how window frames are made, assembled and fitted into the wallframe.
OBJECTIVES:
14.1. Students must be able to name the parts of a window frame and its timber sizes.
14.2. Students should be able to calculate the opening for a window frame in a wall-frame.
14.3. To know how to make a window frame with the correct joints and fitting the security bars.
14.4. To be able to fit a window frame into a wall frame and finish with painting, nailing flywire and architraves around the window.
METHOD: The most difficult part in this section is undoubtedly the calculation of the opening for a window frame in a wallframe.
Therefore a lot of time is needed for practising this calculation.
14.1. Prepare a window frame (a window from the classroom can be used) with all the parts and display it in the classroom for better understanding.
14.2. Prepare photocopies of the tables with the measurements for the openings. Explain to students with aid of blackboard and the window frame the process of calculating the opening.
14.3., 14.4. These two chapters can only be demonstrated on-the-job, but if there is no opportunity to show it on a building project, classroom explanation will be sufficient.
NOTE: It is very important in this section to set many exercises on calculating the opening, because that is the most important step in producing a window of the correct size.
Windows give the house a certain outlook and therefore it is very important to choose a good number of windows of sufficient size to prevent a wall from looking boring. In coastal areas you will make the windows very large, almost down to the floor, to provide good circulation of air in order to keep the room cool.
For highlands, because of the colder climate, windows are made smaller.
When locating the windows and considering their size you have to consider the furniture, toilet and showers, to avoid having a window where a cupboard will eventually be.
Windows for bathrooms and toilets usually have only 4 blades.
Windows for bedrooms and kitchen have from 7 to 10 blades.
Windows for sitting rooms have up to 14 blades.
The glass louvres can be opened to any angle by simply moving a lever and there is a locking device for use when the louvres are closed.

Figure
Windowsill: - The windowsill is the lowest part of the window frame. It is specially designed to provide a stop for the lowest louvre glass and to let the rainwater run off. On the bottom of the sill is a waterdrop off groove. Windowsills are available from building material stores and timber-selling companies.

Figure
Jambs: - The jambs are the side parts of the window frame on which the louvre frames are screwed. The thickness of the jambs can be from 22 mm up to 30 mm. The width is the same as the windowsill.
Head: - This is the upper part of the window frame and is the same size as the jambs.
The opening you have to leave for a window in a wall frame depends on the number of louvre blades, the louvre frame, the thickness of the window frame-timber and the number of windows joined together (single, double-window etc.) as well as the length of the louvre glass.
a) CALCULATING THE WIDTH OF AN OPENING:
- For the width of an opening (between two studs) you have to know the thickness of the jambs, the space for the louvre frame, the length of the louvre glass and the number of windows.
The following table will enable you to find the correct measurements for the opening of the WIDTH of a window frame in the wall frame by a timber thickness of the jambs of 22 mm.
NOTE: Do not apply it to timber of other thicknesses!
Louvre glasses are available in following length:
12" = 305 mm
20" = 507 mm
22" = 558 mm
24" = 610
mm
27" = 685 mm
30" = 769 mm
32" = 812 mm
36" = 914 mm
|
1 window | |
|
GLASS |
OPENING |
|
12" |
389 mm |
|
20" |
591 mm |
|
22" |
642 mm |
|
24" |
694 mm |
|
27" |
770 mm |
|
30" |
846 mm |
|
32" |
896 mm |
|
36" |
1000 mm |

Figure
|
2 windows | |
|
GLASS |
OPENING |
|
12" |
756 mm |
|
20" |
1160 mm |
|
22" |
1262 mm |
|
24" |
1366 mm |
|
27" |
1516 mm |
|
30" |
1670 mm |
|
32" |
1770 mm |
|
36" |
1974 mm |

Figure
|
3 windows | |
|
GLASS |
OPENING |
|
12" |
1123 mm |
|
20" |
1730 mm |
|
22" |
1882 mm |
|
24" |
2038 mm |
|
27" |
2263 mm |
|
30" |
2494 mm |
|
32" |
2644 mm |
|
36" |
2950 mm |

Figure
|
4 windows | |
|
GLASS |
OPENING |
|
12" |
1490 mm |
|
20" |
2300 mm |
|
22" |
2502 mm |
|
24" |
2710 mm |
|
27" |
3010 mm |
|
30" |
3320 mm |
|
32" |
3520 mm |
|
36" |
3926 mm |

Figure
E.g.: We need an opening for 3 windows.
Length of louvre blades = 24" - 610 mm
Timber thickness of
jambs - 22 mm
Space for one louvre frame - 20 mm

Figure
|
4 Jambs |
ea. |
22 mm |
= 88 mm |
|
6 Louvre frames |
ea. |
20 mm |
= 120 mm |
|
3 Louvre glasses |
ea. |
610 mm |
= 1830 mm |
|
_________________________________________ | |||
|
Total width of window opening |
= 2038 mm | ||
Now you can compare the result with the table, and you will find exactly the same measurement!
b) CALCULATING THE HEIGHT OF AN OPENING:
- For the height of an opening (between the trimmers), you have to know the number of blades, the thickness of the head timber and the windowsill.
The following table will enable you to find the correct measurement for the height for a window in a wall frame for a timber thickness of the head of 22 mm and the sill of 35 mm.
Louvre frame with:
|
3 Blades |
502 mm |
|
4 Blades |
642 mm |
|
5 Blades |
780 mm |
|
6 Blades |
920 mm |
|
7 Blades |
1060 mm |
|
8 Blades |
1200 mm |
|
9 Blades |
1340 mm |
|
10 Blades |
1480 nun |
E.g.: We need an opening for a window with 9 blades in the louvre frame.

Figure
|
Window head |
22 mm |
|
Windowsill |
35 mm |
|
Louvre frame 9 B1. |
1238 mm |
|
__________________________ | |
|
Total height of open |
1340 mm |
Now you can compare the result with the table, and you will find exactly the same measurement !
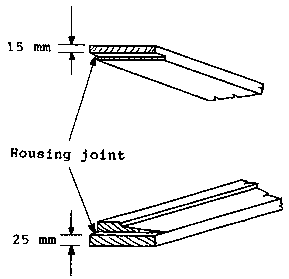
The window frame is joined with housing joints. Sand all surfaces with beltsander before assembling. Then the members of the window frame are glued and nailed together. After joining let the frame rest for some hours to enable the glue to dry.
Figure
The next task is to paint the frames with undercoat. When dry, the frame is provided with "Security bars". For locating the position of the 12 mm security bars, a louvre frame is fixed provisionally and the lever is put in open position. Now it is easy to see where to drill the holes to fit the bars.
Firstly, the lowest bar is located approximately 12 cm above the windowsill. Then measure 14 cm from centre to centre for the next holes.

Figure
It is important that the holes are not outside the wall frame after fixing it into the wall to avoid the possibility of pulling the bars out from the window frame.
Drill 13 mm holes for the bars to make sure the bars slide in easily. Paint bars before assembly.
Window frames can be also secured with security wire mesh. This wire mesh is usually simply nailed on the outside of the frame with staples.
If carpentry machines are available it is advisable to cut a rebate on the frame so that the wire mesh is flush with the outside of the window frame.
a) Setting in a wall frame:
When the window frame is completed, it can be placed in the wall frame opening. There are different ways a window can be fixed in a wall frame.
- The window frame is level with the inside wall.

Figure
- The window frame comes out on the inside wall.

Figure
b) Finishing a window frame: - Punch all nails beneath the surface and fill all holes with a waterproof putty. When dry, sand it and put a second undercoat. Then sand the whole frame again with a fine grit paper and apply the final coat of high, gloss paint. Also paint the security bars a second time. When dry, the louvre frames are screwed into the frame. For this the bottom of the louvre frame is cut out in order to fit into the rebate on the sill. A stop is also needed on the head when the louvres are in the closed position.
Use 1" roundhead screws for screwing the louvre frames to the jambs.
If necessary, a mosquito screen can be nailed on the outside of the frame and covered with 10 mm cover strips.

Figure
 |
 |