Carpentry for Vocational Schools - A Teacher's handbook (GTZ, 252 p.)
13. ROOFING
(introduction...)
13.1. Different roof shapes
13.2. Technical terms of a roof
13.3. Rafter and ridge roof
13.4. Roof truss
13.5. Diagonal roof bracing
13.6. Roofing iron
13.7. Laying of roofing iron
13.8. Finishing a roof
Carpentry for Vocational Schools - A Teacher's handbook (GTZ, 252 p.)
13. ROOFING
TOPIC: 13. ROOFING
INTRODUCTION: This topic teaches students the different
roof shapes; the names of the parts of a roof; how a roof truss is calculated,
made, erected and braced; the proper distance for purlins; roofing iron and
different types of roofing fasteners; laying of roofing iron, ridge cap and
finishing roof.
This topic is very comprehensive. therefore select carefully the
chapters you are able to fit into the yearly programme at the school.
OBJECTIVES:
13.1. Students should be able to
distinguish between the different roof shapes and their characteristics.
13.2. Students should be able to name all the parts of a roof.
13.3. To know when a rafter or ridge roof is needed, their
technical terms and how they are made.
13.4. Students should know the names of the parts of a roof
truss, how the height and the number of diagonal members are calculated, how a
truss is made and assembled and how the trusses are erected.
13.5. To know the purpose of braces and how they are fixed
correctly.
13.6. Students must know the size of the roofing iron and be
able to space the purlin correctly.
13.7. Students must be able to describe how roofing iron is laid
and fastened correctly.
13.8. Students should be able to finish a roof by laying the
ridge cap, fixing fascia and barge board and hanging the gutter.
METHOD This topic is taught in the classroom first. We
prepare photocopies of the drawings of this topic and students glue it in their
trade theory book. We also prepare some roof models for better understanding.
13.1. If there are buildings with different
13.2. roof shapes near the school, show them to the students and
let them name their parts.
13.3. Prepare the timber for a model of a rafter roof in the
scale 1:10 and construct it with the students.
13.4. If we cannot demonstrate the process of making a roof
truss on a building project, we can again use our model house and prepare timber
for a roof truss In the scale 1:10. Explain how to do this work step by step.
13.5. Prepare some small strips of flat iron and allow students
brace the roof of the model house correctly.
13.6. Prepare the timber for the purlins in the scale 1:10 and
students place the purlins on top of the trusses and nail them. Show students
how purlins are straightened properly.
13.7. Prepare some pieces of flat iron which are to be used as
roofing iron for the model house and let students follow the procedure they have
learned in the theory lesson.
13.8. Prepare small flat irons to use as ridge cap for the model
house and timber in the scale of 1:10 for fascia and barge board. Students can
complete the roof now.
NOTE: Because of the size of this section it is advisable
that at least two worksheets are prepared for students, to complete in their own
time.
The main purpose of any roof construction is to carry the weight
of the covering material which prevents rainwater from entering the building and
protects the inhabitants from sun and
wind.
13.1. Different roof shapes
a) Gable roof: - The ordinary roof, which has two sloping
surfaces extending from the eaves to a central ridge, and which forms a
triangular vertical wall at each end above the wall plates. These triangular
shapes are known as "gable ends", hence the name gable roof. The gable roof is
most commonly used for small houses because of its simplicity of construction
and low cost. This type of roof is often used as the basis of, or in combination
with, other types of roofs.
Figure
b) Lean-to or Skillion roof - The lean-to roof is simply a
galved gable roof. It is often used in construction for economical reasons no
ridge capping, only one gutter). To pitch the roof at the right angle and to
support the rafters, one of the two side walls must be build higher. Ceiling
joists are as in the gable roof. When the span is more than four metre, purlins
and strutts must be fitted.
Figure
c) Hipped roof: - The hip roof has four sides, all of which
slope upward towards the centre of the building. The external angle where two
adjacent sloping sides met is called the hip, and the inclined member at this
junction is the hip rafter. The hipped roof is more expensive to build as it
requires more skilled labour because of the difficult construction. On the other
hand, if the complete job is done well, the roof should support itself.
Figure
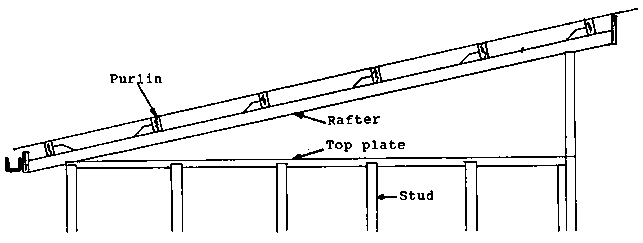
13.2. Technical terms of a roof
a) Barge board: - The inclined timbers on the gable ends which
are fixed to the purlins and cover the ends of the roof timbers.
b) Ceiling joists - Timber across a room to carry the plywood
ceiling.
c) Fascia: - The upright board fixed to the feed of the rafters
to carry the spouting. Any wide board fixed on edge.
d) Purlin or Batten - The horizontal member supporting the
rafters in a roof which in turns is supported off the walls by struts.
e) Rafters: - The inclined members of a roof between the plate
and the ridge which supports the roof covering.
f) Ridge: - The top horizontal member in a roof carrying the
rafters.
Figure
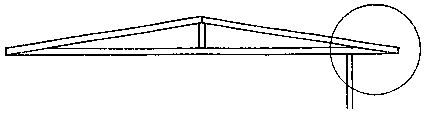
13.3. Rafter and ridge roof
The rafter and ridge roof is used when the span is short or
where high ceilings are desired or where rooms have been included in the design
of the roof.
a) Technical terms:
- The rise: The rise is the high of the
roof.
- The span: The span is the width of the roof at the base of the
roof pitch triangle.
- The run: The run is half the span.
- The overhang: The overhang is the distance between the outside
wall and the end of the roof, which is parallel to the wall.
- The roof pitch triangle: The roof pitch triangle is the slope
of the roof and is expressed in degrees.
- The birdsmouth: An angle cut on the edge of a piece of timber
so that it sits on the angle of a cross piece. Used at the foot of a rafter,
where it sits on the top plate.
Figure
Figure
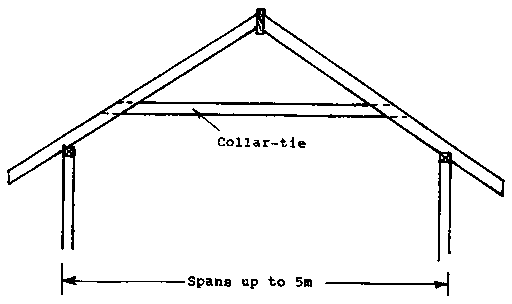
b) Strenghtening the rafter and ridge roof: - If the span of the
roof is up to 5 m, it has to be strenghted. It is done with a COLLAR-TIE or
TIE-BEAM.
Figure
Figure
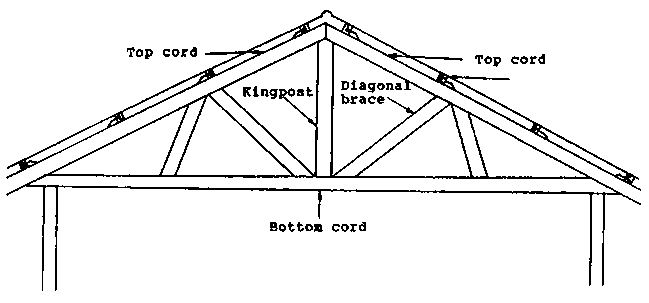
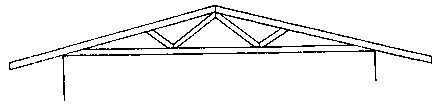
13.4. Roof truss
Where very large spans are required or where low ceilings are
designed it is normal to use trusses which are also easier to erect. The roof
trusses are made up by a series of triangles. At the bottom cord allow a camber
of 12 mm. The camber allows for settlement of the truss when loaded. Trusses are
placed at about 3000 mm intervals.
Figure
a) Different truss types according to the overhangs
Sloped overhang:
Straight overhang;
b) Different Truss types according to the shape:
Standard Truss
Kingpost Truss:
c) Procedure for making a truss:
To make the trusses it is easier to draw a pattern of a truss on
a straight surface like a concrete slab or above floor joists or a layer of
boards. So you make sure each truss get the same size and shape. Nail all the
joints with nail plates, turn the truss and drive in the nail plates on the
other side.
Figure
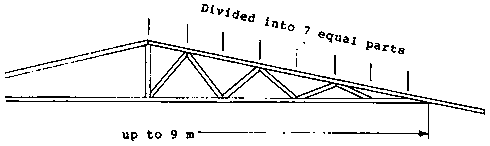
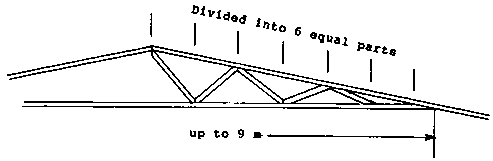
d) How to set the braces: - Kingpost Truss,
Span up to 6 m.
Span up to 9 m.
Span up to 12 m.
e) How to set the braces: - Standard truss,
Span up to 6 m.
Span up to 9 m.
Span up to 12 m.
f) Erecting roof trusses:
Mark the truss position on the top of the wall plates. Erect
gable-end truss, ensuring trusses are flush and plumb with the wall plate. If it
is necessary tack the roof trusses into position. Braces are fixed to the ground
outside the building. If these braces are too long, they will proof ineffective.
In this case, attach braces internally to the internal walls. Stretch a string
line to the apex of one gable truss to the apex of the other. All intermediate
trusses are positioned exactly to the string line. Position the second truss
temporarily, and brace back to the first truss. Continue erecting trusses in
this way. Secure trusses to the top plate with ripple grips, straps or specified
anchorage hardware. Do not leave roof trusses overnight without anchorage. After
erecting all trusses you start to nail the battens, making sure the truss is
exactly plumb and straight. If that procedure is finished attach permanent
diagonal braces.
NOTE: Before erecting roof trusses, you have to straighten out
the top plates. Brace it well, especially at that part, where a roof truss is
placed.
Figure
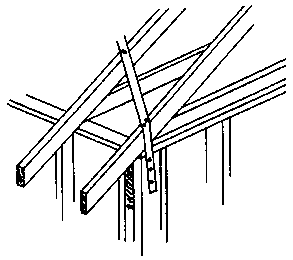
13.5. Diagonal roof bracing
For bracing the roof a flat metal brace is used. The roof has to
be braced diagonally on both sloped sides. The braces are fixed to the purlins
or battens. It is of advantage to secure the brace at every crossing with two
nails. The top end of the brace is fixed to the rafter.
Figure
Figure
Figure
13.6. Roofing iron
Roofing iron is corrugated for many reasons. It is stronger and
more able to withstand load than flat sheets. The corrugations also give
definite ware channels and serve to gauge the side lap of the sheets, and when
nailed through the crown lines of the roof are more waterproof.
Figure
a) Space the Purlin or Batten: - For corrugated roofing iron use
battens with a size of 75 mm x 38 mm minimum. Place one batten near the ridge so
that the ridging can be nailed to it and the bottom batten so that its top edge
is in line with the plumb-cut of the rafter feet. The remainder are spaced in
between.
The battens should be set at a distance of 1200 mm to 1400 mm.
The distance should not exceed 1400 mm.
NOTE: If there are two or more rows of roofing irons, the
overlap should be approximately 300 mm.
Figure
b) Fastening corrugated roofing iron: - The most effective way
of fastening corrugated iron is by means of roofing screws and washers. Cheaper
fixing methods are the spring-head plain nail, the twisted shank nail or the
springhead screw. Holes should first be made with a brick punch which must be
kept sharp to prevent denting of the corrugations .
Figure
Figure
13.7. Laying of roofing iron
A timber is nailed across the endgrain of the lowest batten.
From the outside top edge of that batten, where you have nailed the timber
across, you have to measure down 70 mm. It should not be more or less than 70
mm. If it is less, water could pour down between the gutter and fascia board. On
the other hand, if it is more than 70 mm, the water could overshoot the gutter.
Make a mark on the timber which you nailed across that batten and drive a nail
in. At the other end of the roof you repeat this procedure and stretch a string
between the two nails. Make sure the string is tight so the roofingiron will not
touch it.
Now you have a straight line and can start laying the sheets,
the lower edge of the sheet has to be in line with the string. One worker has to
stand directly below the string and direct the worker on the roof to move the
roofing exact position above the string.
NOTE: The battens have to be exactly straight.
Figure
13.8. Finishing a roof
a) Ridging or ridge cap: - The ridging or ridge cap covers the
ridge at the top of the roof NOTE: the roofing iron and the ridge cap are nailed
together to the batten.
Figure
b) Sisalation paper: - It is a aluminium coated paper which is
used to stop the heat and cold from entering the house.
c) Fascia board: - The fascia board is the upright board fixed
to the end of the rafters to carry the gutter.
Figure
d) Barge board: - The inclined timbers on the gable-ends which
are fixed to the rafters and cover the ends of the roof timbers.
e) Gutter: - The gutter is a galvanised iron spouting and is
fixed by means of brackets to the end of the rafters or to the fascia board.