Carpentry for Vocational Schools - A Teacher's handbook (GTZ, 252 p.)
5. FOOTINGS
(introduction...)
5.1. Correct depth and shape
5.2. Piers or stumps
5.3. Correct embedding of piers or stumps
5.4. Finish
5.5. Strip footing on concrete block wall
5.6. Control joints for concrete block wall
5.7. Applying mortar to a block
5.8. Strip footing on masonry (concrete) wall
5.9. Different types of strip footing
Carpentry for Vocational Schools - A Teacher's handbook (GTZ, 252 p.)
5. FOOTINGS
TOPIC: 5. FOOTINGS
INTRODUCTION: There are a lot of different types of
footings Each one has its own function and there are only few things which they
have in common.
The aim of this section is to teach students how to make proper
footings and identify the different types of footings.
OBJECTIVES:
5.1. Students must know the purpose of a
footing and its correct depth and shape.
5.2. Students must be able to identify the different types of
post or stumps and their characteristics.
5.3. Students should know how stumps or posts are embedded
correctly in the concrete to prevent them from sinking into the ground.
5.4. Students have to know how to finish the top of the concrete
surrounding a post or stump.
5.5. Students should be able to describe a strip footing for a
concrete block wall, how it is reinforced and the mixture of the concrete used.
5.6. Students should be able to state the names of the different
control joints and why it is necessary to make control joints.
5.7. Students should know the correct procedure for laying
concrete blocks.
5.8. Students should be able to describe a strip footing for a
masonry wall and the measurements for placing the reinforcement bars and mesh.
5.9. Students must know the different types of strip footing and
how they are correctly reinforced.
METHOD: We prepare photocopies of the different footings
which are handed out to students after the lesson in the classroom and are glued
into the students trade theory book.
Also this topic might be difficult to demonstrate. If there are
not enough resources and there are no on-going building projects to work on,
models of different footings in the scale of 1:10 can be made for demonstration
to give the students a better understanding of this very important work.
NOTE: At the end of this topic again a worksheet can be
prepared which students fill in their own time for further reinforcement of this
subject and is assessed later.
The footings are carrying the weight of the building and it is
therefore very important that footings are made deep enough in the soil, firm
enough to carry the weight without
sinking.
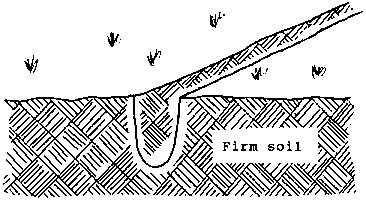
5.1. Correct depth and shape
a) Depth:
- If the site has been back filled you must
dig the footing deep enough to go to a minimum of 550 mm into firm
soil.
Figure
- On undisturbed or excavated sites the
depth of the footing is 550 mm minimum.
Figure
b) Shape:
- As the area of the bottom of the footing
determines the weight it can carry without sinking, the shape of it is very
important. If the shape of a footing is like a wedge, it will easily sink into
the ground.
Figure
- The correct shape of a footing should be
wider at the bottom of the footing than at the top.
Figure
5.2. Piers or stumps
Piers or stumps can be made of iron posts, treated timber posts
or concrete. Tall piers or stumps must be braced.
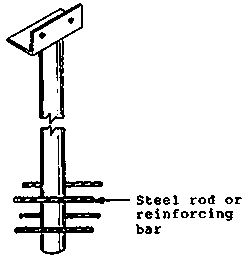
a) Iron posts: - The diameter of the iron post depends on the
number of piers or stumps per square metre, number of stories and the height of
floor level above ground level. Angle iron has to be welded on top and steel
rods must be welded at the lower part of the iron post to increase the area of
support. The other method is to flare the bottom of the pipe or post.
Steel rods welded to the stump
Bottom of stump flared
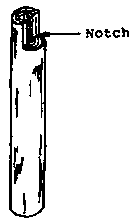
b) Treated timber post: - On top of the treated timber post
there should be a notch. At least the bearer has to sit in the notch two third
of the thickness of the bearer.
Figure
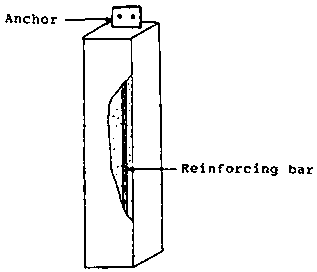
c) Concrete stump: - For concrete stumps you have to make a
formwork and place an anchor before the concrete get dry.
It is advisable to lay reinforcing bars.
Reinforcing bars are placed on each corner.
Figure
5.3. Correct embedding of piers or stumps
When the piers are embedded in the concrete footing it is
important that at least 150 mm of concrete is left between bottom of pier and
bottom of the footing.
- Too close to the bottom and the pier
might push through and sink into the ground.
Figure
- The pier is in the correct distance to
the bottom.
Figure
5.4. Finish
To make a neat finish of the footings and protect the piers the
level of the top of the footing must be above ground level. Use boxing to ensure
squareness and finish with a steel trowel. The surfaces of the footing must
slope away from the pier.
Figure
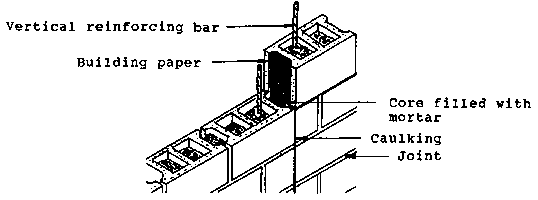
5.5. Strip footing on concrete block wall
Strip footing is the thicker section of concrete at the base of
a column, load-bearing wall, masonry wall or block wall. The strip footing is
reinforced by D12 (deformed 12 mm diameter) bars. The cement mortar should be
composed of one part by volume of cement to four parts by volume of sand. (1:4)
For vertical reinforcement again D12 bars are used and spaced 600 mm apart too.
Figure
5.6. Control joints for concrete block wall
Concrete expands and contracts with extremes of temperature or
with variations in temperature. It may also shrink and cause random cracks. To
prevent random cracks control joints are build in the concrete block wall. These
control joints are build if the wall exceed 10 metre in their length. There are
different types of control joints, the are named : Michigan type, Gasket type,
Control block type and racked type.
a) Michigan type:
Figure
b) Gasket type:
Figure
c) Control block type
Figure
d) Racked type:
Figure
5.7. Applying mortar to a block
The mortar is applied to the lower row of the blocks. Apply
enough mortar at both edges so that the distance of the blocks has 10 mm.
Afterwards fill out the cavities of the blocks.
Figure
5.8. Strip footing on masonry (concrete) wall
For reinforcement, D12 bars are used. Horizontal reinforcement
is spaced 480 mm apart and vertical reinforcement have a distance of 600 mm.
Figure
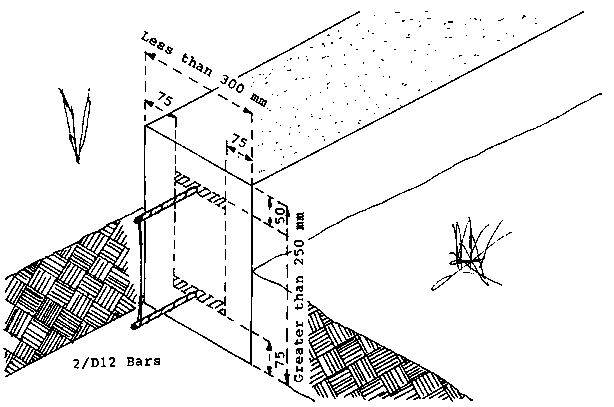
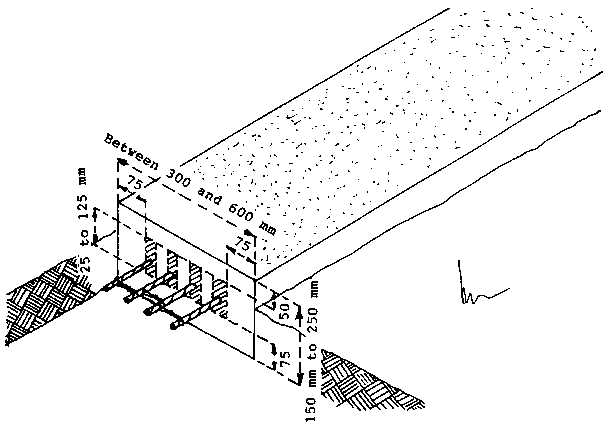
5.9. Different types of strip footing
Footing has to carry the weight of a building. It depends of the
type of the wall, number of storeys and thickness of the walls. A masonry
(concrete) wall is much heavier than a column wall. Therefore the footing of a
masonry wall is stronger than the footing of a column wall.
Figure
Figure
Figure
Figure
Figure
4/D12 bars or 2/D16 bars for footing
less than 400 mm wide.
6/D12 bars or 3/D16 bars for footing
between 400 mm and 600 mm wide.
R.D. = Reduce distance to provide the correct cover. Cover means
the distance from the bar to the surface.