Better Farming Series 25 - The Rubber Tree (FAO - INADES, 1977, 31 p.)
Preparing the seedlings
(introduction...)
Germinating seeds in the germinator
Putting the germinated seeds in the nursery
Plan of nursery
Looking after the nursery
Grafting young plants
Better Farming Series 25 - The Rubber Tree (FAO - INADES, 1977, 31 p.)
Preparing the seedlings
It takes a long time to get good rubber tree seedlings to put in
the plantation.
It takes two years to get seedlings for putting in the
plantation.
To raise seedlings for the plantation, you must:
· make the seeds
germinate in the germinator; · put the
germinated seeds in the nursery; · look after
the nursery; · graft the young seedlings in
the
nursery.
Germinating seeds in the germinator
To do this, you have to:
· make the
germinator; · choose the seeds; · put the seeds in the germinator.
· Making the germinator
A germinator is the place where you sow the seeds to make therm
germinate.
To make a germinator you must choose ground that is quite flat,
that has no vegetable refuse on it; you must choose a spot that can be easily
watered.
Make beds 1 metre wide. Each bed is edged with planks, so as
to make a box. Into each box put sand to a depth of 10 centimetres.
Cover the germinator with a roof made of straw.
The roof must be at least 1 metre above ground, so that you can
get underneath it to put the seeds to germinate.
The roof
· Choosing the seeds
To get good seeds, it is best to ask for them at a seed
selection centre.
The seeds must be put in the germinator as soon as they have
been harvested for they very quickly become unable to germinate.
When you put the seeds in the germinator, you must look to see
if each seed is shiny and bright. If is not, do not put it in, because it will
not germinate.
· Putting the seeds in the
germinator
Push the seed half way into the sand, with the rounded side of
the seed uppermost.
Push the seed half way into the sand
Put the seeds close together, side by side, and water them.
To make a plantation of 1 hectare, with 625 trees, you must put
1 700 seeds to germinate. So you must have a germinator 1.7 metres long and 1
metre wide.
A week later the seed has germinated, and the rootlet is about 2
centimetres long.
This is the time to take the seeds out of the germinator and put
them in the nursery.
Putting the germinated seeds in the nursery
The nursery is the place where you put the germinated seeds so
that they will grow into young rubber trees.
· The soil of the nursery must
be well prepared
Choose a spot that is easy to water.
Grub up all trees. A few days before planting the germinated
seeds remove all vegetable refuse. The soil must be tilled by hand very
deeply, to at least 60 centimetres, with a hoe. Then the soil must be
levelled and harrowed to break up clods.
This is how the nursery is made ready for the germinated
seeds.
Putting the germinated seeds in the nursery
The germinated seeds are planted in rows. In each row leave
40 centimetres between seeds. Leave 30 centimetres between the rows. Plant the
seedlings (germinated seeds) in alternate spacing, as shown in the drawing on
page 9. Make four rows in each nursery bed. Leave 60 centimetres between the
nursery beds. After every four beds, leave a space of 1.20 metres.
Thus 1 hectare will contain 58 000 seedlings.
To make a plantation of 1 hectare, you have to plant 1 500
germinated seeds; that means two nursery beds, each 70 metres long.
When transplanting the seedlings, press the soil well down round
the tap- root and the rootless, without damaging them.
Water the seedlings as soon as you have transplanted
them.
Plan of nursery
Plan of
nursery
Looking after the nursery
You must hoe often to get rid of weeds, and to keep the soil
moist.
In the dry season you must water rather often. But do not water
in the middle of the day. Water in the morning or in the evening. If the soil
is not very fertile, you can give it fertilizer, as follows:
· The first time, 2
months after transplanting, give 150 kilogrammes of ammonium phosphate to each
hectare and 75 kilogrammes of potassium chloride to each hectare. This means
that for a bed of 70 square metres you need 1 kilogramme of ammonium phosphate
and 0.5 kilogramme of potassium chloride.
· The second time, 5 months
after transplanting, give the same amounts.
But you must get advice from technical officers, because
different soils have different needs.
Ten months after transplanting to the nursery, take out the
young plants that have not grown well.
When the young plants are between 12 and 15 months old, during
the short rainy season, grafting must be done.
Grafting is a difficult job. You must pay great attention to
it.
Grafting young plants
Grafting means putting into a young plant (the stock) a little
piece of a branch (the scion) taken from a tree of good quality.
The young plant in the nursery is the stock. It will provide the
roots of the plant which is to be put into the plantation.
You take a piece of a branch from a tree that gives plenty of
latex this is called the scion. The scion will provide the stem of the plant
that is to be put into the plantation.
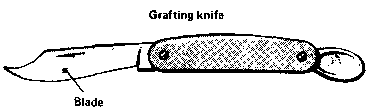
To graft you use a grafting knife with a very sharp blade.
Grafting knife
To do the grafting, you have to:
· prepare the young
plant from the nursery (the stock) · take the
scion from a tree of good quality; · place
the scion in the stock.
Afterwards look to see if the graft has succeeded.
· Preparing the stock
When the young plant in the nursery (the stock) is 3 or 3.5
centimetres thick, it can be grafted.
A few centimetres above the ground, make two cuts in the stock
about 4 or 5 centimetres long and 2 centimetres apart. Then make one cut at the
bottom to join the other two cuts at the lower end.
Preparing the stock
All these cuts are made in the bark only. You must not cut into
the wood.
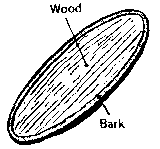
You will see, if you cut a stem right across, that
· outside is the
bark; · inside is the hard wood.
You cut a stem right across
The cuts must be made so that the bark can be peeled back.
Make the cuts on 20 plants, one after the other. You will see a
white liquid flowing out. This is the latex.
· Taking the scion
Ask at a selection centre for rubber tree branches for grafting.
These branches have about the same thickness as the stock. They are called
grafting wood.
These branches for grafting have no leaves; the leaves have been
taken off 10 days before cutting the branches. As soon as the selection centre
has given you the grafting wood, the grafts must be done at once, during the
next 24 hours.
In the first- year course we learned that on the stem there are
buds below the leaves. If you look closely just below a leaf you will see that
there is a bud.
This bud is called an eye.
Bud
To get a scion, take an eye with a little piece of the bark
round it.
Take a branch of grafting wood in order to remove an eye from
it. Round this eye make two cuts 5 or 6 centimetres long and 1 or 2 centimetres
apart. You will see the latex flow out.
Make two cuts
Remove the eye by cutting into the wood of the branch with the
grafting knife.
Remove the eye
Now you have a piece of grafting wood with an eye in the centre
of it.
Eye
If you look at the back of this piece of wood, you will see
that:
· in the middle
there is wood; · round the outside is
bark. · Putting the scion in the
stock
Wood
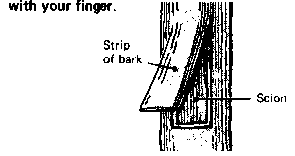
With a rag, wipe off the latex that has flowed out of the stock.
Peel back gently the strip of bark cut when preparing the stock.
You must not touch the underside of this strip with your finger
You must not touch the underside
Take the piece removed from the grafting wood. Make two cuts,
one on each side of the eye, so as to mark off the scion.
Make two cuts
Peel off the piece of bark with the eye. Do not take any wood
and do not touch the underside of the scion.
Peeling off the scion
Now you have the scion by itself.
Next, put the scion under the strip of bark peeled back on the
stock.
Do not touch the wood of the stock and the back of the scion.
Strip of bark
Put back the strip of bark over the scion and bind it to the
trunk with a band 4 centimetres wide and 60 centimetres long. The graft is
finished.
To plant 1 hectare, 1 400 plants must be grafted.
Three weeks after making the graft, take away the band and cut
the strip of bark at the top of the vertical cuts. The graft has been successful
if the scion is well joined to the stock, and if the graft is green when you
scratch it a little. There should be at least 85% of successes.
The young plants are now left in the nursery until the next
rainy season. Then the grafted plants will be put into final position in the
plantation.