|
WORD PROCESSING TUTORIAL
INTRODUCTION TO MICROSOFT WORD
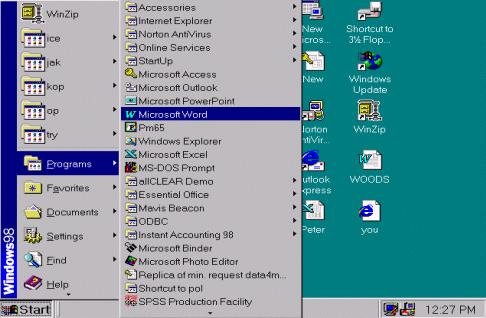
To start MS Word for Windows, do the following:
Using the mouse, click the Start button, then click Programs,
Microsoft Office folder (if it exists) and the MS Word icon.
If folder doesn’t exist, you should be able to see the MS
Word icon.

The Ms Word for Windows Screen:
The MS Word for Windows Screen consists of the following
major features, some of which may not be displayed when you
start MS Word for Windows.
a) The title bar which displays the name of the application
and name of the active document in the window.
b) The application’s Control Menu box at the top left corner
of the MS Word for Windows window.
c) Maximize, minimize and close Control buttons at the top
right corner of the MS Word for Windows window.
d) The Workspace of the application onto which several document
windows can be opened. .
e) The Menu Bar that displays menu names. When there
is no document open, only the File pull-down menu is accessible.
f) The ribbon is a graphic bar across the top of MS Word for
Windows. It shows icons for character formatting, font
box and point size box of selected box or text at the cursor.
When no document window is open, the ribbon is gray (that
is, non-of the icon is available for use).
g) The Ruler is an on-screen helper across the top of a document
window, for formatting paragraphs, adjusting columns widths
in tables, and adjusting page margins. It consists of
the style box icons for paragraph formatting. It can
be turned on and off.
h) Status bar at the bottom of the MS Word for Windows window
that display either status information (that is, position
of the insertion point in the window and modes) or messages
describing the action of any highlighted command in any active
menu.
i) Scroll bars are tools for moving the document in the window
using the mouse. The scroll boxes inside the scroll
bars indicate your approximate location in the document vertically
and horizontally. At the top and bottom of the scroll
bar are scroll arrows.
j) Tool Bar is below the menu bar. It has pictures [called
tools or icons] that act as short cuts to some of the application
functions. Placing the cursor on any of the icons displays
a tool tip that tells you the name or description of the icon.
Note:
The ruler, ribbon and the status bar can be turned on and
off using the view command.
Keyboard Skills and Some Important Keys:
You are reminded that the keyboard is typematic -- a key will
repeat if held down. Therefore avoid holding down keys
for a long time.
Choosing and carrying out commands is the basis for instructing
MS Word for Windows to act on a document. You can choose
commands using the keyboard or the mouse. In this course
we shall concentrate more on using the mouse.
To Select a Command Using a Keyboard:
Use Alt plus the underlined letter of the command.
For example: Alt + F select the command File from the menu.
Using the arrow keys highlight the required command and press
enter.
Some keys are of special importance, these are indicated
below:
-Alt: Turns on/off the menu.
-Backspace: Erases character to the left of the
cursor.
-Enter: Ends a paragraph or sends a command to
the computer.
-Caps Lock: Toggles between upper case and lower
case.
-Shift: Used to get the upper characters on the keys,
or upper case/lower case characters when the Caps lock is
off/0n.
-F1: Help
-Shift F1: Allows you to get help on any command
you want.
To Select a Command Using the Mouse:
In MS Word for Windows, if you have a pointing device (for
example, mouse), you need not use the keyboard to select a
command.
To activate any menu using the mouse, point to the menu name
and then click the left button of the mouse. Then click
the command you want to use.
Next: Working with Text
|
