 |
| ||||||||||||||||||||||||||||||||
|
| ||||||||||||||||||||||||||||||||
Institut f�r berufliche Entwicklung e.V.
Berlin
Original title:
Arbeitsmaterial f�r den
Lernenden
“Stemmen und Stechen”
Author: Rolf Jakoby
First edition © IBE
Institut f�r berufliche Entwicklung e.V.
Parkstra�e
23
13187 Berlin
Order No.: 93-35-3306/2
|
| ||||||||||||||||||||||||||||||||
1. Purpose and Application of Mortising and Ripping
Mortising and ripping are methods of the manual chip-forming woodworking technique. They serve to
- make recesses in the wood,
- prepare surfaces for joining,
- remove adherent material and glue residues.
The purpose of mortising and ripping is
- to manufacture snugly fitting wood joints by shaping the mating surfaces true to dimensions,
- to make recesses for the setting of fittings,
- to shape rough and fine wood surfaces,
- to secure a high surface quality of wood surfaces.
|
When mortising the tools are driven into the wood by means of a striking tool. Ripping is the finishing of the wood by guiding and pushing the tool with both hands. |
|
| ||||||||||||||||||||||||||||||||
2. Types, Construction and Mode of Action of Mortising and Ripping Tools
For different tasks various mortising and ripping tools are applied. Main parts of these tools are:
- the steel blade and
- the haft fixed to it.
The single types mainly differ in the form and the sizes of the steel blade (see Fig. 1).
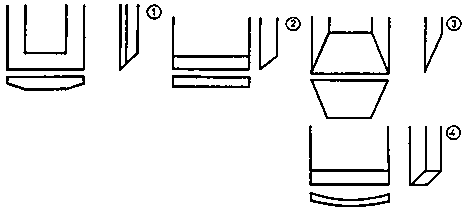
Figure 1 Shapes of steel blades for
mortising and ripping tools
1 ripping chisel, 2 firmer chisel, 3 cross-cut chisel, 4 firmer gouge
Tabl. No. 1 represents the features and usability of mortising and ripping tools as shown in Fig. 1.
Table 1: Types of Mortising and Ripping Tools
|
Name, sizes of the blade |
Features |
Application |
|
ripping chisel |
the blade ist wider than thick, with side chamfer |
- for precutting and chiseling out rectangular and acute-angled recesses for wood joints |
|
- thickness 2.5 to 5 mm | |
- for recessing fittings |
|
firmer chisel width 16 mm to 50 mm |
the blade is wider than thick, without side chamfer |
- for precutting and chiseling out right-angled recesses |
|
cross-cut chisel |
the blade is mostly thicker than wide, with or without side chamfer |
- for chiseling out mortises |
|
firmer gouge |
the blade is hollow |
- for making round recesses |
The parts of the mortising and ripping tools are:
- the blade
- the handle (haft)
- the shoulder (collar)
- the clamp (metal rings)
- the tang
- the button for beating
- the cutting edge

Figure 2 Parts of the mortising and
ripping tools
1 blade, 2 haft, 3 shoulder (collar), 4 clamp (metal rings), 5 tang, 6 button for beating, 7 cutting edge
Being deeply inserted into the haft (above the shoulder) the tang ensures a firm connection between the blade and the grip. Blade and haft must form one common straight line (align). With not aligning tools you cannot hold the exact mortise direction.

Figure 3 Requirements on mortising
tools
1 tool in working order, 2 tool out of order
The haft is made of hard wood. The metal rings on both ends of the haft secure the wood against splitting up.
The cutting edge of the steel blade has the basic form of a one-sided wedge. The best wedge angle is between 25° and 30°. With too obtuse-angled wedges the wedge resistance is too high, with too acute-angled wedges that of the body being worked is too high.
The wedge angle forming surfaces of the cutting edge are called:
- face
- flank
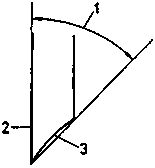
Figure 4 Cutting edge of the steel
blade
1 wedge angle, 2 face, 3 flank
Because of the one-sided bevelled cutting edge the mortising tools can cut the wood with different effort in all directions. The blades of appropriate firmer chisels and mortise chisels are 4 mm to 50 mm wide. In order to prevent the blade from getting jammed the blade’s width must always be smaller than that of the aperture in the wood. Appropriate striking tools for mortising are:
- the round mallet
- the edged mallet
- the round hard rubber mallet

Figure 5 Striking tools
1 round mallet, 2 square hard wood hammer, 3 round hard rubber mallet
Inappropriate striking tools are:
- axes and hatchets
- metal hammers of all types.
Within a short time they will destroy the knob for beating the grip and thus increase the danger of accidents during work.
Select appropriate mortising tools for the following tasks:
a) Making recesses with an acute
angle
__________________________________________________________________________
__________________________________________________________________________
b) Making
mortises
__________________________________________________________________________
__________________________________________________________________________
Why is an axe or a metal hammer unsuitable as a striking tool
for
mortising?
__________________________________________________________________________
__________________________________________________________________________
__________________________________________________________________________
|
| ||||||||||||||||||||||||||||||||
3. Preparation for Mortising and Ripping
3.1. Preparation of the Tools
Mortising and ripping tools in bad condition and with a dull cutting edge cause imperfect quality of the products. Moreover, they require a higher effort. That is why only tools should be applied which are in a proper condition. It is important that haft and blade are firmly connected with each other. In case of loose blades
- exact working is not possible,
- there is the danger of being hurt.
Loose blades will snugly fit again by sticking wooden or textile addings in the haft.
|
Dull tools must be sharpened. |
The sharpening of tools (as done with plane irons) is carried out in two steps:
- grinding the blade by means of a grinding wheel
- honing on a whetstone
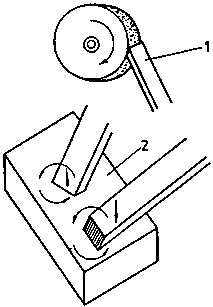
Figure 6 Sharpening of the tools
1 grinding the steel blade by means of a grinding wheel, 2 honing on a whetstone
The face of a firmer gouge with hollow blade is honed with a rounded whetstone.
|
For transport the cutting edges of the tools are to be secured against damage! |
Striking tools should be checked for tightly fitting handles.
|
Loose handles must be wedged firmly and reliably! |
3.2. Preparation of the Workpieces
Timbers the working surfaces of which feature growth defects, such as
- larger knots,
- cracks,
- non-uniform grain direction, are unsuitable for mortising and ripping.
In order to ensure a high-quality work the workpieces should be scribed true to size. Before working them, mark out the respective areas of the workpiece.
3.3. Preparation of the Workplace
A carpenter’s bench or work bench with clamping devices can be used for ripping and mortising smaller workpieces. For making recesses (holes) the workpiece can be clamped in accordance with the position of the respective area to be worked:
- between the bench clamps or
- with screw clamps on the bench plate.
Figure 7 Clamping the workpiece on a carpenter’s bench
1 between bench clamps, 2 with a screw clamp
In case of ripping the workpiece must be fixed rigidly.
For working larger workpieces horses are suitable where the workpiece is placed on or clamped on with screw clamps. When mortising the trainee can also sit sidewards on the workpiece and weigh it with his body weight.
When mortising thinner, i.e. springy wooden workpieces place them on non-springy supports!
|
When cutting through workpieces be sure not to penetrate the support! |
The mortising and ripping tools as well as the striking tools should be placed so to be at hand. Make sure that the hafts of the tools lie always in the direction of the trainee.
Why should the mortising and ripping tools be put away with the
hafts facing the
trainee?
__________________________________________________________________________
__________________________________________________________________________
__________________________________________________________________________
|
| ||||||||||||||||||||||||||||||||
4. Precutting of Recess Edges by Means of Ripping Tools
Precutting along the scribed lines for the recesses to be mortised in the wood ensures dimensional accuracy and straightness of recess edges
- which cannot be mortised accurately to dimension,
- which cannot be cut in by means of sawing tools.
Precutting is mainly done in case of recess edges across the grain. In doing so the wood fibres are cut on the surface by means of the ripping chisel.

Figure 8 Precutting of wood fibres
along the edges of the recesses
1 wood fibres, 2 cutting edge of the ripping chisel
For precutting and the subsequent mortising of recesses
- smaller workpieces are clamped on a carpenter’s bench or on a bench plate.
- larger workpieces are fixed on horses or (not too high) supports.
Suitable cutting tools are firmer chisels and ripping chisels with steel blades of medium width and a wedge angle from 25° to 27°.
|
The cutting edge of the blade must be sharp in order to reliably cut the wood fibres. With a dull cutting edge no fine and straight cut can be achieved! |
Precutting is carried out in the following steps:
- clamping the workpiece,- checking the scribing: when scribing with a marking gauge pin or a scriber the wood fibres should be slightly cut in,
- selecting and checking the suitable cutting tool,
- cutting along the scribed line,
· For this purpose the firmer chisel blade should be grasped by the hand.· The flank of the cutting edge is turned outwards.
· The blade is slightly tilted sidewards and back, so that the flank of the cutting edge ist guided at a right angle and the cutting edge itself is guided at an acute angle to the surface of the workpiece.
· During cutting the working direction is towards the trainee.

Figure 9 Precutting along the scribed
line

Figure 10 Precutting across the grain
1 flank of the cutting edge, 2 right angle, 3 cutting edge, 4 acute angle, 5 surface of the workpiece, 6 working direction
- notching along the scribed line diagonally to the grain and cutting off wood chips.
· Here the face of the tool’s blade is turned outwards.
· The position and the cutting direction of the tool is the same as mentioned above.

Figure 11 Notching along the scribed
line
1 scribed line, 2 wood chips, 3 face of the blade
What are the features of sharp and dull cutting edges of
mortising and ripping
tools?
__________________________________________________________________________
__________________________________________________________________________
__________________________________________________________________________
|
| ||||||||||||||||||||||||||||||||
5. Chiselling out Recesses
The chiselling out of recesses (openings) for wood joints and for the mounting of fittings is carried out according to:
- the position of the workpiece area to be worked,
- length and width,
- depth and
- the shape of the recess.
With recesses
- being manufactured on outer surfaces of the entire width or thickness of the workpiece (e.g. overlapping joints, dovetail joints, slots) two of the recess edges can be cut in by means of sawing tools. The third one is to be chiselled.
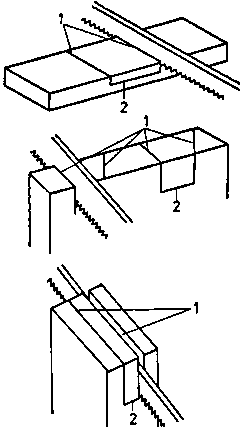
Figure 12 Cutting in two recess edges
by means of sawing
1 to be cut by sawing, 2 to be chiselled out- where all the five edges are inside the workpiece (e.g. covered mortises, fittings) all faces are to be chiselled out up to the working depth.
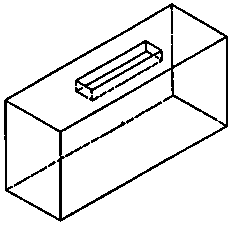
Figure 13 Depth limited recesses
within the workpiece
- through the entire width or thickness of the workpiece (e.g. for through mortises) two recesses should be chiselled out (from the two opposite working faces, up to the half of the working depth each).
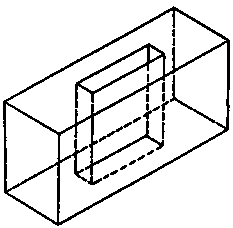
Figure 14 Recess chiselled through
the workpiece (mortise)
The cutting through of holes from one face to the opposite face will result in size deviations and fraying of wood fibres at the edges!
When mortising
- the trainee encloses with one hand the haft of the mortising tool and guides it to the area to be worked,- the other hand grasps the striking tool for beating the mortising tool.
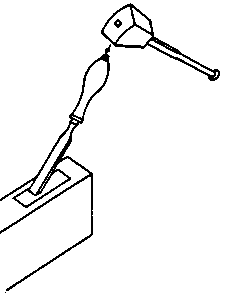
Figure 15 Handling of the mortising
and ripping tools
5.1. Chiselling out Recesses (Overlap Joints)
The manufacturing of larger (longer) recesses comprises the following operations:
- clamp the workpiece,- give a cut with the saw close to the limiting lines across the grain up to the marked working depth (cf. Fig. 12). In addition to it, cut in longer recesses sectionally,
- drive in the firmer chisel (from the centre of the recess, with the grain and in an acute angle to the working face.) Tilt the cutting edge of the blade slightly upwards!
- Split off the wood chips by bending the firmer chisel backwards and down,
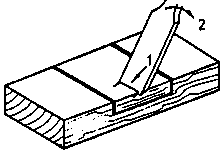
Figure 16 Driving in and bending the
firmer chisel
1 driving in with the grain, 2 bending backwards and downwards- work the recess in the opposite direction,
- repeat the alternate splitting off of the wood until the required recess depth is reached.
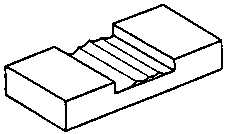
Figure 17 Chiselled recess
- flatten and smooth the prechiselled surface by reworking with the ripping chisel across and diagonally to the grain,
· the cutting edge of the ripping chisel blade is pointed at the working face,
· guide and push the ripping chisel with both hands.
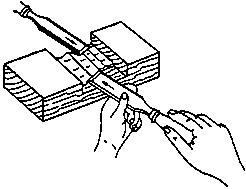
Figure 18 Reworking of the chiselled
surface with the ripping chisel
Chiselling out and reworking of smaller (narrow) recesses can only be done with narrow firmer chisel blades across the grain. In doing so
- first cut off the thicker wood fibres,- then (before reaching the envisaged working depth) cut off thinner chips from outside to inside.
|
Do not guide the cutting edge of the firmer chisel beyond the recess edge, in order to avoid fraying of wood fibres! |
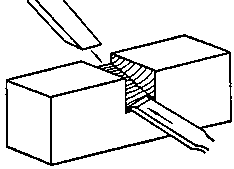
Figure 19 Chiselling of narrow
recesses and reworking with the ripping chisel
5.2. Chiselling out Recesses (Openings) at the Edge of the Workpiece (e.g. Slots, Dovetail Holes)
The chiselling out of through holes and depth limited openings at the edge of the workpiece is divided into the following operations:
- give a cut with the saw close to the scribed lines in parallel to the grain, up to the transverse limiting lines (cf. Fig. 12),- precut and notch at the limiting line across the grain (see Fig. 9 to Fig. 11),
- drive in the chisel at the precut scribed line and cut off the wood fibres. The cutting edge of the chisel blade
· is pointed outwards at the scribed line,
· is guided parallel to the face to be chiselled,
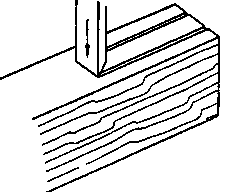
Figure 20 Driving in the firmer
chisel at the scribed line and cutting off the wood fibres
- drive in the chisel close to the scribed line diagonally to the grain and split off the wood chips,
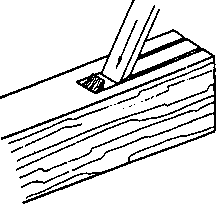
Figure 21 Splitting off the wood
chips
- enlarge the funnel-shaped hollow by repeatedly cutting and splitting off wood fibres up to half the working depth (the centre of the workpiece).
In case of through holes: Stop chiselling out just before reaching the margin. Leave 1/3 of the remaining length as support for working from the opposite side!
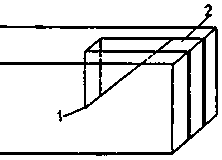
Figure 22 Recess chiselled from the
first working surface of the workpiece
1 half the working depth (centre of the workpiece), 2 supporting surface for working from the opposite side
For through holes:
- reclamp the workpiece and chisel out its opening in the same way from the opposite side,- drive in the chisel from the end-grained narrow face with the grain and split off wood layers,
- cut through the opening up to the centre of the workpiece and cut off the remaining wood chips.
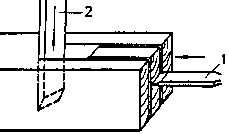
Figure 23 Chiselling of the recess
from the second working surface
1 cutting off the wood layers, 2 cutting through up to the centre of the workpiece
On which side of the scribed line must you guide the saw blade,
in order to manufacture the opening to be chiselled out true to
size?
__________________________________________________________________________
__________________________________________________________________________
__________________________________________________________________________
Why must through holes not be chiselled out from one side
only?
__________________________________________________________________________
__________________________________________________________________________
__________________________________________________________________________
5.3. Chiselling out Recesses in the Centre of the Workpiece, (e.g. Mortises, Holes for Fittings)
When chiselling out depth limited openings and through holes in the centre of the workpiece, perform the following operations:
- precut and notch at the limiting line across the grain (see Fig. 9 to Fig. 11),- drive in the chisel along the limiting line with the grain. In doing so
· the cutting edge of the chisel blade is pointed outwards,
· the cutting edge of the blade is driven in at a distance of approx. 1 to 2 mm from the scribed line towards the opening’s side,
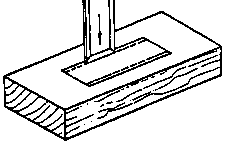
Figure 24 Cutting the wood fibres
with the grain
- cut a notch in the centre of the opening by:
· alternately driving in the ripping chisel diagonally to the grain and
· splitting off wood chips,
- enlarge the funnel-shaped hole up to a distance of 3 to 5 mm from the precut transverse limiting line,
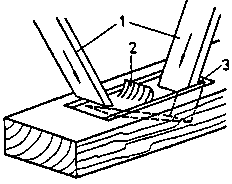
Figure 25 Caulking a notch in the
centre of the opening
1 diagonally to the grain, 2 splitting off the wood chips, 3 distance from the transverse limiting lines
- drive in the chisel at the transverse limiting lines and cut off the wood fibres (see “Chiselling out Recesses at the Edge of the Workpiece”),- cut and split off wood chips by:
· alternately driving in the chisel from the centre of the opening, with the grain and
· bending it backwards and downwards,
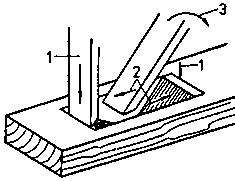
Figure 26 Alternately chiselling out
the opening
1 cutting the wood fibres, 2 cutting and splitting off the wood chips, 3 bending the firmer chisel backwards and downwards
- the lateral cutting of the wood fibres at the 4 limiting lines and the subsequent splitting off of the wood chips is carried out
· with depth limited openings until the required depth is reached,
· with through holes up to the centre of the workpiece,
- rework the chiselled faces up to the envisaged size of the hole by guiding the ripping chisel diagonally and across (in case of narrow holes) the grain,- when chiselling out through holes
· reclamp the workpiece with the opposite side on top,
· cut through the hole in the same way.
Before being chiselled out, depth limited and through holes may
also be predrilled.
When chiselling out predrilled holes
- first rework with the firmer chisel the surfaces at the 4 lateral limiting lines,
- then cut off the wood chips and
- finally rework the surfaces with the ripping chisel.
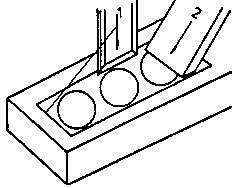
Figure 27 Chiselling out predrilled
holes
1 cutting the wood fibres with and across the grain, 2 splitting off the wood chips
|
| ||||||||||||||||||||||||||||||||
6. Ripping of Faces, Edges and Corners
6.1. Making Chamfers
If chamfers cannot be made by means of planing, ripping tools are applied to produce short narrow faces (chamfers) on the edges of wooden workpieces.
The method of schamfering is applied, e.g.,
- to avoid fraying of wood fibres at the bottom edges of the feet (legs) of tables, seating furniture, storage shelves and other products standing on the floor,- to ensure a better insertion of the tenon into the mortise (in case of a hidden mortise and tenon joint).
Such chamfers are mainly made with a ripping chisel at the edges of end-grained faces.
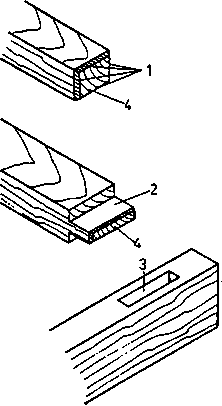
Figure 28 Making chamfers with
ripping tools
1 chamfers at the bottom edges of a foot (leg), 2 tenon, 3 mortise, 4 end-grained faces
Chamfering with the ripping chisel involves the following sequence of operations:
- clamp the workpiece,
- cut off wood chips from the outside up to the centre of the edge. In doing so
· the cutting edge of the ripping chisel blade is pointed at the workpiece,
· the blade is guided at an angle of approx. 45° to the adjacent faces and with the grain,
- work the edge in the opposite direction up to the centre.
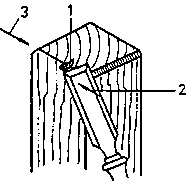
Figure 29 Chamfering with the ripping
chisel, sequence of operations
1 cutting off the wood chips, 2 working direction up to the middle of the edge
In order to avoid fraying of wood fibres, do not guide the ripping chisel outwards beyond the middle of the edge!
6.2. Cutting off Projecting Material Residues
When cutting off adherent residues of material made of wood or plies, the appropriate working method depends on
- the type of the respective material,
- the grain (with materials made of wood).
When working thin wood materials (veneers)
- with the grain, the working direction corresponds always with the ascending wood fibres;- across the grain, the workpiece must always be worked from outside towards the centre, in order to avoid fraying of wood fibres.
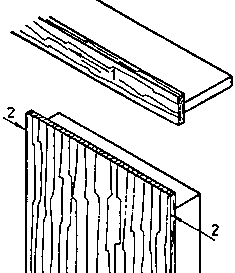
Figure 30 Cutting off thin wood-based
materials (veneers)
1 in the direction of the ascending wood fibres, 2 across the grain
When working soft plastic materials the working direction is “from the outside to the centre of the workpiece”.
The cutting edge of the ripping chisel blade is pointed at the workpiece and is guided parallel to the working face. In doing so, pay attention that the surface of the workpiece is not damaged by the rip ping chisel blade.
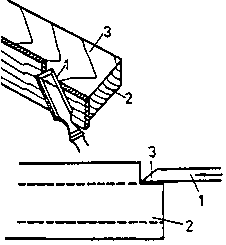
Figure 31 Guiding the ripping chisel
blade in cutting off projecting material residues
1 cutting edge of the blade, 2 workpiece, 3 surface of the workpiece
6.3. Removing Adherent Glue Residues by Means of Ripping Tools
On completion of constructional gluing (i.e. making assembly groups and finished parts by sticking together wooden piece parts) glue residues - either still soft or hardened already - can be removed with the ripping chisel
- from the wide and narrow faces,
- from the corners.

Figure 32 Removing adherent glue
residues by means of ripping tools
1 glue residues, 2 workpiece surfaces, 3 workpiece corners, 4 ripping chisel blade, 5 acute angle
According to the different position of the glued joint and the possible working direction, the ripping chisel blade is brought up to the residual glue at an acute angle to the workpiece surface. In doing so, handle the tool with care, in order not to damage the workpiece surface.