 |
| |||||||||||||||||||||||||
Institut f�r berufliche Entwicklung e.V.
Berlin
Original title:
Arbeitsmaterial f�r den Lernenden
"Spalten
und Schnitzen"
Author: Fritz Dienemann
First edition © IBE
Institut f�r berufliche Entwicklung e.V.
Parkstra�e
23
13187 Berlin
Order No.: 93-35-3303/2
|
| |||||||||||||||||||||||||
1. Purpose and Meaning of Splitting and Carving
Splitting and carving are cutting and chip-producing techniques to produce simple commodities as well as to design and produce objects of arts and crafts from the natural material of wood. Splitting of wood is looked upon here as prestage of carving to prepare the raw material for the drying process.
|
| |||||||||||||||||||||||||
Splitting and Carving - Course: Manual woodworking techniques. Trainees' handbook of lessons (Institut f�r Berufliche Entwicklung, 10 p.)
2. Splitting and Carving Tools
2.1. Mode of Action and Types of Splitting Tools
Wood which is relatively easy to work is used for carving. This calls for a wood moisture contents of 8 % to 10 %. Drying of wood in the trunk (log) results in many drying cracks which heavily limit the use of the wood or even make it useless. The logs must be prepared first before the drying process can start. For this purpose the logs are cut on machines in sawmills as many times as necessary or they are manually split up. The basic shape of all splitting tools is the shape of a double-sided wedge which effects the chip less cutting of the wood.

Figure 1 Double-sided wedge
1 beating force or pressure (F), b angle of wedge
The axe is used for splitting of thin round timbers and for rough chiselling-off of wooden objects.
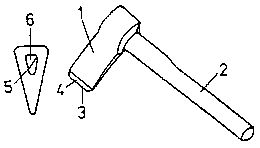
Figure 2 Axe
1 blade, 2 handle, 3 cutting edge, 4 bevel, 5 blade head, 6 wooden key or steel key
The handle should have a length of approx. 600 mm and be firmly secured (keyed) in the blade head. The cutting edge has the shape of a double-sided wedge with an angle of wedge of 25 degrees and must always be kept sharp.
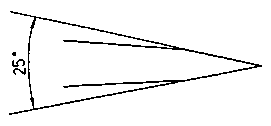
Figure 3 Angle of wedge of the axe
cutting edge
For splitting of shorter and longer logs, steel or hardwood wedges are used which are driven into the wood by a sledge hammer.

Figure 4 Hardwood and steel wedges
bH hardwood wedge angle = 25 degrees
bS steel wedge angle = 15 degrees
The slenderness ratio (angle of wedge) is important for the shape of the wedges.
What components does an axe consist of?
______________________________________
2.2. Mode of Action and Types of Carving Tools
Different types of carving knives and carving chisels are used as carving tools. The carving knives are provided with a ground double-sided taper and consequently with the shape of a double-sided wedge with a very small angle of wedge.
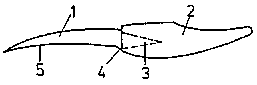
Figure 5 Carving knife
1 blade, 2 handle, 3 spike, 4 bit, 5 cutting edge
The carving knife is held and guided by one hand and predominantly used to produce smaller objects which can be carved in the hand with no need for clamping devices. The carving chisels are provided with a ground single-sided taper and consequently with the shape of a single-sided wedge. Therefore, their mode of action is similar to that of firmer chisels and mortise chisels.
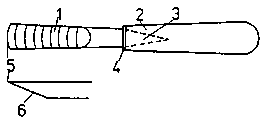
Figure 6 Carving chisel (sculptor's
chisel)
1 cutter, 2 handle, 3 spike, 4 bit, 5 cutting edge, 6 bevel
The carving chisels, also called sculptor's chisel, are guided by hand or beaten by a wooden cudgel (mortise cudgel).
Carving chisels are produced in a great variety of shapes and sizes and thus can be used for any types of carving operations.
Table 1:
Carving chisels (sculptor's chisels)
|
Designation |
Features |
Application |
|
Straight chisels for different cuts |
Square, angular or round main cutting edge |
Carving of recesses of different types |
|
Bent chisels |
Chisels are bent or offset in their longitudinal axis |
Carving of hidden recesses |

Figure 7-1 Carving chisels: straight
chisels for different cuts

Figure 7-2 Carving chisels: bent
chisels
Why must a carving chisel, which is beaten by a wooden cudgel, have a metal ring at the upper handle?
____________________________________
2.3. Maintenance of Tools
Maintenance of carving tools comprises:
- attendance and cleaning of the tools,
- checking and, if necessary, replacement of the handle,
- sharpening of the cutting edges of the tools.
The general attendance of carving tools is similar to that of other chip-producing tools.
Sharpening of splitting and carving tools, however, features some peculiarities which are explained in the following.
Sharpening of splitting tools
Splitting tools are sharpened by grinding. The axe is ground to the specified wedge shape by rotating grindstones or emery wheels with the cutting edge to be held against the direction of rotation of the grinding tool. The burr produced is removed by alternately stoning the two bevels of the cutting edge with circulating movements of a wetted oilstone.
Steel wedges are not ground nor stoned. By beating with the sledge hammer, burr maybe produced at the rear side of the wedges which is to be removed by grinding.
Attention: Burr particles of the wedge may split off when the wedge is driven in and cause injuries!
Wooden wedges are used until they split up or break, and then they are replaced.
Sharpening of carving tools
Carving tools are also sharpened by grinding.
Grinding and stoning of carving knives and carving chisels requires great care and a lot of experience. Trainees should not sharpen carving tools until they master the sharpening process of simple wood-working tools.
Because of the great variety of shapes of the carving chisel cutting edges, each tool is to be treated differently.
Grinding is similar to grinding of planing tools or fimer and mortise chisels. With round chisels, guidance by hand is to be steady, smooth and with little pressure. Constant cooling is required during grinding to avoid annealing.
Grinding is to be done carefully to prevent excessive abrasion!
For stoning of the cutting edges (removal of burrs), different oilstones are to be used, the cross-sectional shape of which must correspond to the shape of the cutting edge.
Figure 8 Cross sections of oilstones
1 square, 3 triangular, 3 round, 4 half-round, 5 wedge-shaped
The reciprocating movement of the tool on the oilstone or vice versa is continued until the burr is removed and the cutting edge has a bright appearance.
Carving tools are generally to be stored so as to prevent them from rusting and hitting of hard objects.
When the tools are not used, the best way of storing them is in a suspension device in a wall chest.
During carving the tools should be orderly arranged side by side on the workbench with the cutting edge showing towards the trainees.
Which tools are used for sharpening of carving chisels?
__________________________________________________
|
| ||||||||||||||||||||
Splitting and Carving - Course: Manual woodworking techniques. Trainees' handbook of lessons (Institut f�r Berufliche Entwicklung, 10 p.)
3. Preparation of Splitting and Carving
The preparations for splitting and carving include:
- selection of suitable material,
- selection of the necessary tools,
- preparation of the working place,
- taking the necessary measures for labour safety.
Special preparations for splitting of logs include:
- securing the logs from rolling off,- making available a sufficient number of steel and hardwood wedges as well as a sledge hammer,
- making available an axe and supporting block for splitting of round timber.
Special preparations for carving include:
- selection of wood with suitable properties (dry, preferably knotless, soft, sound),
- making available sketches and drawings,
- checking and, if necessary, sharpening the tools,
- selection of clamping devices.
4. Splitting and Carving Techniques
Splitting involves the following sequence of operations:
- The log is to be secured from rolling off by placing wooden wedges under it at both sides.- The steel wedge is to be placed and made "grip" with a gentle hammer blow.
- Then the wedge is to be driven into the wood with powerful blows until the log splits.
- If necessary, another steel wedge is to be driven into the other end of the log.
- The splits are to be enlarged using thicker hardwood wedges until the log is split up into halves.
- If the log halves are to be quartered, the steel wedges are to be placed in the heart at the inside of the log halves.

Figure 9 Placing of the wedge
1 hammer blow (force F)
Wood cannot be split transversely to the grain direction!
Carving involves the following sequence of operations:
- The outer shape is to be transferred from the drawing onto the blank. In figure carving, the longer side should be in grain direction.- The shape is to be sawn out with the fret saw.
- Larger cavities are to be bored out with a boring bit.
- Rough-carving is to be done with a bigger chisel and mortise cudgel.
- If no mortise cudgel is used, one hand is to guide the chisel while the other hand is exerting pressure.
- If the workpiece cannot be clamped, the chisel is to be held in the hand as short as to make the ball of the thumb touch the workpiece so that the hand holding the workpiece cannot be injured.
- The cutting direction should be with the grain, if possible.

Figure 10 Correct cutting direction
1 cutting direction
- Finish-carving is to be done with smooth movements of the hand. Dirty surfaces of the wood are to be avoided. Otherwise the surface is to be sanded to remove the dirt. In that case it is important to sand the entire face or figure.
The carving technique requires much practising, a good eye and safe hand. The above points imply the basic rules of carving. If the trainee is familiar with such basic rules and with handling the tools, and is talented too, he will improve his skills by repeated practising.
Why must logs to be split be secured from rolling off?
__________________________________________________
Why must the carving chisel be held by both hands when carving without mortise cudgel?
__________________________________________________
What are the features of sharp and dull cutting edges of carving tools?
__________________________________________________