 |
| ||||||||||||||||||||||||
|
| ||||||||||||||||||||||||
Institut f�r berufliche Entwicklung e.V.
Berlin
Original title:
Arbeitsmaterial f�r den Lernenden
“Grundlagen des Passens”
Author: Frank Wengh�fer
First Edition © IBE
Institut f�r berufliche Entwicklung e.V.
Parkstra�e
23
13187 Berlin
Order No.: 90-35-3131/2
|
| ||||||||||||||||||||||||
1. Purpose, Kinds, and Methods of Manual Fitting Operations
[...]
Application of Interference Fits:
levers and cranks on shafts, toothed gears and pulley on shafts, bushes in bases (housings).
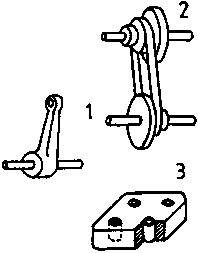
Figure 4 Interference fits
1 lever on shaft, 2 pulleys on shafts, 3 bushes in bases (housings)
Application of Clearance Fits:
slide bearings, guides, movable coupling elements, cluster gears in transmissions, pistons in cylinders of engines.

Figure 5 Clearance fits
1 flat guide, 2 dovetail guide, 3 flat guide with dovetail, 4 inverted guide, 5 cylindrical guide
Fits appear on surfaces where assembled parts are in contact with each other or on which parts movable against one another can come into contact.
We distinguish between the following fits according to the form of the surfaces:
- cylindrical fits fit between cylindrical mating surfaces
- flat fits fit between plane surfaces
Fitting works are marked by different methods applied in the individual and series production.
Individual production
In the field of crafts and in case of repair work fits are being manufactured by hand.
First one part is produced, and then the matching piece is fabricated by testing and reworking. One part is adjusted to the other until the desired type of joint is reached.
Example:
During the repair of a machine a damage in material was discovered at a guide top, and this element can no longer be used. It is not possible to get a spare part from the producer of the machine, and there is no engineering drawing.
With the help of the lower part of the guide the new guide top has to be manufactured as matching piece and adjusted.
Series production
In the industrial production the various component parts of machines and plants are produced independently of each other by using different methods and in different production fields.
The necessary dimensional accuracy of the component parts is specified by fit directions in the working drawings. The component parts are worked until the dimensions correspond to the fit directions. Manual reworking will only be necessary, if the component part shows defects caused by electrodeposits, formations of buns, corrosion or transport (defects due to blows, local upsetting deformations) and which prevent an assembling.
Example:
A shaft has broken in the transmission of a machine. Spare shafts for this transmission are offered by the producer, the broken shaft is dismantled, the spare shaft is inserted - it fits since the shafts for this transmission have been fabricated with fixed measures, they are exchangeable.
Manufacturing Condition:
If component parts which belong together due to their function are to be assembled, they have to be “exchangeable”!The fabrication of well fitting and easily exchangeable elements is the precondition for time-saving and economic assembly.
What is the purpose of
fitting?
___________________________________________________________________________
___________________________________________________________________________
Which types of fits are
distinguished?
___________________________________________________________________________
___________________________________________________________________________
Which methods can be applied in fitting
works?
___________________________________________________________________________
___________________________________________________________________________
Which manufacturing condition is good for an economic
assembly?
___________________________________________________________________________
___________________________________________________________________________
|
| ||||||||||||||||||||||||
2. Tools, Testing Means and Auxiliary Accessories
Fitting works can be performed by machines or by hand.
In assembly shops these works are mostly performed by using the techniques of filing, scraping and reaming.
Files
All forms of finishing, fine finishing and precision files are used for removing roughnesses and unevennesses, for rounding and chamfering sharp edges and for deburring.

Figures 6 Files
Scrapers
All sorts of scrapers are used for producing exact surfaces for guides, for fitting in parts with exact bearing faces and for producing tightening bearing faces.

Figure 7 Scrapers
Reamers
We use hand reamers with and without angular momentum, readjustable reamers and tap wrenches which are required for reworking or making precision bores.

Figure 8 Reamers with tap
wrench
Matching pieces
For the direct control and assembling we use matching pieces corresponding to the element to be worked.

Figure 9 Matching pieces
Testing means
All types of gauges for tolerance and fit determination and form determination are used, particularly in the series production:
|
- plug limit gauge |
- for bores up to 100 mm |
|
- flat limit gauges |
- for internal dimensions exceeding 100 mm |
|
- spherical-end measuring gauges |
- for internal dimensions exceeding 250 mm |
|
- external limit gauges |
- for external dimensions |

Figure 10 Gauges
1 plug limit gauge, 2 flat limit gauge, 3 spherical-end measuring gauge, 4 limit gap gauge
Measuring instruments
In addition to vernier calipers, external micrometers, internal and depth micrometers, as well as dial gauges are used for an exact size determination particularly in the individual production.
Marking devices
Levelling straight-edges, surface plates, colours or paste and devices (to distribute the colour so that surface defects can be recognized) are used.

Figure 11 Measuring means
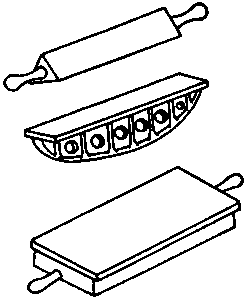
Figure 12 Marking devices
Special clamping devices
We use various devices and supports which make possible a fast and careful clamping of hard-to-hold parts.
Vice
Vices with flat or Vee-jaws and additional protective jaws of different materials and forms are used for a safe and careful clamping of component parts.

Figure 13 Special clamping
devices

Figure 14 Vice with protective
jaws
Which tools are used for manual fitting
works?
___________________________________________________________________________
___________________________________________________________________________
|
| ||||||||||||||||||||||||
3. Selected Basic Terms of the ISA System of Fits
A system of fits is a systematically arranged series of fits with different assignments of internal and external dimensions, it takes into account cylindrical and flat fits.
The setting up of internationally standardized systems of fits made it possible to exchange ready-to-assemble component parts produced in different countries and to insert them without expensive subsequent mechanical treatment.
In countries with the metric system of units the worldwide effective ISA System of Fits has been adopted in addition to national systems:
ISA - International Federation of the National Standardizing Associations (founded in 1926)
Since 1946 the international standardization has been continued by the following successor organization:
ISO - International Organization for Standardization
Both symbols, ISA and ISO, are valid for fit specifications.
3.1. Fundamental Problem
In the production engineering it is not possible to produce analogeous parts without any deviations from each other.
The actual size of the completed workpiece will always deviate from the size given in the drawing by some tenths, hundredths and thousandths of a millimetre.
To achieve a certain fit, though, the occurring dimensional variations have to be kept within certain limits.
These limits are given by the use of the elements.
Example:
The spindle of a vice may have greater dimensional variations than the spindle of an external micrometer.The permissible dimensional variations are given in the engineering drawing in order to make possible an exact manufacturing of the elements.
3.2. Dimensions and their Representation by the Example of a Shaft
Nominal size
Dimension (200 mm) given in the drawing without further specification in the millimetre unit.
Actual size
Actually obtained size of the completed element (200.1 mm) which equals the nominal size or shows slight deviations and can be read from the measuring instrument.
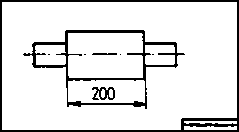
Figure 15 Nominal size

Figure 16 Actual size
Since a specified size described as “nominal size” can never exactly be found two dimensions are necessary between which the actual size may vary. These dimensions are called limit dimensions where the greater of the two is called maximum limit, and the smaller one is called minimum limit
Dimensions which are important for the function must, consequently, have additional specifications on the nominal size to determine the dimensional limits!
These additional specifications are given by the “dimensional variations”.
Dimensional variations
Permissible deviations from the nominal size, given in the drawing behind the nominal size as a number with the symbol + or - in the millimetre unit (+0.2 mm and -0.1 mm).
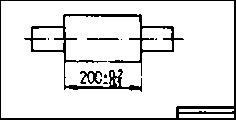
Figure 17 Nominal size with
dimensional variations
The combination of nominal size and upper dimensional variations results in the maximum limit 200.2 mm) and the combination of nominal size and lower dimensional variation results in the minimum limit (199.9 mm).
Tolerance (dimensional tolerance)
Range of the permissible dimensional variation from the nominal size, corresponds to the permissible gap of dimensions between maximum limit and minimum limit (0.3 mm).
The graphic representation of the tolerance limits between maximum and minimum limit is called tolerance zone.
All elements of a manufactured series the actual size of which lies within the required tolerance zone can be used for assembling.
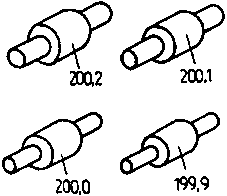
Figure 18 Series corresponding
to the manufacturing requirements with the permissible tolerance
For what reason has the internationally valid ISA System of Fits
been
adopted?
___________________________________________________________________________
___________________________________________________________________________
3.3. Representation of Fits
A fit can be recognized in an engineering drawing by the dimensional specification marked by fit sizes.
Fit size:
Nominal size with specifications of dimensional variations or nominal size with ISA symbol. Fit sizes are used to specify lengths and diameters.If the shaft is efficiently connected with a bore (gear hub), a fit results.
For each fit the dimensions of the diameters of shaft and bore have to be coordinated to obtain, according to the use, interference fits, clearance fits or the intermediate stage called transition fits.

Figure 19 Fit size
specification with dimensional variations
For this reason two tolerance specifications are necessary for each fit - for the external dimension and the internal dimension which refer to the same nominal size of the two mating parts.
In engineering drawings the representation of the dimensional specifications is very extensive, for assembled basic units the dimensional specification by numbers is very space-consuming. For this reason symbols of the Latin alphabet are used for tolerance specifications.
Capital letters (A to Z) are used for internal dimensions (bores), and small letters (a to z) are used for external dimensions (shafts).
In addition to the specification of the tolerance zone by a letter, a number is added containing a statement on the size of the tolerance zone. This number (1 to 16) is called “quality number”.
|
Quality 1 to 7 |
: no or small dimensional variation permissible - (for gauges) - small tolerate zone |
|
Quality 5 to 13 |
: medium dimensional variation permissible - (for fits) - medium-sized tolerate zone |
|
Quality over 13 |
: greater dimensional variations permissible - large tolerance zone |
Example:

Figure
Dependent upon nominal size there are dimensional specifications for fixed tolerance zones which can be read from an ISA table, if these dimensions are necessary.
Parts of an ISA Table
Dimensional Tolerances for Shafts
|
Range of the nominal |
Dimensional variations in micrometre | |||
|
size in mm |
d 11 |
e 8 |
h 11 |
k 6 |
|
over 6 |
- 40 |
- 25 |
0 |
+ 10 |
|
up to 10 |
- 130 |
- 47 |
- 90 |
+ 1 |
|
over 10 |
- 50 |
- 32 |
0 |
+ 12 |
|
up to 14 |
- 160 |
- 59 |
- 110 |
+ 1 |
Dimensional Tolerances for Bores
|
Range of the nominal |
Dimensional variations in micrometre | |||
|
size in mm |
D 11 |
E 8 |
H 11 |
K 6 |
|
over 6 |
+ 130 |
+ 47 |
+ 90 |
+ 2 |
|
up to 10 |
+ 40 |
+ 25 |
0 |
- 7 |
|
over 10 |
+ 160 |
+ 59 |
+ 110 |
+ 2 |
|
up to 14 |
+ 50 |
+ 32 |
0 |
- 9 |
According to given fit sizes the maximum and minimum limits can be determined from the table.
Example:
Fit size of a shaft:
|
Æ 10 e 8 |
tabular value of the dimensional variations:
-25 mm = -0.025 mm
-47 mm = -0.047 mm
|
maximum limit: |
10 - 0.025 = 9.975 mm |
|
minimum limit: |
10 - 0.047 = 9.953 mm |
fit size of a bore:
|
Æ 10 E 8 |
tabular value of the dimensional variations:
+ 47 mm = + 0.047 mm
+ 25 mm = + 0.025 mm
|
maximum limit: |
10 + 0.047 = 10.047 mm |
|
minimum limit: |
10 + 0.025 = 10.025 mm |
If the two parts are joined to form a fit, the specification reads as follows:
|
|

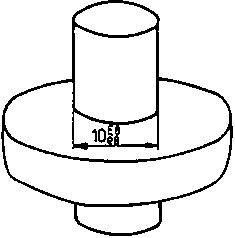
Figure 20 Fit size
specification with ISA symbols
3.4. Practical Use of the ISA System of Fits
The application of the standardized systems of fits has special advantages:
1. The fabrication of series-manufactured fits is possible also in case of separated single-part production.2. The spare part production for defective component parts with ISA fits is easy and can quickly be caried out.
3. Fits are partly produced and reworked with tools the dimensions of which correspond to the standardized system of fits.
4. The testing of fit sizes is performed with standardized gauges containing maximum and minimum limits in accordance with the standardized system of fits. This makes possible a time-saving testing of the quality of the fit without determination of the actual size.
Example:
A pulley shall get a centred bore with the fit size Æ 10 H 8.After drilling and countersinking the finishing is performed with a reamer Æ 10 H 8, and subsequently the fit size is tested with a plug limit gauge Æ 10 H 8.
Conclusion:
Coordinated dimensions of tool and testing instrument render possible an interaction of manufacturing and control process.

Figure 21 Tools and testing
means according to ISA standard
Hints on Testing:
To obtain exact test results it is necessary to take care to see to it that testing means and workpieces have the same reference temperature.For testing means a reference temperature of 20º C is given by the producer.
Testing means are precision instruments, they have to be protected against damages caused by blows, impacts and corrosion!
Which specifications have to be recognizable in engineering
drawings for fit
sizes?
___________________________________________________________________________
___________________________________________________________________________
How is the specification of an ISA fit size
marked?
___________________________________________________________________________
___________________________________________________________________________
What practical advantage does the ISA System of Fits have for
testing?
___________________________________________________________________________
___________________________________________________________________________
Which hint has to be paid attention to during the
testing?
___________________________________________________________________________
___________________________________________________________________________
|
| ||||||||||||||||||||||||
4. Fitting Works on Plane and Curved Surfaces
There are following possibilities for the sequence of fitting operations on component parts and sub-assemblies:
- The order of the fitting operations can be taken from the engineering drawing. The engineering drawing of the mating part contains respective hints.- The sequence of the fitting operations works is derived from the construction and mechanism of the machine into which the mating parts have to be inserted.
- At first the mating part is produced the working of which better guarantees the required geometrical accuracy and dimensional accuracy.
4.1. Fitting Works on Plane Surfaces
As internal and external surfaces plane surfaces can be angular, parallel and staggered to each other.
They serve as bearing faces, working faces or measuring faces.
Plane surfaces are manufactured mechanically by planing, slotting, milling, grinding and broaching. To achieve very high surface qualities these works are followed by honing and lapping. Plane surfaces are manufactured manually by filing and scraping, and to achieve high surface qualities these works can be followed by polishing.
For all fitting works prefabricated workpieces are being reworked. The surface quality to be obtained and accuracy of fit determine the technique to be applied!
Fitting Works on Narrow Surfaces
Narrow surfaces as those of sheet metal are being filed and tested with the help of gauges by light gap test method.
Task:
A mitre angle gauge of 135º is to be made of 2-mm-thick sheet metal.
Sequence of operations:
1. The sheet metal has been prepared by sawing and filing to size, an instrument for angular measurement or an available gauge were used as testing means.
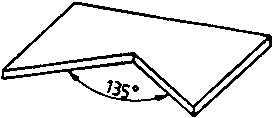
Figure 22 Mitre angle gauge
2. The first fit test is performed with the light gap test method, points of contact are marked with pencil or chalk and are afterwards filed off slightly.
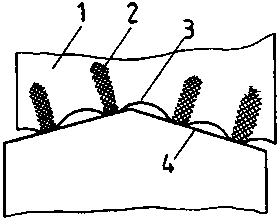
Figure 23 First fit test -
highly enlarged representation
1 workpiece, 2 points of contact marked with pencil, 3 hollow spots, 4 gauge
3. During the second fit test the broader points of contact are marked with arcs and worked further.

Figure 24 Second fit test
4. When the light gap becomes evenly visible, the fitting work can be finished.
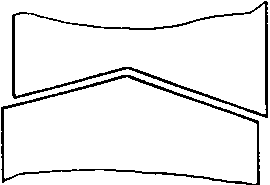
Figure 25 Fitting work
finished - uniform light gap
Hints:
If more than two narrow surfaces (edges) are to be mated, those surfaces are worked first which lie in one plane and of which there is a greater amount!

Figure 26 Fitting work on
several surfaces
1 surfaces to be mated first, 2 surface to be mated subsequently
If a surface is parallel to an already finished surface and two other surfaces are not parallel to another, the first mentioned surface is to be mated first; then the other two surfaces are mated. If all surfaces are parallel or not parallel to each other, they have to be mated simultaneously.
Fitting Works on Broad Surfaces
The degree of difficulty of these fitting works is higher since in most cases several surfaces have to be mated which are often arranged symmetrically and require a “shift-fitting”, i.e. the fit has to be guaranteed also in case of rotation by 90° or 180°.

Figure 27 Shift-fitting - the
square has to fit in the recess also when it is being rotated
Moreover, the requirements of the fit quality with regard to the type of fit have to be considered, too.
The light gap test method is no longer sufficient as testing procedure.
The drag mark method is used, i.e. the workpieces are rubbed against each other and the points of contact can be recognized as bright spots.
Condition:
1. Mating surfaces are very broad.
2. Contact of the mating surfaces is only possible by pushing in or through.
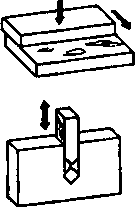
Figure 28 Drag mark method
The touching-up is an extension of the drag mark method.
The surfaces are thinly coated with a colouring agent, then the surfaces are being rubbed against each other or rubbed with marking devices.
Different elevations and cavities appear with different intensities of colour on the surfaces.
Task:
A square socket wrench for a three-jaw chuck is to be manufactured with a clearance of 0.1 mm, a gauge is used for testing.
Sequence of operations:
1. The square has been prepared by sawing and filing with an allowance of 0.4 mm.

Figure 29 Pre-fabricated
square - surfaces 1 to 4 are filed
2. Take surface 1 as reference surface and file surface 2 planely and angularly.

Figure 30 Testing of the
angularity
3. File surface 4 planely and angularly with regard to surface 1, allowance is to amount to 0.2 mm.4. File surface 3 planely and angularly with regard to surfaces 2 and 4, allowance is to amount to 0.2 mm.
5. Working of all surfaces to fit size; square shall touch the gauge so that drag marks become visible.
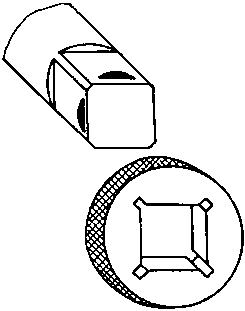
Figure 31 Testing of the
working fit
6. File off the drag marks, square is inserted in the gauge again to determine the drag marks.7. Repeat operation until the square can be inserted in the gauge in any position and even drag marks are visible as surfaces.
8. Final operation - the clearance of 0.1 mm is to be tested with a feeler gauge.
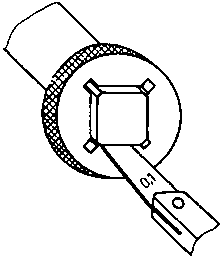
Figure 32 Testing of the
clearance
Task:
A pre-fabricated lock screw is to be fitted in a dovetail guide with its head. The clearance shall amount to 0.1 mm. The head has an allowance of 0.4 mm.
Sequence of operations:
1. File base surface (1) of the screw head planely.
2. Chamfer the inclined side faces (2 and 4).

Figure 33 Preparation of the
base surface as reference surface
1 base surface, 2 side faces, 3 front surface, 4 side face, 5 guide
3. File side face (2) planely and at an angle of 60° to the base surface (1).4. File front surface (3) planely and at an angle of 90º to the base surface (1).
5. Find out how much material has to be removed from side face before fitting the head.
6. File side face (4) planely and at an angle of 90º to front surface (3) and at an angle of 60° to base surface (1).
7. Determine the drag marks by inserting the head in the guide.

Figure 34 Determination of the
drag marks
8. File off the drag marks, repeat the operation until the head can easily be moved through the guide.9. Ensure a clearance of 0.1 mm by uniformly filing or scraping the surfaces (2 and 4).
4.2. Fitting Works on Curved Surfaces
Curved surfaces may look curved or rotationally symmetrical (turned parts), they appear as internal and external surfaces.
Contrary to curved surfaces used for machines with control tasks, shafts, bushes, bearings and guides have rotationally symmetrical internal and external surfaces. The fit of the surfaces is performed according to their function. There are stationary (non-moving) working surfaces, for example in slide bearings and cylindrical guides. Such surfaces are being mechanically produced mostly by turning, boring, grinding, Honing and lapping.
They are produced or reworked manually by filing, scraping and reaming.
Narrow curved surfaces are being worked in the same way as narrow plane surfaces. Broad curved surfaces are to be worked in different ways.
Task:
A slide bearing is to be adjusted to a shaft.
Sequence of operations:
1. The shaft is thinly and uniformly coated with colour.2. The bearing shells are being attached, and thin sheets of metal are being moved as insets between the lower and the upper bearing shell. The bearing shells are joined by screws. When the bearing bore is worn out, the insets are replaced by thinner ones or completely removed.

Figure 35 Assembling of the
bearing shells
1 upper bearing shell, 2 screw, 3 inset of sheet metal, 4 lower bearing shell
3. The touching-up is performed by several rotations of the shaft in the bearing shells, afterwards the bearing shells are again disassembled.4. The points of contact (bearing spots) are shaved off by pushing rotary motion with a triangular or spoon scraper.
5. The touching-up and scraping is continued until a uniform bearing contact pattern is visible. It is favourable that the bearing marks lie denser on the side faces of the bearing than at the top and at the bottom.
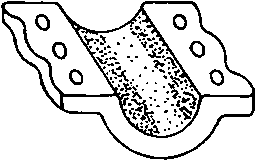
Figure 36 Bearing contact
pattern in the bearing shell
6. With the triangular scraper, oil grooves are uniformly scraped, but they must not flow out on the front surfaces.

Figure 37 Scraped oil grooves
7. After completion the bearing shells have to rest firmly on the shaft, the shaft must not jam, but also not have an excessive clearance.
Task:
A precision bore in a toothed gear is to be reworked for the reception of a completed shaft.
Sequence of operations:
1. Testing of the dimensional tolerance of the shaft with the help of limit gap gauges.
2. Selection of the fit size for the gear bore according to the type of fit.
3. Deburring of the bore with the triangular scraper or countersinking with the countersink.
4. Reaming of the bore with a reamer according to the fit size.
5. Testing of the bore with the plug limit gauge according to the fit size.
6. Assembling and testing the functioning of the fit.
What does “shift-fitting”
mean?
___________________________________________________________________________
___________________________________________________________________________