 |
| ||||||||||||||||||||||||||||||||||||
|
| ||||||||||||||||||||||||||||||||||||
Institut f�r berufliche Entwicklung e.V.
Berlin
Original title:
Arbeitsmaterial f�r den
Lemenden
“Sto�en von Nuten”
Author: Horst K�th
First edition © IBE
Institut f�r berufliche Entwicklung e.V.
Parkstra�e
23
13187 Berlin
Order No.: 90-35-3404/2
|
| ||||||||||||||||||||||||||||||||||||
1. Purpose and importance of the technique of shaping grooves
Grooves are joints of different shapes such as spline-shaft key-seats, shaft keyseats or hub keyways. They serve mainly for mounting and guiding of the part itself or other parts.
Shaping of grooves on shaping machines (mechanical) is a special kind of machining shapes. It is characterized by the fact that the corresponding grooves shape is cut into the plane surfaces or end faces of the workpiece. For this purpose the profile of the required surface of the workpiece is recessed in the tool or the shaped surface is produced by a positively coupled and controlled feeding movement.
Grooves are shaped in most cases immediately after the plane surfaces or end faces have been machined. That is why the position of the groove is determined by the positional accuracy of the base surface.
Profiles are often shaped as in this way they can be produced with relatively simple tools at lower costs as compared with milling tools, especially in single and small-scale series production.
|
| ||||||||||||||||||||||||||||||||||||
2. Construction and kinds of tools for shaping grooves

Figure 1. Grooving tool
(1) straight grooving tool,
(2) chamfered grooving
tool,
(3) rounded grooving tool,
(4) prismatic grooving tool
For the technique of shaping grooves on shaping machines mainly the straight, chamfered or rounded grooving tool is used. These grooving tools can be manufactured most easily and can take up the greatest forces.
For special shapes of grooves the grooving tools to be used are ground according to the shape to be manufactured.

Figure 2. Grooving tool for
special shapes
What components does a grooving tool consist of?

Figure 3. Construction of a
grooving tool
1. ___________________________________
2.
___________________________________
3.
___________________________________
4.
___________________________________
5. ___________________________________
Due to the complexity of the grooves and the constantly interrupted cut during approach and run-out of the tool, tools made of high-speed steel are normally used. Carbide-tipped tools often chip. Bent tools (hook tools) are used when machining with straight tools is not possible.

Figure 4. Bent tool (hook
tool)
As they are more difficult to manufacture than straight tools, they are relatively seldom used for shaping.
Whether a tool is a right-hand tool or a left-hand tool can be determined when the tool points with its cutting part to the person holding it. If the primary cutting edge is on the left, it is a left-hand tool.
Why are mainly tools made of high-speed steel used for shaping
grooves?
_______________________________________________________________________
_______________________________________________________________________
_______________________________________________________________________
|
| ||||||||||||||||||||||||||||||||||||
3. Preparation for shaping of grooves
It is part of the preparation of the respective sequence of operations to lay out all necessary working tools, objects of work and auxiliaries in a suitable way and according to regulations.
In doing so, observe the following rules:
- Check the necessary tools for operational reliability and put them down in such a manner that they are clearly arranged and ready at hand. So they can immediately be used, thus making work efficient.
- Put down measuring and testing means on bases provided for this purpose.
- Tools must not lie on top of each other.
| The work can be done in an optimum way only if the tools are sharpened and the necessary angles are observed.
- Choose all necessary auxiliaries according to the work order and place it on a base provided for this purpose (clamping bolts, baseplates for mounting of the workpieces, angle-plates, work rest, clamping gib, step block, clamp dog, machine vice).

Figure 5. Clamping auxiliary
1 clamping bolt,
2 baseplate for mounting of the workpieces
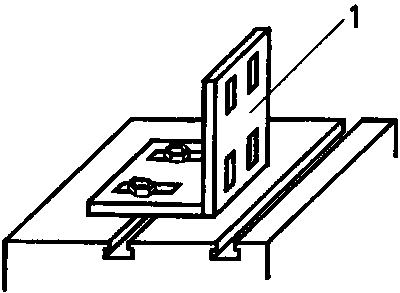
Figure 6. Clamping auxiliary
1 angle-plate
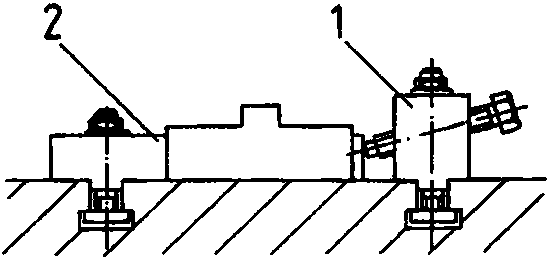
Figure 7. Clamping auxiliary
1 work rest,
2 clamping gib
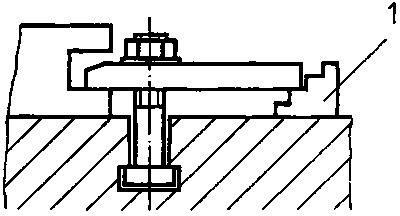
Figure 8. Clamping auxiliary
1 step block
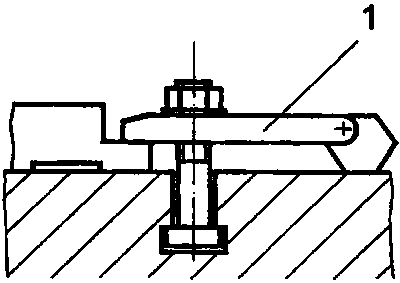
Figure 9. Clamping auxiliary
1 clamp dog
Figure 10. Clamping auxiliary 1
machine vice
What are the criteria according to which tools are to be checked
for
serviceability?
_______________________________________________________________________
_______________________________________________________________________
_______________________________________________________________________
For machine setting basically the following working steps are necessary:
Clamping the workpiece for shaping of grooves
- The quality of the workpiece to be machined is considerably influenced already by setting up.
- When grooves are shaped on shaping machines the cutting force acts parallel to the workpiece supporting surface.

Figure 11. Cutting force acts
parallel to the work support
1 cutting force related to the workpiece,
2 passive force
related to the workpiece,
3 partial cutting force
- Each workpiece clamping must be firm, safe and definite in position.
- Each workpiece clamping must be done in such a way that no permanent deformations on the workpiece result.
- The clamping forces must be so great that a displacement of the workpiece is prevented.
- When using the machine vice (mainly for chucking small workpieces with parallel outer surfaces), screw it firmly on the machine table by means of clamping dies.
- Locate the machine vice by means of tongues.
- There must be no dirt particles or chips between machine table and machine vice.
- Place the workpiece directly on the guideway of the vice (use parallels when the workpieces are flat - see Fig. 18) and tighten the vice.
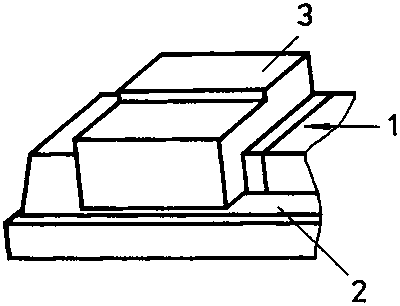
Figure 12. Clamping of the
workpiece in the machine vice
1 clamping force,
2 guideway of the machine vice,
3
workpiece
- Knock the workpiece in place with a hammer from above so that it firmly rests on the guideway of the vice. Ground supports made of cast iron take up vibrations better than steel supports when knocking the workpieces in place. When clamping is made on the machine table, clamping is effected from both sides, e.g. by means of clamps (clamping workpiece on the machine table under compression - vertical clamping forces).
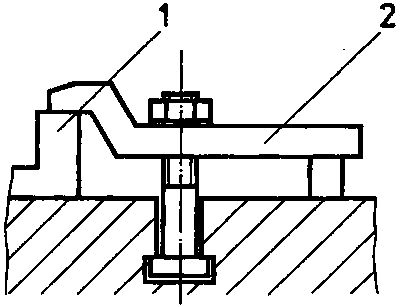
Figure 13. Clamping of the
workpiece on the machine table under compression with clamp
1 workpiece,
2 clamp
- Another possibility consists in pressing against tongues or stop blocks (clamping workpiece on the machine table - horizontal clamping forces).
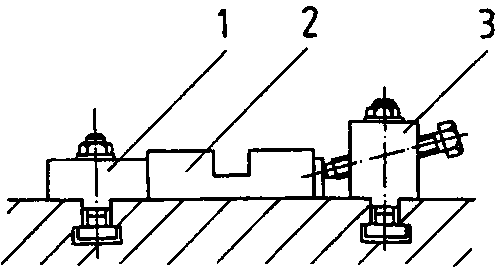
Figure 14. Clamping the workpiece
on the machine table against tongues or stops
1 tongues,
2 workpiece,
3 clamping element with clamping
nut
- Use only serviceable nuts for clamping bolts.
- Choose the clamping forces to be 1.5 to 2 times as big as the cutting forces.
- Holding-down of the workpiece must also be effected by the clamping force. For this purpose the clamping forces shall be applied near the contact surface of the tool.
What has to be considered when clamping a workpiece for shaping
grooves?
_______________________________________________________________________
_______________________________________________________________________
_______________________________________________________________________
_______________________________________________________________________
_______________________________________________________________________
_______________________________________________________________________
_______________________________________________________________________
What purpose does chucking in the machine vice
serve?
_______________________________________________________________________
_______________________________________________________________________
_______________________________________________________________________
When is clamping on the machine table
applied?
_______________________________________________________________________
_______________________________________________________________________
_______________________________________________________________________
_______________________________________________________________________
_______________________________________________________________________
_______________________________________________________________________
Clamping of tools for shaping grooves
Fix the shaper tool into the tool holder located on the lower part of the ram (tool post).
The following rules shall be observed:
- Clamp tool short and firmly to prevent bouncing.
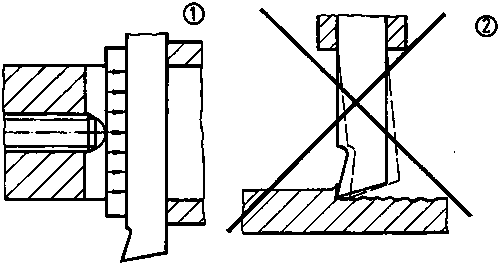
Figure 15. Short and firm clamping
of the tool
(1) tool clamped short and firmly
(2) tool clamped too long,
chatter marks are produced on the workpiece
- Use only unobjectionable jaw wrenches.
- Clamping surfaces must be even and free from dirt and chips.
- Choose the length of the cutting part according to the depth of the groove to be machined.
- Clearance angle and rake angle depend on the material of the workpiece.
- Use tool, with largest possible shank section (prevention of vibrations).
- Tool must not bite during feeding.
- Chips must flow off well in the groves.
Why must the clamping surfaces be even and free from dirt when a
tool is
clamped?
_______________________________________________________________________
_______________________________________________________________________
Explain how a tool is to be clamped and what rules are to be
observed in doing
so.
_______________________________________________________________________
_______________________________________________________________________
_______________________________________________________________________
_______________________________________________________________________
Setting of stroke length and position of the ram stroke
The stroke length and position of the ram stroke must be set according to the length of the workpiece and position to the clamping table.
- The stroke length is composed of approach, length of the workpiece and overrun.
- The stroke length is adjusted by moving the crankpin. If the spacing is small, the stroke is also small. If the spacing becomes large, the stroke is large as well.
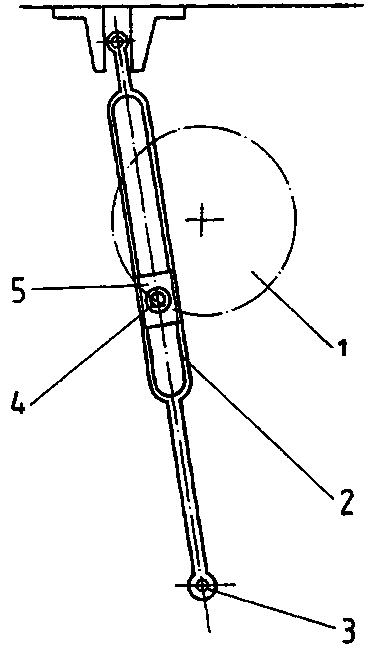
Figure 16. Adjustment of the stroke
length by moving the crankpin
1 crank gear (simplified),
2 crank arm,
3 fulcrum of crank
arm,
4 crankpin,
5 sliding block
- It must be ensured that stroke length and position of the ram stroke with short overrun path and accurately adjusted. The free run-out of the tool must be ensured also during cutting.
- The position of the ram stroke is correct, if there are run-out and overrun. The ram is displaced by operating the hand crank which turns the screw arranged in the ram. Displacement of the ram is forced according to the principle of screw and nut.
Setting of the number of strokes
The number of double strokes is derived directly from the cutting speed in connection with the stroke length. In case of fixed numbers of stroke on the machine that number of stroke shall be set which is closest to the calculated number of strokes. The calculated number of strokes should not be exceeded.
What is a stroke adjustment necessary
for?
_______________________________________________________________________
_______________________________________________________________________
_______________________________________________________________________
What are the criteria for choosing the stroke
length?
_______________________________________________________________________
_______________________________________________________________________
_______________________________________________________________________
What criteria are to be considered when setting the number of
strokes?
_______________________________________________________________________
_______________________________________________________________________
_______________________________________________________________________
_______________________________________________________________________
|
| ||||||||||||||||||||||||||||||||||||
4. Shaping of simple grooves (rectangular grooves)
Rectangular grooves are produced in most cases immediately after plane surfaces and end faces have been machined.

Figure 17. Rectangular groove
Therefore, the position of the groove is determined by the positional accuracy of the base surface.
- Use the machine vice.
- When clamping the workpiece, pay attention that parallelism and angularity to the primary motion are ensured.
- Supporting and locating surfaces must be clean.
- Set the tool slide exactly to 0.
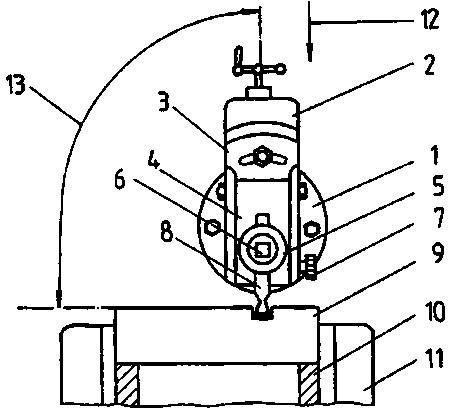
Figure 18. Tool slide in exactly
vertical position
1 ram head
2 tool slide
3 clapper box
4 ram
clapper
5 tool post
6 locking bolt
7 ram clapper pin
8 grooving
tool
9 workpiece
10 parallels
11 machine vice
12 feeding movement of
tool slide
13 angle of 90°
- The tool block stands vertically.
- If the groove depth is small and the overrun path sufficiently long, the tool can be lifted out of the groove during the return stroke. In this way the vertical side surfaces of the groove are not damaged by biting. If this is not possible, the tool block must be fixed.
- Align the straight primary cutting edge exactly parallel to the workpiece or table surface (fig. 18).
- Reduce the cutting speed by approximately 40 to 50% as compared with the table data, as flowing off of the chip is hindered by the side surfaces of the groove.
- After having scratched, work with a feed of 0.05 to 0.2 mm per double stroke according to the scale value.
- Machine grooves of low accuracy in one operation. The cutting edge of the tool has the width of the groove to be manufactured.
- During machining the tool is to perform cutting work, if possible, to prevent scraping of the primary cutting edge.
- Machine grooves of higher accuracy with a tool the cutting edge of which is 0.5 mm narrower than the groove.
- Position in such a way that on both sides an equally great machining allowance remains for finishing.
| At a machining depth of approximately 1 mm check positional and dimensional accuracy and correct, if necessary.
- Finish-machine the depth of the groove.
- Finish with a tool the width of which is ground accurately to size.
|| When working, never stand in front of the machine, but always beside the machine on the side of the control elements (splashing chips, danger of getting injured).
|| Check the workpiece or tool, on principle, only when the machine is at rest.
What has to be done, if by mistake the infeed of the tool in
relation to the final size has been set too
high?
_______________________________________________________________________
_______________________________________________________________________
_______________________________________________________________________
_______________________________________________________________________
_______________________________________________________________________
What criteria does the choice of the feed depend
on?
_______________________________________________________________________
_______________________________________________________________________
_______________________________________________________________________
_______________________________________________________________________
_______________________________________________________________________
Why is the cutting speed reduced by approx. 50% as compared with
the table data when grooves are to be
shaped?
_______________________________________________________________________
_______________________________________________________________________
_______________________________________________________________________
_______________________________________________________________________
_______________________________________________________________________
Why must the workpieces always be deburred after
machining?
_______________________________________________________________________
_______________________________________________________________________
_______________________________________________________________________
_______________________________________________________________________
|
| ||||||||||||||||||||||||||||||||||||
5. Shaping of T-slots
T-slots are machined according to the following working steps:
- recessing of a rectangular groove
- cutting of a horizontal
recess
- cutting of the opposite horizontal recess

Figure 19. Working steps when
machining a T-slot
(1) recessing of a rectangular groove, (2) cutting of a horizontal recess, (3) cutting of the opposite horizontal recess, 1 feeding movement
· Work with the machine vice.
· Make sure that the workpiece is accurately aligned.
· When using supports, apply only strips which are parallel ground.
· Recess the rectangular groove to the depth of the T-slot to be produced and finish-machine the upper width.
· Premachine wide slots.
· Premachine and finish the horizontal recesses with a T-slot cutting tool.
| Special attention during work is necessary, as the cutting operation can be watched only partially.
What is to be understood by the term “slot
width”?
_______________________________________________________________________
_______________________________________________________________________
_______________________________________________________________________
_______________________________________________________________________
When is a T-slot
premachined?
_______________________________________________________________________
_______________________________________________________________________
_______________________________________________________________________
What working steps are to be carried out when T-slots are
machined?
_______________________________________________________________________
_______________________________________________________________________
_______________________________________________________________________
|
| ||||||||||||||||||||||||||||||||||||
6. Shaping of dovetail grooves
Dovetail grooves are machined in the following working steps:
- recessing of a rectangular groove
- machining of an
inclined surface
- machining of the opposite surface
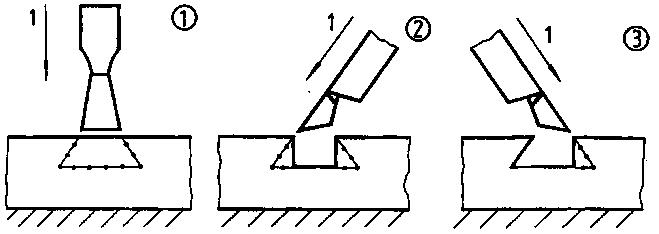
Figure 20. Working steps when
machining dovetail guides
(1) recessing of a rectangular groove, (2) machining of an inclined surface, (3) machining of the opposite surface, 1 feeding movement
· Work with the machine vice.
· Align the workpiece accurately and in parallel.
· Recess the rectangular groove to the depth of the dovetail groove to be produced and finish-machine the upper width.
· Cut out both side parts one after the other (shoulder tool).
· Wide and flat dovetail grooves can be shaped with a forming tool after the rectangular groove has been cut out.
Why are at first the depth and upper width finish-machined when
making dovetail
grooves?
_______________________________________________________________________
_______________________________________________________________________
_______________________________________________________________________
_______________________________________________________________________
When are dovetail grooves finished in one
operation?
_______________________________________________________________________
_______________________________________________________________________
_______________________________________________________________________
_______________________________________________________________________
_______________________________________________________________________
What functions do dovetail guides
have?
_______________________________________________________________________
_______________________________________________________________________
_______________________________________________________________________
_______________________________________________________________________
_______________________________________________________________________
What are the criteria for feeding when inclined surfaces are
machined?
_______________________________________________________________________
_______________________________________________________________________
_______________________________________________________________________
_______________________________________________________________________
_______________________________________________________________________
Grooves are checked according to the required accuracy at several points of the workpiece by means of depth gauge, vernier caliper, slip gauge or gauge.
The geometrical accuracy is checked vertically to the machining direction with a gauge.
|
| ||||||||||||||||||||||||||||||||||||
7. Shaping of profiles
Machining of profiles on the shaping machine is often applied, as production at favourable costs, especially single-piece production, is possible with relatively simple tools.

Figure 21. Profiles
The more surfaces and shapes of different kind exist on the workpiece, the higher are the skills required for machining the profiles.
Profile workpieces are machined by manufacturing the surfaces and shapes individually one after the other.
Profiles are shaped in most cases by means of:
- contours marked on the workpiece
- templates
- sample
workpieces.
Machining is made in the following working steps:
- positioning of the tool according to marking, template or
sample workpiece
- scratching of the workpiece
- checking for accuracy of
dimensions and profile
· Before finishing, recess the groove centrally.· Finish the profile.
· Check for dimensional and geometrical accuracy.
· Work in the machine vice.
· Be sure to align the workpiece exactly plane-parallel.
· If profiles are rough-machined before, adjust the tool according to the necessary machining allowance by placing a slip gauge on the template or the sample workpiece.
· Only such pieces are suited as sample workpieces which can be chucked with the workpiece directly in the machine vice.
· If several workpieces with the same profile are to be manufactured, position them one after the other according to the possibility of clamping and machine them together. When clamping the workpieces take care to ensure that all workpieces are positioned next to each other plane-parallel and well aligned.