 |
| ||||||||||||||||||||||||||||||||
|
| ||||||||||||||||||||||||||||||||
Institut f�r berufliche Entwicklung e.V. Berlin
Original title:
Lehrbeispiele f�r die berufspraktische Ausbildung
"Arbeiten
an Band- und Kreiss�gemaschinen"
Author: Johannes Schollbach
First edition © IBE
Institut f�r berufliche Entwicklung e.V.
Parkstra�e
23
13187 Berlin
Order No.: 93-33-3401/2
|
| ||||||||||||||||||||||||||||||||
Preliminary Remarks
This material contains five instruction examples for practising the sawing of straight-line oblong, cross and angle cuts on the circular sawing machine, equally sawing curved oblong and cross-cuts on the band sawing machine.
In order to facilitate preparations and operations the necessary materials, machines and tools, measuring and testing means besides aids have been indicated, similarly also required preliminary knowledge for the exercises. The added work sequence sets out the sequence of steps for undertaking the exercises. Each instruction example has a workshop drawing indicating the size and shape of the workpieces. The execution of cuts true to both size and shape constitutes the preliminary stage to further processing workpieces determining the ultimate quality of the final product. Commensurately, practising pieces complying with practical work tasks were selected as instruction examples. These are all single items which, following further processing, become usable objects: frames for various purposes, individual parts of a wall shelf. The linear measures are recommended lengths which may be aligned to local conditions by the trainees.
|
| ||||||||||||||||||||||||||||||||
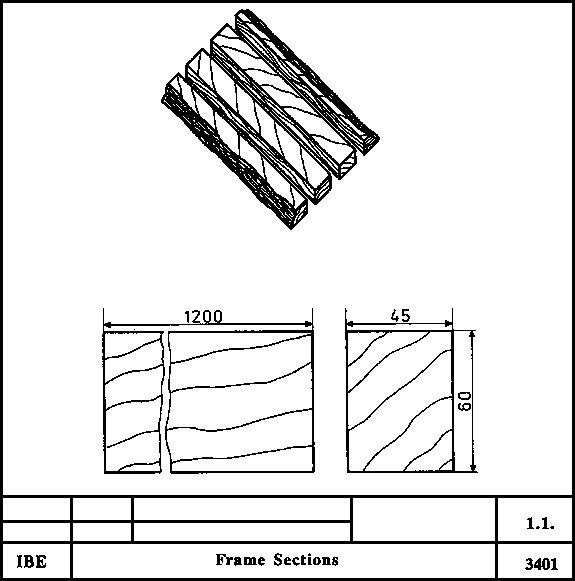
Instruction Example 1.1.: Frame Sections
Undertaking oblong cuts using the circular saw bench for seaming and cutting frame sections to width.
Material

Figure
Unseamed boards
Length: 1200 mm
Width: 200 mm
Thickness: 45 mm
Machines and tools
Circular saw bench, circular saw blade with acute-angled teeth or gullet teeth
Measuring and testing means
Folding rule
Aids
Straight edge, feed strip, pencil
Necessary previous knowledge
Measuring and marking
|
Sequence of operations |
Comments |
|
1. Position material, mark with pencil and straight edge onto the board. |
Mark so that the external edges are rectangular after cutting. Saw blade teeth tips should only protrude slightly beyond the workpiece thickness, set splitting wedge max. 10 mm behind the saw blade, guard hood must be 20 mm above the saw blade circle. |
|
2. Set saw blade to workpiece thickness, set splitting wedge and guard hood. | |
|
3. Switch on the machine and seam the board as marked through oblong cut. |
Oblong cut at scribed line requires special attention. |
|
4. Switch off the machine. | |
|
5. Check the seamed narrow face. |
Check the seamed narrow face for evenness visually or with straight edge. |
|
6. Following machine standstill set stop rule at the width. | |
|
7. Switch on the machine and cut the board to width. |
Push the board through with feed strip. |
|
8. Switch on the machine. | |
|
9. Check the board for dimensional accuracy, if required reset the stop rule. |
Undertake dimensional inspection using folding rule. |
|
10. Oblong-cut the remaining boards, switch off the machine. |
Ensure a tidy workplace, remove chippings to prevent accidents. |
Possible addition
Seam further boards and cut to various frame sections of differing widths.
Frame
Sections
|
| ||||||||||||||||||||||||||||||||
Instruction Example 1.2.: Frame Sections
Undertake cross-cuts at an angle of 90° using the table circular saw bench for sawing off frame sections cut to width.
Material

Figure
Sawn timber from instruction example 1 seamed on both sides
Length: 1200 mm
Width: 60 mm
Thickness: 45 mm
Machines and tools
Circular saw bench, circular saw blade with acute-angled tooth
Measuring and testing means
Folding rule, try square
Aids
Pencil
Necessary previous knowledge
Measuring and marking
|
Sequence of operations |
Comments |
|
1. Position material, switch on machine. | |
|
2. Undertake first cross-cut using sliding table. |
Sliding table should be easily movable, check angle accuracy of 90°. |
|
3. Mark linear measure at other end of board or at the length setting position of the sliding table. |
Mark linear measure using try square and pencil. |
|
4. Undertake second cross-cut at other end of board. |
Ensure dimensional accuracy, minimal feed to avoid fraying. |
|
5. Control dimensional accuracy of length. |
Undertake dimensional inspection using folding rule. |
|
6. Switch off the machine. |
Ensure a tidy workplace, remove chippings to prevent accidents. |
Completion
Mill the broad and narrow faces, insert slotted frame connections, glue connections and grind frames for yielding complete, usable frames.

Frame
Sections
|
| ||||||||||||||||||||||||||||||||
Instruction Example 1.3.: Frame Sections
Executing angle cuts at an angle of 45° using the circular saw bench to cut off frame sections.
Material

Figure
Sawn timber taken from instruction examples 1 and 2
Length: 1050 mm
Width: 60 mm
Thickness: 45 mm
Machines and tools
Circular saw bench, circular saw blade with acute-angle tooth
Measuring and testing means
Folding rule, mitre angle 45° or 135°
Aids
Pencil
Necessary previous knowledge
Measuring and marking
|
Sequence of operations |
Comments |
|
1. Position material, set sliding table stop to a cutting angle of 45°. | |
|
2. Switch on the machine and undertake two test cuts. Check angle accuracy. |
Fold up test piece. Both pieces must when put together form an angle of 90°. |
|
3. Undertake the angle cuts of 45° on all workpiece adhering to the required linear measure. |
Low feed rate yields a clean cutting edge and avoids fibre fraying. |
|
4. Check for proper fitting and control dimensional accuracy. |
Fit together the frame woods, visually check the mitre joints, dimensional inspection using folding rule. |
Completion
Mill the folds, glue the mitre joints, finish and grind the frames and break the edges with abrasive paper for yielding complete, usable frames.

Frame
Sections
|
| ||||||||||||||||||||||||||||||||
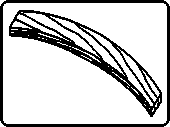
Instruction Example 1.4.: Curved Frame Sections
Execute curved cuts using the band sawing machine.
Material
Figure
Sawn timber with milled wide and narrow faces
Length: 1100 mm
Width: 280 mm
Thickness: 45 mm
Machines and tools
Band sawing machine, wide band saw blade, trammel points
Measuring and testing means
Folding rule
Aids
Pencil
Necessary previous knowledge
Measuring and marking
|
Sequence of operations |
Comments | |
|
1. Mark curve on the workpiece. |
Use trammel points. | |
|
2. Set up band sawing machine: | | |
| |
- check saw blade tension | |
| |
- set saw blade roll guide and saw blade covering to workpiece thickness. | |
|
3. Set up the machine and undertake curved cut, freehand, cutting at the scribed line. |
Position workpiece securely to sawing table, do not push too quickly. Otherwise saw blade can move away from scribed line. | |
| |
Whilst sawing keep hands away from the sawing area. | |
|
4. Switch off the machine and cover up the saw blade to the table surface. |
Given longer machine standstill, unchuck the saw blade. |
|
|
5. Control cutting accuracy. |
Visually check the concurrence of scribed line and saw cut. | |
Possible addition
Cut curves of varying dimensions on the band sawing machine.

Curved Frame
Sections
|
| ||||||||||||||||||||||||||||||||
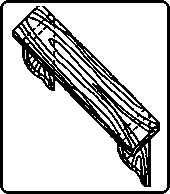
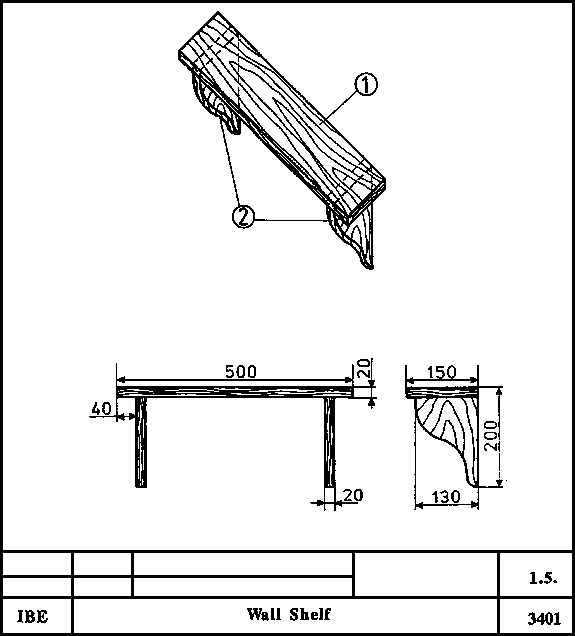
Instruction Example 1.5.: Wall Shelf
Undertaking oblong, cross and curved cuts on the band sawing machine.
Material
Figure
Sawn timber with milled wide and narrow faces (1)
Length: 500 mm
Width: 150 mm
Thickness: 20 mm
Sawn timber - milled (2)
Length: 400 mm
Width: 130 mm
Thickness: 20 mm
Machines and tools
Band sawing machine, narrow band saw blade
Measuring and testing means
Folding rule, try square
Aids
Templet for the curve, pencil
Necessary previous knowledge
Measuring and marking
|
Sequence of operations |
Comments |
|
1. Complete templet. |
Make templet manually of plywood or hard cardboard. |
|
2. Check and set up band sawing machine. |
Position narrow band saw blade. |
|
3. Set workpiece width on stop rule. |
Process parts (1) and (2). |
|
4. Switch on the machine and cut workpiece to width. |
Push slowly, otherwise saw blade can disappear. |
|
5. Mark linear measure on the workpieces and cut from length using the angle guide. |
Check adjustable angle guide for correct angle setting. |
|
6. Mark curves on the parts (2) according to the templet. |
The templet ensures that all curves are like-formed. |
|
7. Cut out the curves freehand at the scribed line. |
Ensure that the hands are not in the sawing area during operations. |
|
8. Switch off machine. | |
|
9. Control cutting accuracy. |
Visual check. |
Completion
Connect parts (1) and (2) by means of burr-joints. Grind the wide and narrow faces, glue burr-joint, break edges.
Wall
Shelf