 |
| ||||||||||||||||||||||||||||||||||||||||||||||||||||||||||||||||||||||||||||||||||||||||||||||||||||||||||||||||||||||||||||||||||||||||||||||||||||||||||||||||||||||||||||||||||||||||||||||||||||||||||||||||||||||||||||||||||||||||||||||||||||||||||||||||||||||||||||||||||||||||||||||||||||||||||||||||||||||||||||||||||||||||||||||||||||||||||||||
|
| |||||||||||||||||||||||||||||||||||||||||||||||||||||||||||||||||||||||||||||||||||||||||||||||

World
Employment
Programme

International Labour
Office
Geneva
Prepared by the International Labour Office, with the collaboration of Mr. Chartier, ILO expert, Mr. Randriamihajamanana Thomas, Malagasy horn-processing artisan, and Mr. Ramanana, illustrator
The World Employment Programme (WEP) was launched by the International Labour Organisation in 1969. as the ILO's main contribution to the International Development Strategy for the Second United Nations Development Decade.
The means of action adopted by the WEP have included the following:
- short-term high-level advisory missions;
- longer-term national or regional employment teams; and
- a wide-ranging research programme.
Through these activities the ILO has been able to help national decision-makers to reshape their policies and plans with the aim of eradicating mass poverty and unemployment.
A landmark in the development of the WEP was the World Employment Conference of 1976. which proclaimed inter alia that "strategies and national development plans should include as a priority objective the promotion of employment and the satisfaction of the basic needs of each country's population". The Declaration of Principles and Programme of Action adopted by the Conference will remain the cornerstone of WEP technical assistance and research activities during the 1980s.
This publication is the outcome of a WEP project.
Copyright © International Labour Organisation 1988
Publications of the International Labour Office enjoy copyright under Protocol 2 of the Universal Copyright Convention. Nevertheless, short excerpts from them may be reproduced without authorisation, on condition that the source is indicated. For rights of reproduction or translation, application should be made to the Publications Branch (Rights and Permissions), International Labour Office, CH-1211 Geneva 22, Switzerland. The International Labour Office welcomes such applications.
ISBN 92-2-105358-X
First published 1988
Published in French under the title: Technologie du travail de la corne (ISBN 92-2-205358-3)
The designations employed in ILO publications, which are in conformity with United Nations practice, and the presentation of material therein do not imply the expression of any opinion whatsoever on the part of the International Labour Office concerning the legal status of any country, area or territory or of its authorities, or concerning the delimitation of its frontiers. The responsibility for opinions expressed in signed articles, studies and other contributions rests solely with their authors, and publication does not constitute an endorsement by the International Labour Office of the opinions expressed in them. Reference to names of firms and commercial products and processes does not imply their endorsement by the International Labour Office, and any failure to mention a particular firm, commercial product or process is not a sign of disapproval.
ILO publications can be obtained through major booksellers or ILO local offices in many countries, or direct from ILO Publications, International Labour Office, CH-1211 Geneva 22, Switzerland. A catalogue or list of new publications will be sent free of charge from the above address.
Printed by the International Labour Office, Geneva, Switzerland
|
| |||||||||||||||||||||||||||||||||||||||||||||||||||||||||||||||||||||||||||||||||||||||||||||||
PREFACE
The countries of the Third World are engaged in a fierce struggle on all fronts to achieve self-reliant, harmonious and balanced development. In this struggle, there is an urgent need for them to exploit their natural resources to the full. This cannot be done, however, unless the methods and means of exploiting them are rationalised by a general command of technology that will enlist the active and effective participation of the population, thereby equipping society as a whole to move forward and creating the internal dynamic for an authentic process of development.
The new techniques play a fundamental role in the process of development as they generate the innovations without which the economies of the developing countries are likely to remain in a fragmented and precarious state for a long time to come for lack of effective training that could inject true dynamism into development.
The modern techniques made available by the developed countries have merely been superimposed on traditional techniques in an artificial and insular fashion without any attempt to penetrate and activate them so as to give rise to training and to the creation of poles and foci of authentic development. As a result, the traditional techniques have remained static and archaic, following procedures based on routine, tricks of the trade and rule of thumb with no recourse to scientific know-how or methods. These techniques are not without interest but must nevertheless be rethought in terms of an appropriate technology that is acceptable to and can be assimilated by the people as a whole in an innovative technological leap forward.
Horn is a high-quality raw material that is abundant in Madagascar, which can boast of having one zebu per inhabitant as others would speak in terms of cars or television sets per household. The possibilities of this raw material have long been neglected in favour of plastics, which horn could advantageously replace in a number of everyday utilitarian or decorative objects that do not require much mechanical strength.
Moreover, horn working is a many-sided technique comprising a number of crafts that can lead to a sound division of labour in the organisation of production.
The project for developing this craft, now being carried out at the Malagasy National Craft Centre (CENAM), has attempted to describe the different techniques of horn processing in this manual on the technology of the craft. The manual is the result of collaboration between high-level technicians and small-scale artisans, who have worked together to rationalise the traditional techniques so as to develop an appropriate technology that will eventually lead to product standardisation.
This publication, and the idea that inspired it, could be a starting point for other constructive and fruitful meetings and could furnish a model for the popular mastery of horn technology. It is, in this sense, a useful innovation. It will not, of course, be directly addressed to the majority of horn workers, but in any case it should encourage technicians to develop simple manuals for use by the artisanal sector.
We are particularly grateful to the promoter of this work, the development project for Malagasy crafts, to the Norwegian Government which helped to fund it, and also to Mr. Randriamihajamanana Thomas, an artisan in horn, who was kind enough to unveil and explain its secrets for posterity.
Jean Robiarivony,
Director General of Planning,
Chairman
of the Administrative Committee of the Malagasy National Craft
Centre
(CENAM)
|
| |||||||||||||||||||||||||||||||||||||||||||||||||||||||||||||||||||||||||||||||||||||||||||||||
FOREWORD
There are many different types of horn; horns of Bovidae, rhinoceros, antelope and giraffe, as well as the substance of which the beaks of birds, and the claws and hooves of many animals, are made. The horn with which this manual is concerned may be defined as hard, conical, hollow horn, composed of dead epidermal cells bound together by keratin, which covers the excrescence of the frontal bones that are called "horn cores". This type of horn is found in a species of cattle that is common in Asia and Africa, the zebu. The term "horn" will be used in this manual to denote both hollow horn and its constituent material.
Before the advent of plastics, prosperous artisans throughout the world for centuries produced useful or decorative objects in horn: combs, handles for knives and tools, door handles, sheaths for whetstones, horns for blowing, buttons, stylised animals and plants, rings, bracelets, etc. However, plastics have rapidly replaced horn, and horn processing is in jeopardy.
The compression, injection and extrusion of plastics requires machinery and complex moulds and dies that have to be imported, are expensive to buy and to maintain, and are heavy consumers of energy. Being automated, and hence with a high level of productivity, these processes also cause unemployment. The regulation and operation of this machinery entails the services of qualified electrical engineers, which is a form of specialisation rarely found in developing countries. Horn, on the other hand, can be worked by hand with simple tools such as saws, scissors, gouges and hand drills which, for the most part, can be produced by local artisans. The work can be made much more efficient by the use of small electrically powered tools such as jigsaws, drills, sanders, woodworking lathes, and small grinding wheels which, even if imported, are of low cost and consume little energy.
In some developing countries, plastics are imported at great expense, while horn is a raw material that is cheap and abundant in the countries themselves. In Madagascar, for example, the current price for horn attached to the core is 10 to 11 Malagasy francs per kilo. Obviously horn could not replace all plastic materials but it could easily be used as a substitute for plastics to make a number of small objects that are not subject to great physical stress.
In certain countries, artisans continue to make objects in horn, mainly for the tourist trade. Some of these objects are technically and artistically of high quality. In the majority of countries, however, a great deal of horn is still left relatively unprocessed. In the next few years, it will undoubtedly be in the interest of the developing countries to give preference to horn rather than to plastic materials whenever this is possible. This possibility will entail the development of horn processing, and consequently the training of new artisans. To encourage and complete the training of these artisans, it would be useful for each one to have a manual where all the techniques of horn working are described. This is the purpose of this publication.
We have chosen the terra "homer" to denote an artisan who makes objects in horn. This term, which is to be found in English dictionaries, has fallen into disuse. It would seem appropriate to revive it in this English version of the manual.
A.S. Bhalla,
Chief,
Technology and Employment
Branch
|
| |||||||||||||||||||||||||||||||||||
Small-Scale Horn Processing (ILO - WEP, 1988, 104 p.)
CHAPTER I. HORN AND ITS PREPARATION
Throughout this book, all measurements in the diagrams that are not specified are in mm.
1. Supply
Bovid horn is an abundant raw material in many developing countries. Artisans usually obtain their supplies from slaughterhouses or from the countryside where many animals are slaughtered by their owners. In many instances, too, unused horns may be seen lying in the streets and squares and on waste land in large numbers.
The collection of horn could be very easily organised by designating one person in each village to be responsible for the purchase of horns from the slaughterhouse and their storage in a damp, dark place before they are despatched to horners. A small-scale intermediate market would thus be created that would generate employment but would have little effect on the price of manufactured objects, as the cost of untreated horn accounts for a very small proportion of the total price of a finished object.
2. Horn varieties
The two horns of a particular animal are virtually identical. Quality, size and colour may vary, however, from one animal to another. The largest horns measure approximately 10 cm in diameter at the base and 50 cm in length (figure I.1).

Figure I.1: Bovid horn
Artisans usually prefer to use horns with a base diameter of over 6 cm and a length of more than 17 cm. These may be of a uniform colour: black, white, yellow or red; or mottled and veined, white or yellow, with black or red markings, which give the horn a tortoiseshell appearance.
3. Extraction of cores
After the animals are slaughtered, horn cores are sawn off flush with the forehead. Figure I.2 shows a section of horn after slaughter, as it is supplied to the horner. The first operation consists in extracting the core after having destroyed the ligaments which attach it firmly to the horn.
There are two extraction techniques: one is extremely simple, slow and somewhat unhygienic but economical. It consists of allowing the ligaments to rot by storing the horn in a damp, dark place for a long period of time.
The other technique is much quicker and consists of soaking the horns in cold water for two to three days in a vertical position, with the tip pointing downwards (figure I.3) to allow the gases that form between the core and the hollow horn to escape.

Figure I.2: Cross-section of a horn

Figure I.3: Soaking of horns
After being removed from the water, the horn is boiled for one hour in a vertical position, tip downwards, as shown in figure I.4. The core may then be removed by hand. If necessary, it can be more easily detached by lightly tapping the external surface of the horn with a wooden mallet (figure I.5).
The core can be sold to producers of animal feed or fertiliser.
4. Cleaning of horns
To prepare horns for processing, their external surface simply needs to be washed in cold water containing a little detergent. The remains of ligaments adhering to the inside of the horn may be removed by swabbing with a long-handled brush or mop while keeping the inside full of soapy water (figures I.6 and I.7). Horns should not be washed in hot water as this dissolves the keratin and reduces the lustre of the horn when polished.

Figure I.4: Boiling of horns

Figure I.5: Removal of the core

Figure I.6: Cleaning the inside of a
horn

Figure I.7: Cleaning equipment -
Long-handled brush

Figure I.7: Cleaning equipment -
Long-handled
mop
|
| ||||||||||||||||||||||||||||||||||||||||
Small-Scale Horn Processing (ILO - WEP, 1988, 104 p.)
CHAPTER II. CUTTING OF HORNS
1. Sawing
The most commonly used method of cutting horn is cold sawing. Fine-toothed blades are used to avoid flaking. Blades used for cutting metal are the most suitable, preferably those intended for soft metals as they are cheaper and less brittle.
All the saws illustrated here were designed for a specific purpose. However, saws may be suitable for several cutting operations. All these cases will be examined in detail in the following paragraphs. A well-equipped and rationally organised workshop should possess at least one of each type of saw, but every artisan will select the type of saw that best corresponds to his or her needs and financial means. In the following diagrams, the inside of the horn is represented by a dotted line. The outline of the shapes to be cut, carved or engraved should be marked in soft-lead pencil on light coloured horns and in white chalk on black horns.
2. Cutting along the length
A hacksaw (figure II.1) is used for cutting along the side of a horn while leaving the opposite side intact.
This sawing method should only be used on the convex middle section of the horn, as the figure shows, to prevent the saw-end from damaging the horn-tip.
The pistol-grip handsaw shown in figure II.2 is indicated for longitudinal cutting of the horn from any angle. In addition, this type of saw is very economical as broken hacksaw blades can be used.
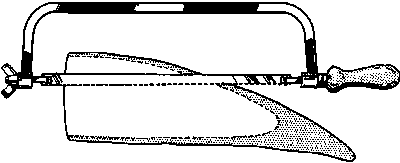
Figure II.1: Hacksaw
A jigsaw, as shown in figure II.3, may be used for straight cuts through the widest part of the horn, where the internal diameter is large enough for the blade to reach its lowest point without coming into contact with the opposite side of the horn.
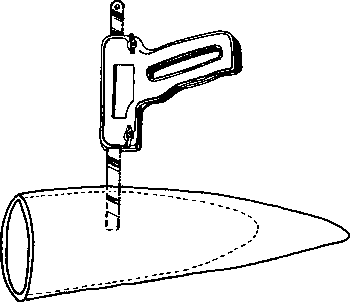
Figure II.2: Pistol-grip handsaw
A hacksaw may be used when the horn is to be cut through its diameter, by applying the blade at right angles to the clamping device, as shown in figure II.4. In a mechanised workshop, this operation can be carried out rapidly using a bench band saw, as shown in figure II.5.
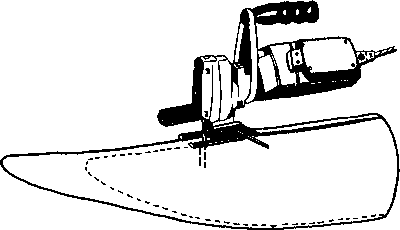
Figure II.3: Jigsaw
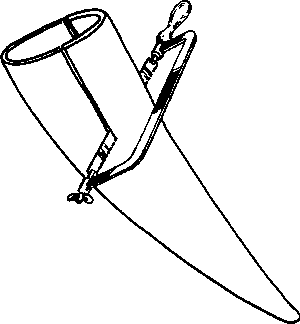
Figure II.4: Longitudinal cut with
hacksaw

Figure II.5: Bench band saw
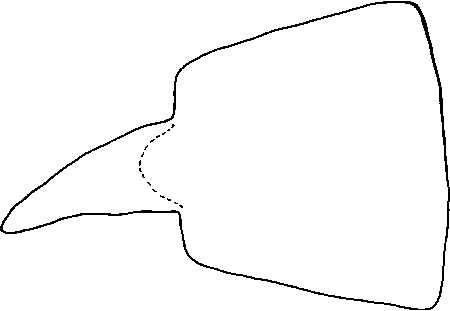
Figure II.6: Straight cut
When the horn is flattened, as shown in figure II.6, straight cuts can be made by a hacksaw, a pistol-grip hand-saw, a jigsaw or a band saw.
3. Cross-cutting
Partial or complete cross cuts, as in figure II.7, may be made with either a hacksaw or a band saw.
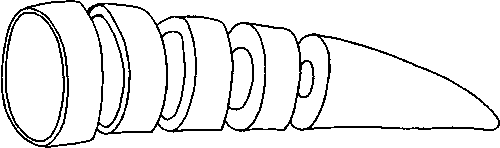
Figure II.7: Cross
cutting
4. Bow sawing
Curved cuts in a flattened horn, such as those in the outline of a salad spoon in figure II.8, may be made with a bow saw using an abrasive wire as a blade (figure II.9).
5. Cutting by drilling a series of holes
Owing to the position or shape of the cut to be made, it is not always possible to use a saw, as in the case of the feet of a heron, shown in figure II.10. To cut out such shapes, a series of holes must be drilled along the line required for the off-cut in a section of waste horn. (See figure X.2 for the finished model.)
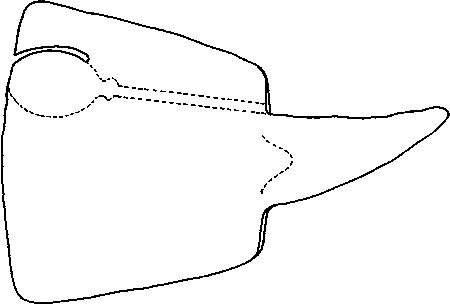
Figure II.8: Curve cutting
Figure II.9: Bow saw
Figure II.10: Cutting by drilling a
series of holes
The diameter of the holes may vary from one cut to another. If the diameter is too small, it will be necessary to make a large number of holes. If it is too large, the edge of the cut will be too rough. In most cases a drilling diameter of 5-6 mm is recommended.
6. Discs and ring blanks
Discs, such as those used in the production of buttons, can be cut rapidly with a bit of the type illustrated in figure II.11. Ring blanks can be drilled and cut in a single operation using a bit of the type shown in figure II.12. These two types of bit can be used with a hand drill or an electric drill.
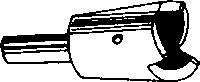
Figure II.11: Bit used to cut discs
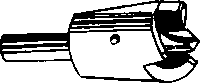
Figure II.12: Bit used to cut ring
blanks
|
| ||||||||||||||||||||||||||||||||||||||||
Small-Scale Horn Processing (ILO - WEP, 1988, 104 p.)
CHAPTER III. WORKING OF HORN
1. The workbench
A wooden workbench is suitable for working horn. It should be equipped with a wooden vice, a fitter's vice and a bench clamp. The wooden vice is used for holding untreated horns. The fitter's steel vice has parallel jaws and is used for holding pieces of horn while they are being worked. The clamp is used to secure untreated or flattened horns firmly to the bench. It should have an eccentric grip to avoid splintering the horn.
A workbench with its fittings is shown in figure III.1.
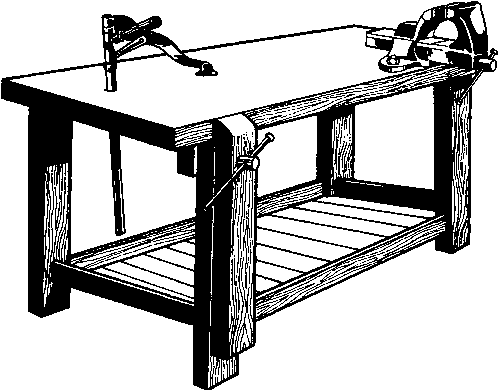
Figure III.1: Workbench with
fittings
2. Drilling
Twist drills used for drilling soft metals are suitable for working horn (figure III.2). A set of 25 drills ranging from 1 to 13 mm at 0.5 mm intervals (figure III.3) is usually sufficient. The drills can be used on a hand drill (figure III.4) or a low-powered 300 to 350 W portable electric drill (figure III.5) which can be clamped to a small bench stand, as shown in figure III.6. A small parallel-jaw vice (figure III.7) is very useful for securing pieces to be drilled to the bed plate.

Figure III.2: Twist drill
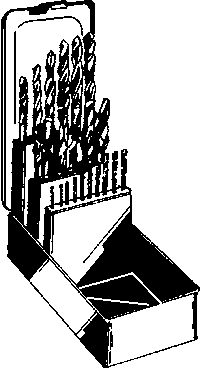
Figure III.3: Set of twist drills
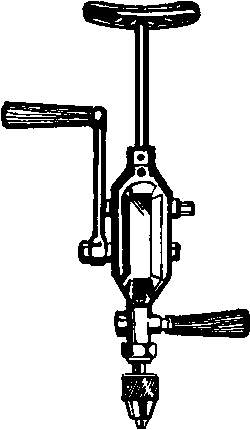
Figure III.4: Hand drill

Figure III.5: Portable electric
drill
3. Filing
Filing is done with wood files. The three types shown in figure III.8, which are 200 mm long, are perfectly adequate in most cases. Two sets are necessary: one with large teeth for making the rough model and another with small teeth for finishing before polishing.
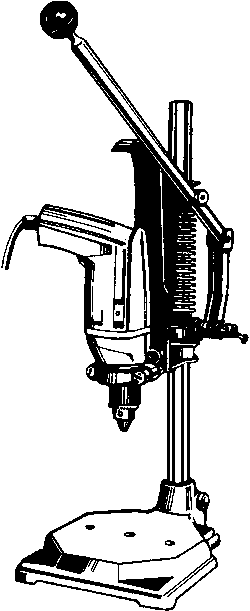
Figure III.6: Bench stand

Figure III.7: Parallel-jaw vice
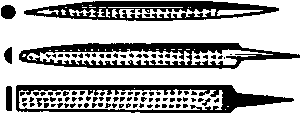
Figure III.8: Wood
files
4. Engraving and carving
When a good deal of material has to be cut away in order to rough out an object in the solid part of the horn, artisans use a bill-hook, as illustrated in figure III.9.
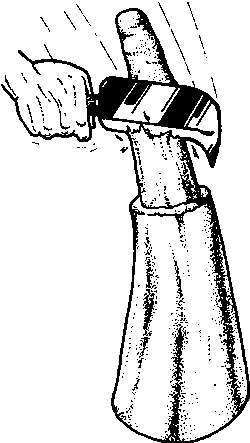
Figure III.9: Bill-hook
Horn may be carved manually using chisels, mortises and gouges for wood carving, such as those presented in figure III.10. As it is not necessary in most cases to go much below the surface of the horn and as horn is relatively soft, light pressure is applied to the tool handle manually or the handle top is tapped with the heel of the hand or with a wooden mallet (figure III.11).

Figure III.10: Chisels, mortises and
gouges for wood carving

Figure III.11: Wooden mallet
In a semi-mechanised workshop, carving may be carried out using small milling cutters, such as those illustrated in figure III.12. These cutters are mounted on a small portable milling machine, as shown in figure III.13.
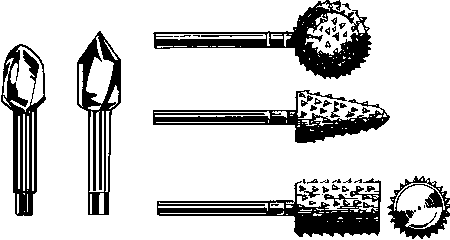
Figure III.12: Series of milling
cutters
On the milling machine, the electric motor (A) provides the power to rotate the cutter through a transmission cable in a flexible sheath (B). A milling spindle (C) enables the cutter to be held and directed manually during milling. The motor is switched on and off by means of a pedal (D). The horn should be firmly held by a vice or clamp during milling, but it may in some cases be held by hand when it is only the surface that needs to be worked. If no motor is available, the flexible shaft may be connected to an electric drill.

Figure III.13: Portable milling
machine
5. Turning
Horn may be worked on a wood or metal lathe. Cutting speeds, feed operations and cutting tools are similar to those used in working hard wood.
Horn may be turned using a loose head between stocks or by a combined method (mandrel on one side and tail-stock on the other), depending on the section to be worked and the type of turning operation required. In mounting a solid horn section only, the horn can be held safely by a mandrel, or between stocks or both. In mounting a hollow section, or in drilling, only a mandrel should be used.
In order to hold the piece tightly when using a mandrel, protective jaws previously milled to the shape of the horn should be used. If, however, a piece of both hollow and solid horn is to be worked, it may be held either with a mandrel or with mandrel and stocks, the solid section being held at its end by the tail-stock. Whenever a tail-stock is used, a central hole must be drilled (figure III.14) with a centre bit (figure III.15) at the end of the horn held by the tail-stock. Except in cases where short lengths are to be used, the horn must be heated and straightened before being mounted on the lathe. A brilliant finish can be obtained by polishing the horn on the lathe with oiled sandpaper.
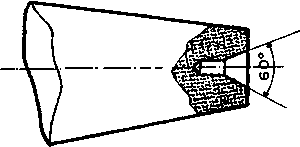
Figure III.14: Drilling a central
hole

Figure III.15: Centre bit
The mounting shown in figure III.16 is easy to do and enables the outside of a whole horn to be turned on the lathe while being held between stocks. The drilled hardwood corner allows the horn to be fixed on the tip of the headstock. This type of mounting is particularly recommended for the rapid cleaning and polishing of untreated horn.
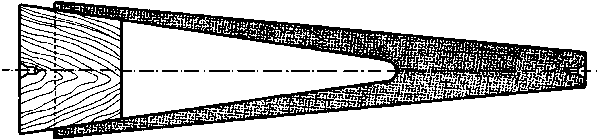
Figure III.16: Lathe work on a horn
held between
stocks
6. Thread cutting
Screws and nuts can be made from horn, using taps (figure III.17) and dies (figure III.18) which are generally used for metal-thread cutting.

Figure III.17: Tap
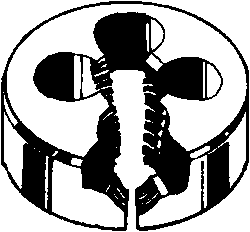
Figure III.18: Die
A tap wrench (figure III.19) and a die stock (figure III.20) are essential for turning taps and dies by hand.

Figure III.19: Tap wrench

Figure III.20: Die stock
To make a screw, the external diameter of the horn, before threading, is taken to be equal to the diameter of the screw. It is different in the case of tapping: the diameter of the holes to be drilled before tapping is given in table III.l. The thread and screw dimensions given are those of the International Organization for Standardization (ISO).
Table III.1: Diameter of holes to be drilled before tapping (mm)
|
Screw diameter |
3 |
4 |
5 |
6 |
8 |
10 |
12 |
14 |
16 |
18 |
|
Screw thread |
50 |
70 |
80 |
100 |
125 |
150 |
175 |
200 |
200 |
250 |
|
Diameter of holes to be drilled before tapping |
2.4 |
3.2 |
4 |
4.8 |
6.5 |
8.2 |
10 |
11.6 |
13.6 |
15 |
|
| |||||||||||||||||||||||||||||||||||||||||||||
Small-Scale Horn Processing (ILO - WEP, 1988, 104 p.)
CHAPTER IV. SHAPING
1. General
Heating makes horn malleable for purposes of curving, folding and stamping. These operations still present difficulties, however, as horn, even when well heated, remains fairly resistent to shaping. It still has a tendency to revert to its original shape. Consequently, horn products should not be washed in hot water, especially long pieces such as salad servers, ladles, spoons and so on.
2. Heating
Among horners the most common method of heating horn is over a fire, particularly a wood fire which produces long, wide flames that cover the horn. Moreover, wood is plentiful and cheap even in the remotest parts of the bush. A candle flame may be used for heating small pieces. Gas or hot air are used in modern workshops. Small finishing touches may be made over the fire, after the horn has been polished. In this case, the horn should be held away from the flame, though this lengthens the heating time. Horn should be heated and shaped before polishing, as exposure to flame causes the keratin to sizzle and the surface to spoil. Experience has shown that little damage is done if the horn is kept moist throughout heating by being immersed in water at regular intervals. The section of horn to be shaped should be run lightly and continuously over the flame, as shown in figure IV.1. Prolonged holding of horn in the same position causes overheating which spoils its texture and appearance, even after polishing.
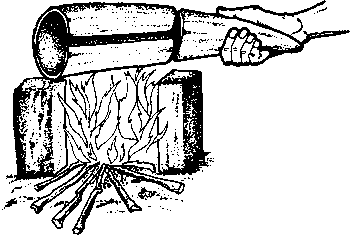
Figure IV.1: Heating a
horn
3. Straightening
Horns are naturally curved and straightening may be necessary for the manufacture of certain objects. To straighten a hollow horn section, it is first necessary to fix it while still hot to a post set securely in the ground and to pull or push it in the opposite direction to the curve (figure IV.2).
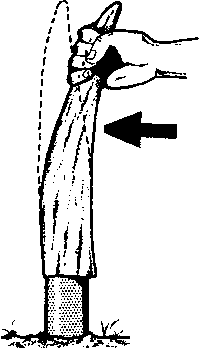
Figure IV.2: Straightening a horn
attached to a post
The solid horn section can also be heated and straightened by pushing it laterally by hand, the unheated hollow section being held securely in a vice (figure IV.3). To prevent the horn from bending in the opposite direction as a result of the hand pressure while it is being straightened, the straightened section is made rigid by moistening it with water. The horn tip is straightened by being heated and tapped with a wooden mallet.
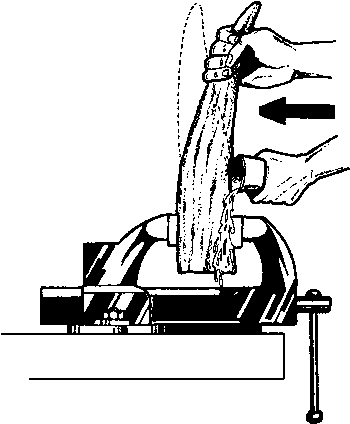
Figure IV.3: Straightening a horn
held in a
vice
4. Opening the hollow section
To flatten a hollow horn, it must first be opened by a cross cut (figure IV.4) at the point where the side of the hollow section becomes thicker. The cut is made not across the entire width of the horn but only up to the inner surface of the hollow section. A longitudinal cut is then made (figure IV.5) along the entire length of the hollow section.
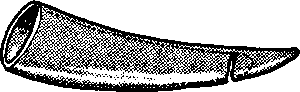
Figure IV.4: Cross cut
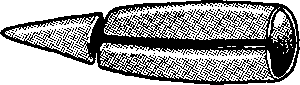
Figure IV.5: Longitudinal cut
The hollow section is heated on both sides of the longitudinal cut. The opposite side of the hollow section must remain straight and rigid when the horn is opened. When the heated section of the walls has softened, the horn must be placed on a post fixed firmly in the ground or on a spindle held in a vice and pushed, as shown in figure IV.6. The hollow section will now open easily. Care must be taken to see that the horn is hot enough to be malleable as the hollow section will otherwise crack and be unusable.
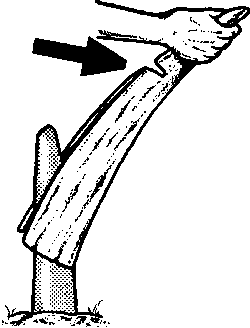
Figure IV.6: Opening the hollow
section
5. Flattening the hollow section
Once the hollow section has been opened, the wall is flattened while still hot by being pressed down with the foot (figure IV.7) or tapped with a wooden mallet. Flattening is completed by placing the horn, while still hot, in a wooden vice and/or tapping it with a wooden mallet.
If the hollow section is to be flattened for the manufacture of buttons, spoons, and so on, whose width is less than half the circumference of the hollow section, the horn should be cut as indicated in figure IV.8. It will then be easy to flatten the two hollow section halves by heating them and gripping them tightly between the jaws of a wooden vice.
6. Bending and folding
A small piece of horn may be curved by hand by heating it, as shown in figure IV.9.
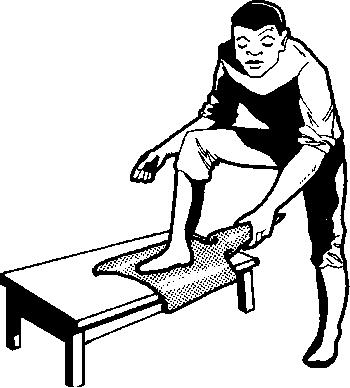
Figure IV.7: Flattening the hollow
section
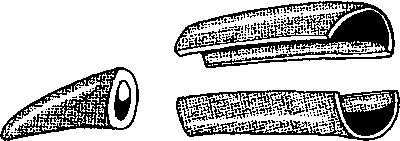
Figure IV.8: Cutting the horn
For bending, a candle flame (figure IV.10) provides a pin-point source of heat which enables the radius of curvature of the bend to be reduced to a minimum.

Figure IV.9: Heat bending
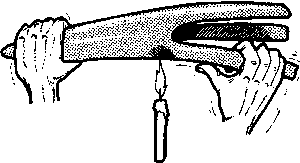
Figure IV.10:
Folding
7. Stamping
To stamp a flat piece of horn it must be heated until it is soft and clamped firmly between a stamp and a die of the required shape.
This technique may be illustrated by a specific example. Stamping is most commonly employed by artisans for shaping the hollow part of a spoon (see figure IX.4). Figure IV.11 shows a rough model of a spoon made from flattened horn. The flat end is to be stamped to form the hollow of the spoon.
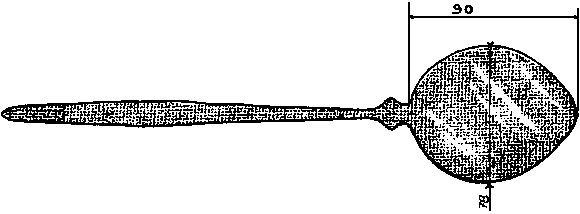
Figure IV.11: Outline of spoon cut in
flattened horn
Figure IV.12 shows an adjustable vice which can be used as a stamping press. A stamp and die (figure IV.13) are mounted between the jaws of the vice (figure IV.14). The convex form of the stamp must be exactly the same as the inner shape of the hollow part of the spoon to be made, while the concave form of the die must be equally identical with the external shape of the hollow part of the spoon. Two sliding lugs are used to align the stamp and die correctly during the stamping operation. To be stamped, the flat end of the model simply has to be heated to soften it, then gripped tightly between stamp and die. When only a small number of objects is required, the stamp and die used may be cut in hardwood such as rosewood. For larger batches, the stamp and die should be made of a material that is more resistant than wood, such as sand-cast aluminium alloy. This technique may be used readily in certain countries where a large number of artisan-founders manufacture kitchen utensils (pots, plates, ladles, spoons, etc.) from aluminium scrap. Other objects can be made on the same principle, from flattened horn, all that are needed being stamps and dies of the required shape.
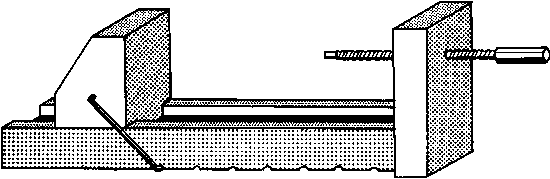
Figure IV.12: Adjustable vice
Figure IV.13: Stamp and die
Figure IV.14: Mounting stamp and
die
|
| |||||||||||||||||||||||||
Small-Scale Horn Processing (ILO - WEP, 1988, 104 p.)
CHAPTER V. POLISHING
1. Trimming
To make horn shiny it must be trimmed and polished. The trimming of the convex parts does not present any problems. Wood rasps or coarse sandpaper may be used for this.
Manual scraping with sandpaper is a long and tedious operation. A well-equipped workshop will use a sanding machine, such as that shown in figure V.1, fitted with a supple sanding head and coarse sandpaper discs.
Figure V.1: Sanding machine
Removal of rough areas in concave parts of the horn is a more complex task as rasps and sanding discs cannot reach the hollow parts. Care must be taken to smooth rough areas while the horn is flat, i.e. before bending or stamping.
2. Sanding
Sanding of the convex parts of the horn is carried out with sandpaper, in the same way as trimming. Sanding of concave parts of engravings and carvings should be carried out with a scraper, as shown in figure V.2. The scraper can easily be made from woodsaw blade sections.

Figure V.2:
Scraper
3. Polishing
The horn is first polished by vigorously rubbing it with extra-fine sandpaper that has first been coated with mineral oil or soap, either manually or with a sanding machine.
A better shine is obtained by vigorously rubbing the horn by hand with a soap-impregnated chamois leather sprinkled with rice-husk powder, which is an excellent abrasive because of its microscopic silica grains. Commercial metal polishes in paste or liquid may also be used.
Polishing by hand, like trimming, is a time-consuming and tedious operation. It can be considerably shortened by using a sanding machine with polishing pads (figure V.3) or felt pads mounted on a bench sanding lathe (figure V.4). For machine polishing, the polishing and felt pads should be impregnated with soap, rice husk powder or metal polish.

Figure V.3: Sanding machine with
polishing pad

Figure V.4: Sanding lathe with felt
pads
|
| |||||||||||||||||||||||||||||||||||||||||||||
Small-Scale Horn Processing (ILO - WEP, 1988, 104 p.)
CHAPTER VI. RATIONAL USE OF HORNS
1. General considerations
A rational use of boards or corrugated iron sheets presents no problems as they are uniform in size and dimensions. The same cannot be said of horns, which differ in size, shape and colour. It is therefore not possible to formulate a general rule for the rational use of horns. We will limit ourselves to giving a few examples of manufacture of simple everyday objects. For each new model created, it will be up to the artisans to find the most economical way of producing the object that is compatible with the shapes required and the manufacturing and assembly conditions. A systematic approach will enable the artisan to economise both in raw materials and in the amount of time required to work and shape horns.
2. Buttons
Any section of horn can be used to produce buttons, as shown in figures IX.1 and IX.2. Buttons may be cut from a flattened hollow horn section, as illustrated in figure VI.1. Smaller buttons are cut from areas close to the base of the horn where the walls are thinnest. Larger and thicker buttons should be cut progressively towards the solid section of the horn. Very large buttons may be made by cross-cutting the solid section of the horn, as shown in figure VI.2. This method enable buttons of standard thickness to be obtained.
Figure VI.1: Cutting buttons
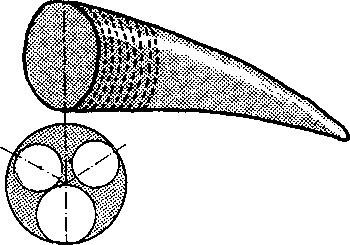
Figure VI.2: Longitudinal cutting of
buttons
3. Salad servers and spoons
In the salad set illustrated in figure IX.4, the fork differs from the spoon only in that prongs have been cut out of it. This operation is effected only after the flat end of the rough model has been given a concave shape. An identical spoon and fork can thus be obtained (figure VI.3).

Figure VI.3: Cutting forks and spoons
If the horn to be used is not long enough, the handles must be cut along the whole length of the hollow section of the horn. Tea spoons, salt spoons and syrup spoons (figures IX.5 and IX.6) may be made from off-cuts, as shown in figure VI. 3.
4. Bracelets and combs
The bracelet referred to in Chapter X, section 1, and the hair comb described in Chapter IX, section 3, are made from rings cut in the hollow section of the horn, according to the method indicated in Chapter II, section 3.
Depending on the diameter and thickness required, rings are cut either from the base of the horn, which is larger in diameter with a thinner wall, or from the area close to the solid section, which is smaller in diameter but with thicker walls.
Rings cut in the hollow section of horn are used for the manufacture of bracelets because of their similarity of shape. Surprisingly, however, such rings are also suitable for the manufacture of flat combs since, in order to ensure that the teeth are strong, they must be cut parallel to the horn fibres, i.e. along the length of the horn.
To manufacture a horn comb, it is first necessary to cut a ring in the hollow section of the horn. The width of the ring should be slightly greater than the desired width of the comb to allow for trimming and polishing. The perimeter of the ring must be longer than the desired length of the comb. The ring is then split along a line to allow flattening into a rectangular shape, from which the comb is made, as indicated in Chapter IX, section 3.
Solid horn sections may be used to produce buttons or knobs and handles, as shown in sections 1 and 5 of Chapter IX.
5. Knobs and handles
To produce knobs and handles, advantage can be taken of the conical form of the horn to cut knobs and handles of different sizes from one and the same horn, the smallest being manufactured from the tip (see figure VI.4).
This figure provides an example of a combination of knobs and handles made from the same horn. A number of other combinations are possible, depending on the design and size of the desired articles.
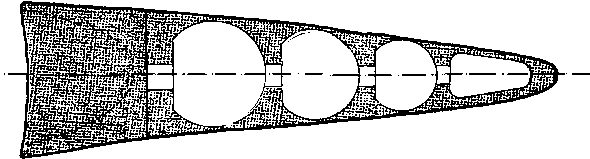
Figure VI.4: Cutting knobs and
handles
6. Heron
The stylised heron shown in figure X.2 is a decorative item for whose production a whole horn is needed. It is cut out in a single piece (see figure VI.5).

Figure VI.5: Outline of a heron
The curve of the horn gives the heron its slender and graceful form. The heron is the best example of the rational use of a horn. Not only are there very few off-cuts, but the slightly curved shape is well adapted to the stylised lines of the heron.
7. Crustacean
As in the case of the heron, an entire horn is necessary to make a stylised crustacean, as shown in Chapter X, section 3.
The crustacean is made of various elements; body, claws, antennae, legs and tail fan, which are cut out separately (see figure VI.6).
The body is taken as a single piece from the solid horn section. The eight legs, four antennae, two claws and the tail fan are cut from the hollow section.

Figure VI.6: Outline of a
crustacean
|
| ||||||||||||||||||||||||||||||
Small-Scale Horn Processing (ILO - WEP, 1988, 104 p.)
CHAPTER VII. ASSEMBLY METHODS
1. Bonding
Bonding is the easiest way of assembly. Most strong adhesives are suitable. Artisans in Madagascar prefer to use modern epoxy resin adhesives. The technique for bonding horn is the same as that used for bonding wood or iron. The pieces are first cleaned carefully with fine sandpaper. Then a very fine film of adhesive is applied to the two surfaces to be bonded. Finally, the two parts are pressed together until the adhesive has hardened. This process may take 24 hours. The parts may be held together by placing heavy objects on top of them, or they may be held in a vice or bench clamp. A well-equipped workshop should possess manually operated vices such as those shown in figures VII.1 and VII.2. The vice in figure VII.3 may be fixed to a table or shelf during the drying process. The vice in figure VII.1 may be replaced by a hardwood model, manufactured by a joiner, or even by a horn vice.

Figure VII.1: Manual vice
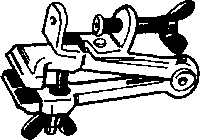
Figure VII.2: Manual vice
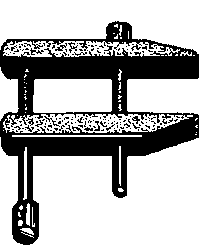
Figure VII.3: Bench
clamp
2. Joining
This method of assembly is commonly used by artisans, for example to mount a leaf on a branch (see figure VII.4).

Figure VII.4: Assembling a leaf
In order to make a joint, a cylindrical hole must be drilled in the support piece and the male end of the part to be mounted must be filed to the same nominal diameter. In the example given in figure VII.5, it is a leaf stalk. Parts may be assembled with a tight or loose fit. If a tight fit is required, the diameter of the male part should be slightly larger than that of the hole. The pieces must be forced together in order to obtain a rigid assembly. If the diameter of the male part is slightly smaller than that of the hole, the assembly will be loose. It may be made rigid by placing a small quantity of adhesive in the hole before assembling the parts.
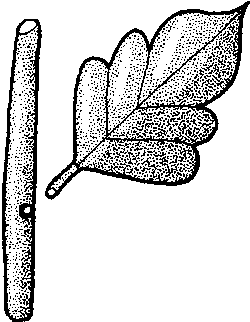
Figure VII.5: Example of
joining
3. Pinning
Pinning, known as pegging or dowelling in woodworking, allows rigid but dismountable joints to be made. Pinning is a form of joining as it consists of placing a pin or peg in a Pin, cylindrical hole drilled through the two parts to be assembled, which are joined together as shown in figure VII.6. The pin may be of horn, hardwood or metal. The nominal diameter "d" of the pin depends on the nominal diameter "D" of the male part.
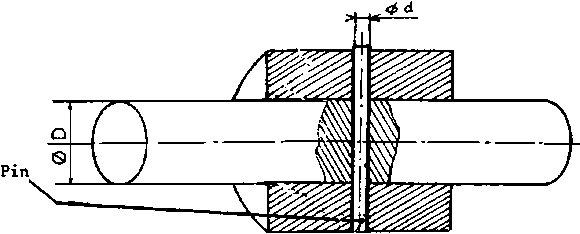
Figure VII.6: Example of pinning
|
D |
6 |
8 |
10 |
12 |
14 |
16 |
18 |
20 |
|
d |
1,5 |
2 |
2,5 |
3 |
3,5 |
4 |
4,5 |
5 |
It is possible to dismount the assembly by removing the pin with the aid of a pin-punch, such as that shown in figure VII.7.

Figure VII.7:
Pin-punch
4. Screw and nut assembly
We have seen in Chapter III that screws and nuts may be made from horn. The following paragraphs describe three particular techniques of threaded assembly, which can be very useful to horners.
Threading a screw is an easy task. The same screw will therefore be used in the three cases examined. The original feature of the method lies in the technique used for nut threading.
Figure VII.8 shows a screw-tipped rod which could, for example, be a lamp support screwing into a tap-threaded base. Figure VII.9 shows the two parts before they are screwed together. It will be seen that the base (the nut) is tapped through. This is usual when the nut component is not very thick. In this case, nut threading presents no problems.

Figure VII.8: Threaded screw
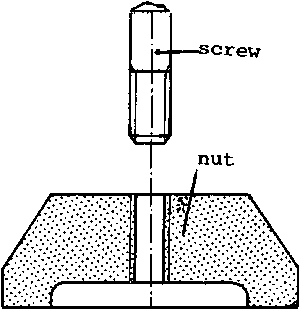
Figure VII.9: Parts before assembly
When the nut component is thicker, it need not be threaded through, but only to a depth sufficient to accommodate the screw. As it is difficult to thread to a precise depth, it is preferable to thread the nut component to a depth slightly greater than the length of the screw. Before threading the nut component is, in any case, drilled through (figure VII.10).
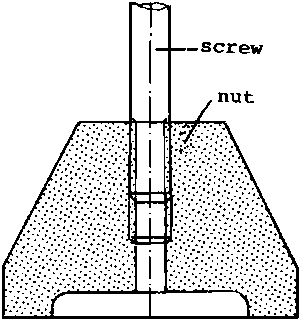
Figure VII.10: Nut threading
Figure VII.11 illustrates the depth of screw cutting recommended for this type of assembly (in mm).
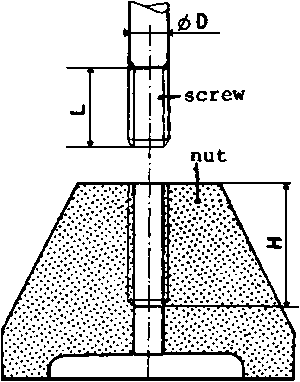
Figure VII.11: Parts before they are
assembled
|
� D |
3 |
4 |
5 |
6 |
8 |
10 |
12 |
14 |
16 |
18 |
|
L |
5 |
6 |
8 |
9 |
12 |
15 |
18 |
21 |
24 |
27 |
|
H |
L+2 |
L+3 |
L+3 |
L+4 |
L+5 |
L+6 |
L+7 |
L+8 |
L+8 |
L+10 |
In figure VII.12, the hole is neither drilled nor threaded completely through. This is known as recessed threading. It is used especially when the surface of the nut component opposite the surface which receives the screw must be, for aesthetic reasons, free of drilled or threaded holes. This technique is also used when the nut component is too thick to be completely drilled through.
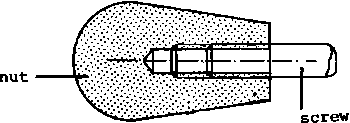
Figure VII.12: Recessed threading
Figure VII.13, which shows the parts before they are mounted, indicates the recommended depths of drilling and threading according to the screw diameter.
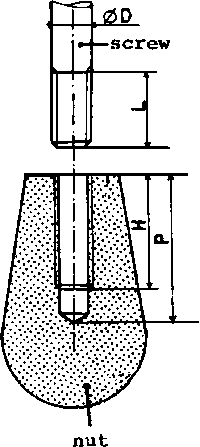
Figure VII.13: Parts before they are
mounted
|
� D |
3 |
4 |
5 |
6 |
8 |
10 |
12 |
14 |
16 |
18 |
|
L |
5 |
6 |
8 |
9 |
12 |
15 |
18 |
21 |
24 |
27 |
|
H |
L+2 |
L+3 |
L+3 |
L+4 |
L+5 |
L+6 |
L+7 |
L+8 |
L+8 |
L+10 |
|
P |
L+5 |
L+6 |
L+8 |
L+10 |
L+12 |
L+14 |
L+16 |
L+18 |
L+20 |
L+22 |
|
| |||||||||||||||
Small-Scale Horn Processing (ILO - WEP, 1988, 104 p.)
CHAPTER VIII. DYEING OF HORN
1. Technology of dyeing
While dyeing is usually carried out in such a way as to obtain uniform tints, in some cases, like that of horn, differences in colouring are required.
To obtain a range of bright colours, the fat must first be removed from the horn by placing the horn in a bath of warm water to which 10 g of washing soda has been added. The horn may then be coloured by synthetic dyes, in the same way as for dyeing bone, but in a more concentrated and cooler solution.
A jet-black colour can be obtained by soaking the horn for several hours in the following solution:
|
Nitrate of mercury |
20 g |
|
Water |
100 g |
The salts of mercury fixed in the horn are then sulphurated by immersion in the following solution:
|
Liver of sulphur |
100 g |
|
Water |
1000 g |
The horn must finally be rinsed and left to dry.
To give the horn a white colouring, the following must be homogeneously blended:
|
Red oxide of lead (minimum) |
30 g |
|
Quicklime |
50 g |
|
Caustic potash |
40 g |
|
Water |
200 g |
The horn is left to soak in this solution for about 20 minutes. It penetrates into the keratin impregnated with lead which sulphurises on contact with the sulphur. The horn should not be left in longer because it will become brittle and the surface will take on a powdery appearance. Objects made of horn are wiped after being removed from the bath. They are then put immediately into an acid bath containing water to which 250 g of hydrochloric acid have been added per litre. When the desired colour has been obtained, the objects should be dried in bran.
The tortoiseshell type of mottling is obtained by applying the following mixture to certain areas:
|
Quicklime |
20 g |
|
Litharge |
10 g |
|
Caustic soda |
10 g |
|
Water |
50 g |
The lead combines with the sulphur in the horn to form a black pigment.
|
| |||||||||||||||||||||||||||||||||||||||||||||
Small-Scale Horn Processing (ILO - WEP, 1988, 104 p.)
CHAPTER IX. MANUFACTURE OF USEFUL OBJECTS
1. Buttons
Figures IX.1 and IX.2 show two models of the most common clothing buttons. They differ only in regard to the number of holes in them.

Figure IX.1: Example of button

Figure IX.2: Example of button
As the thickness of the walls of hollow sections vary from one horn to another and from one end of the same horn to the other, it is not possible to obtain buttons of exactly the same thickness. This does not generally inconvenience buyers, who accept small variations in thickness. As an indication, the average thickness may be 1.5 mm for the smallest buttons and 3 mm for the largest ones. Buttons of medium thickness fall within these limits.
Buttons manufactured in small-scale units must be sewn by hand, as differences in thickness may impede the distribution of buttons in automated sewing-machines. It is essential to introduce mass production if the price of buttons is to remain competitive.
Horn discs are cut with a crown bit (figure II.11) mounted on a sensitive drill. The horn sheet must be polished before the discs are cut. A drilling device, preferably with a steel drill, is used to cut holes, as shown in figure IX.3. The horn disc is placed in the recess in the stand. The drill template, intended to guide the bit, is placed over the centring pins and rests against the discs. Once the first hole has been drilled, the positioning pin is placed through it to ensure that the axes of all holes are perfectly aligned during drilling.
It is essential to round off and polish button edges carefully and to trim the holes in order to ensure that rough edges will not cut the sewing thread.
Finally, buttons should be classified according to colour before being put on sale.
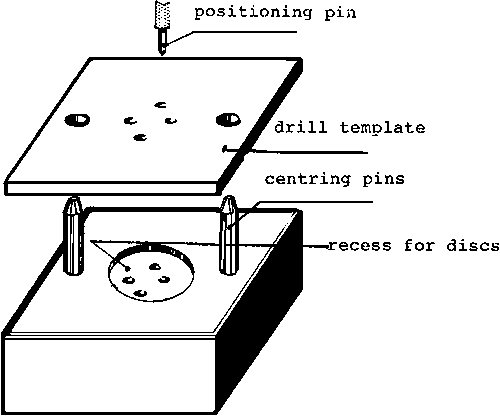
Figure IX.3: Drilling device for
cutting holes in
buttons
2. Salad servers and spoons of various kinds
Figure IX.4 shows salad servers of the kind commonly manufactured by artisans. Their size and shape are given by way of example, but homers can modify these according to their wishes or consumer tastes. In this example, the spoon and fork are the same, except for the piece cut away between the two prongs of the fork. As the piece is not cut off the fork until the concave ends of the models have been stamped, the fork and spoon are in fact identical.

Figure IX.4: Model for salad servers
The straight part of the spatula is cut by one of the methods for the rectilinear cutting of flattened horn (see Chapter IV, section 7). The length and width of the spatula end in the model should be a few millimetres larger than the desired length and width of the concave end to allow for finishing the edges with a rasp after the end has been stamped. To cut out the piece between the fork prongs a cylindrical drill should be used to make a hole at the inner end of the slit, then the sides of the slit should be cut with a bow saw. If this type of saw is not available, a straight cut should be made to obtain a narrow slit which can then be rounded off with a wood rasp.
The same method can be used to manufacture syrup spoons (figure IX.5) or small salt and pepper spoons (figure IX.6).
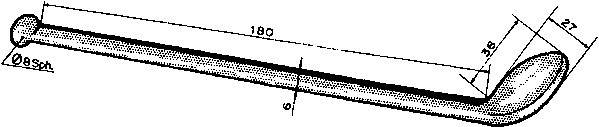
Figure IX.5: Syrup spoon
The outline of these two types of spoon is in the hollow horn. The cutting technique is similar to that used in the case of salad servers. The spatula end of the salt and pepper spoons is stamped in the same way as for salad servers, but the process is much easier as the spoons are small with shallow concave ends.
Syrup spoons are easy to manufacture as the spatula end is not stamped.
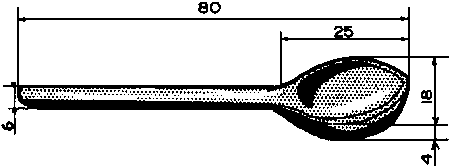
Figure IX.6: Salt and pepper
spoons
3. Hair combs
Hair combs are undoubtedly one of the most common articles made from horn. Plastics, and even certain metals, have been used as a substitute for horn in the manufacture of combs. It seems that the exclusion of horn from comb manufacture is largely due to the requirements of large-scale industrial production techniques which produce inexpensive items. Nevertheless, horn combs made by artisans are just as resistant as plastic combs. Furthermore, horn colours are so varied that two horn combs are never absolutely alike; this provides a choice that mass production cannot offer.
Figure IX.7 shows a classic type of hair comb, The sizes shown in millimetres are indicative only. Artisans may produce different types of combs varying in shape and size, but the technique is always the same.
As explained in chapter VI, section 4, combs are made from a ring cut in the hollow section of horn previously opened and flattened. The flattened piece of horn should be polished and given a gloss before the teeth of the comb are cut.
The teeth are cut one by one, using a hacksaw. It is a long and tedious process which requires considerable patience, care and skill. A skilled horner need not mark the teeth on the horn but will decide on the thickness while cutting them. He or she does this in two stages, sawing the teeth from one end of the comb to the middle and then from the other end to the middle. The centre tooth is generally thicker than the others. The teeth should then be carefully trimmed.

Figure IX.7: Cutting a
comb
4. Shoehorn
The term "shoehorn" is still popularly used, although this article is now produced in metal and plastic. The name dates back to the period when all shoehorns were made of horn.
To manufacture a shoehorn the horn simply has to be divided into two parts, as shown in figure IX.8. The inside of the curved section is then used as a shoehorn.

Figure IX.8: Cutting a shoehorn
Nowadays, the shape of the shoehorn has been slightly refined. Figure IX.9 presents a classic model. The natural curve of the horn provides the required shape and simplifies the production process. To make a shoehorn like this the external shape is cut in the interior curved part of a hollow horn, as shown in figure IX.10. The natural curve of this part of the hollow section is the same as that of the shoehorn. To complete the operation, a hole is drilled for hanging, and the surfaces are polished and given a gloss.

Figure IX.9: Classic model of a
shoehorn

Figure IX.10: Cutting out a
shoehorn
5. Knobs and handles
These articles are very useful as door, furniture or drawer handles. They are also used in industry mounted on various appliances and machines. Such knobs and handles are industrially made from bakelite, but this could be advantageously replaced by horn. The shapes and sizes indicated are those in use in European industry, so the objects made are interchangeable with industrially produced knobs and handles. Artisans may wish to modify the specifications in accordance with consumers' requirements (see figures IX.11 IX.12 and IX.13, all measurements are in mm).
Horn has to be straightened before knobs and handles can be manufactured. Pieces from the solid section of the horn are turned on a lathe by the method outlined in Chapter VI. They are then drilled and threaded by recessed threading.
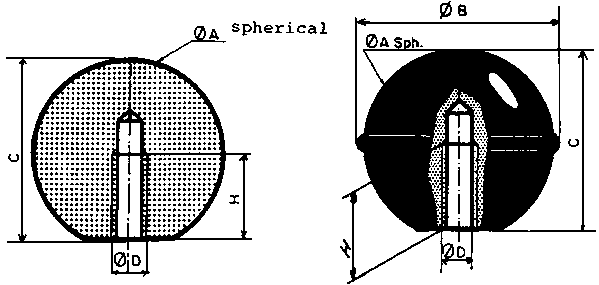
Figure IX.11: Knob or handle
|
�A |
�B |
C |
�D |
H |
|
10 |
11 |
9 |
M4 |
5 |
|
15 |
16 |
14 |
M5 |
8 |
|
20 |
22 |
18 |
M6 |
10 |
|
25 |
27 |
23 |
M8 |
13 |
|
30 |
33 |
28 |
M8 |
15 |
|
35 |
38 |
33 |
M8 |
15 |

Figure IX.12: Knob or handle
|
�A |
20 |
25 |
30 |
35 |
|
�B |
21 |
26 |
32 |
37 |
|
C |
14 |
17 |
21 |
24 |
|
�D |
M4 |
M5 |
M6 |
M8 |
|
E |
5 |
6 |
7 |
8 |
|
H |
8 |
9 |
12 |
15 |
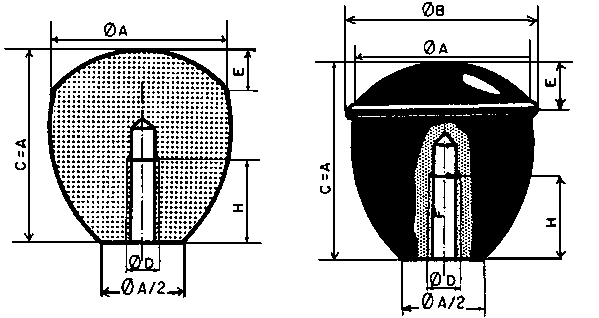
Figure IX.13: Knob or handle
|
�A |
20 |
25 |
30 |
35 |
|
�B |
21 |
26 |
32 |
37 |
|
�D |
M4 |
M5 |
M6 |
M8 |
|
E |
5 |
6 |
7 |
8 |
|
H |
9 |
11 |
13 |
17 |
6. Lamp
The lamp shown in figure IX.14 is a good example of an article that is both useful and decorative. Light passing through the translucent petals and leaves shows up horn markings in an effective manner. Figure IX.15 gives an exploded view of the components in assembly position. The letter assigned to each part corresponds to those of the diagrams with dimensions in figure IX.16. The three petals "A" are bonded to the top of the stem "C" and small pins are used to strengthen the assembly. The base of each stalk is bonded in the holes drilled for this purpose on top of the support "D". The tips "E" are plugged in and bonded in the ends of the feet of the support "D". The electric bulb socket is screwed into the threaded tube "F" which is itself screwed into the top of the stem.
The basic dimensions given in the detailed diagrams in figure IX.16 form a harmonious whole. The overall height of the lamp, after assembly, is approximately 450 mm. The three petals and the leaves are cut from the hollow section of the horn. The leaf veins are engraved. The stem and the tips made from the solid section of the horn are turned on a lathe. The whole length of the stem is drilled to enable the electric wire to pass through. The base is made partly from the solid body of the horn and partly from the hollow section. The feet ends are cylindrical in order to fit into the tips. If the lamp is being produced in large numbers, the external part of the support should be turned before the feet are cut and shaped. With the method illustrated in figure IX.16, the rough support can easily be set up on the lathe. Drilling and polishing can also be done on the lathe. The feet can be bent by candle heating. The threaded tube should preferably be of brass, bronze or aluminium alloy. If these metals are not available, it may be made from horn.
7. Wall light
The translucent yellow horn varieties, mottled or veined with red or black, give an attractive effect under lighting and by transparency. They are thus particularly suitable for making lamps (see figure IX.17).
The technique for making a wall light is given below as an example.
Making the lamp
- Select a horn about 50 cm in length.- Remove the base of the hollow section by cross-cutting with a saw; keep a length of horn of about 400 mm.
- Cut the central part of the hollow section to the dimensions given in figure IX.18 leaving a strap on the concave side of the horn curve.
- Open the upper part of the hollow section by sawing along a line drawn diametrically opposite the strap (figure IX.19).
- Open out the upper part of the hollow section by heating, keeping a slight curve (20 mm) and a camber (35 mm) to form a reflector (figure IX.20).
- Trim and polish the whole body of the lamp.
- Bend the base of the strap by heating the bend with a candle flame (figure IX.21).
- While the reflector is bent back, drill a 6 mm hole to allow for the passage of the electric wire (figure IX.22).
- Straighten the reflector by heating the bend with a candle flame (figure IX.23).
- Adjust the rear face of the wall light to the dimension indicated in figure IX.24.
- Drill two 6 mm holes at the points indicated in figure IX.25. The ends of the stalks will then be fitted into these holes.
- If necessary, put finishing touches to the polish.

Figure IX.14: Example of a horn lamp

Figure IX.15: Exploded view of parts
of the lamp in assembly position
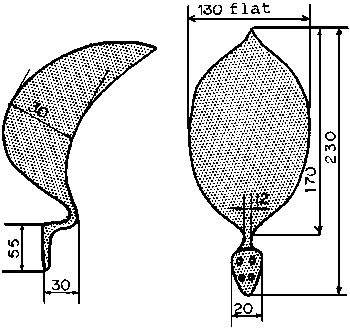
Figure IX.16: Details of parts of the
lamp - Part A
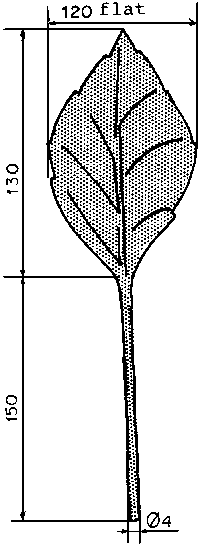
Figure IX.16: Details of parts of the
lamp - Part B

Figure IX.16: Details of parts of the
lamp - Part C

Figure IX.16: Details of parts of the
lamp - Part D
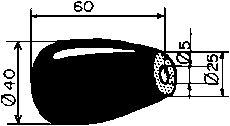
Figure IX.16: Details of parts of the
lamp - Part E
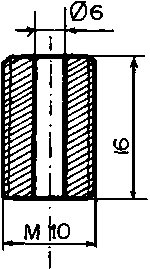
Figure IX.16: Details of parts of the
lamp - Part F

Figure IX.17: Wall light

Figure IX.18: Cutting the central
section
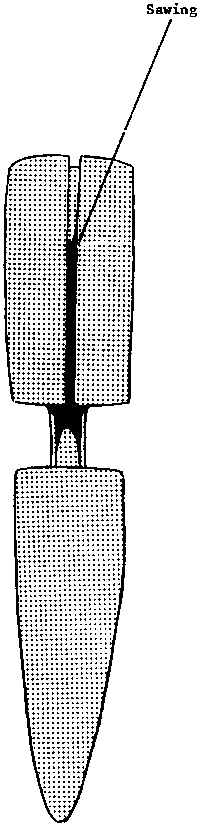
Figure IX.19: Opening the hollow
section by sawing
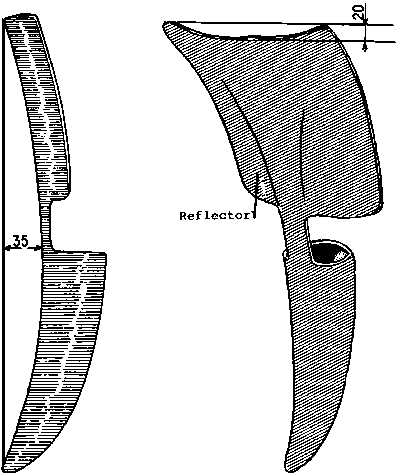
Figure IX.20: Shaping the reflector

Figure IX.21: Bending by heating
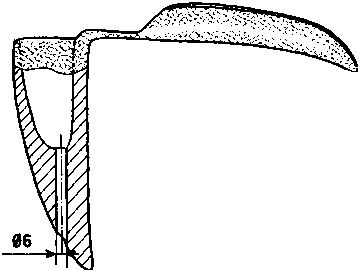
Figure IX.22: Drilling a hole for the
electric wire
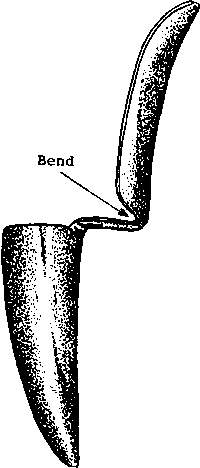
Figure IX.23: Straightening the
reflector
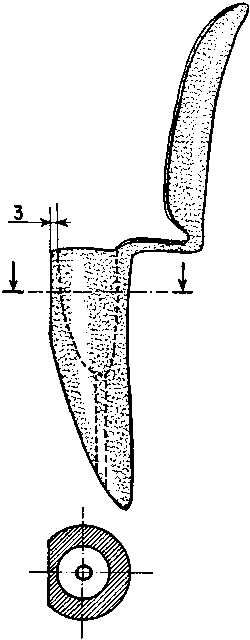
Figure IX.24: Adjusting the rear
attachment face
Making the support
- The support is made from a horn of the same size as that used for the body of the lamp.- Cross-saw the horn at the point where the outside diameter "D" is equal to that of the lower part of the body of the lamp (figure IX.26).
- Keep the upper hollow section which will be used later to make the leaves.
- Saw the sharp end of the horn lengthwise so that the cavity is split into two equal sections, while carefully preserving the symmetry of the outer curve of the horn in relation to the saw cut. The off-cuts will not be used in the manufacture of the rest of the lamp (figure IX.27).

Figure IX.25: Drilling holes for the
leaf stalks
- Flatten an area on the face opposite the sawn face and drill a 6 mm hole through the sides of the support at the point indicated in figure IX.28. The hanging bracket will be fitted into this hole. Trim and polish the support and give a gloss to it.

Figure IX.26: Manufacture of the
support
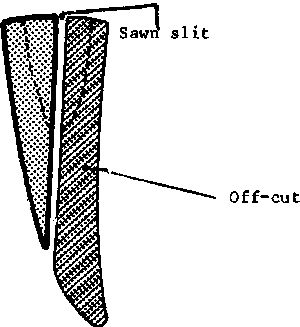
Figure IX.27: Sawing the sharp end of
the horn

Figure IX.28: Drilling a hole for the
bracket fitting

Figure IX.29: Dividing the hollow
section
Making the leaves
- Divide the retained hollow section into two equal parts (figure IX.29).- Flatten the two halves.
- Cut the leaves and leaf stalks to the dimensions given in figure IX.30. The leaf stalks must be cut in the direction of the horn fibre.
- Trim and polish the leaves and leaf stalks and give a gloss to them.
- Engrave the leaf veins (figure IX.30).
Screw-in adaptor
The threaded tube (figure IX.31) is used to adapt the form of the socket to fit into the body of the lamp. It is made of brass or aluminium alloy. It can also be made of horn, but will then be more fragile.
Auxiliary parts
Before mounting the wall light, some auxiliary parts that are shown in figure IX.32 have to be made:
Cap: In order to fit the contact socket securely to the body of the lamp, the cavity must be sealed with a cap made of horn or hardwood. It has a cylindrical shape and a thickness of about 15 mm. The cap is fitted into the cavity flush with the upper edge. A hole is drilled and tapped in its centre.Bracket fitting: This is a cylindrical bar 6 mm in diameter and equal in length to the width of the support. Its axis must be in the direction of the horn fibre.
Dowels: The flat surfaces of the support and the lamp body are glued together. For greater strength four 3 mm holes are drilled through the support and the lamp body to take small dowels made of horn or hardwood.
Assembly
Figure IX.32 shows the position of the various parts after assembly.
- The support and the lamp body are mounted as indicated above (using dowels).- The bracket fitting, the dowels and the cap are glued in their respective places.
- The ends of the leaf stalks are also glued in the holes drilled for that purpose. They should be welded by a candle flame so that the two leaves can be arranged harmoniously in front of the reflector.
- The adaptor is screwed into the cap and the contact socket is pressed against the cap.
Figure IX.33 gives a rear view of the assembled light.
Wall fitting
Figure IX.34 is a diagram of the wall fitting of the light.
A wooden or plastic dowel is driven into the wall. A screw is threaded into the dowel until the bracket fitting is squared with the screw and the back of the support is flat against the wall.

Figure IX.30: Dimensions of the
leaves
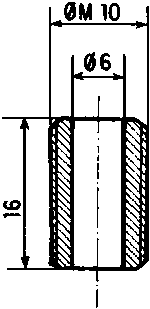
Figure IX.31: Threaded tube
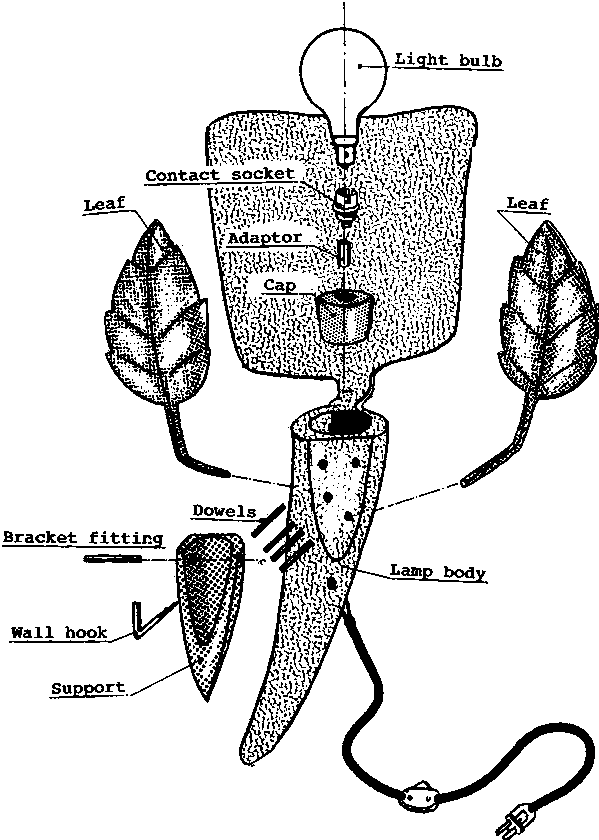
Figure IX.32: Auxiliary parts
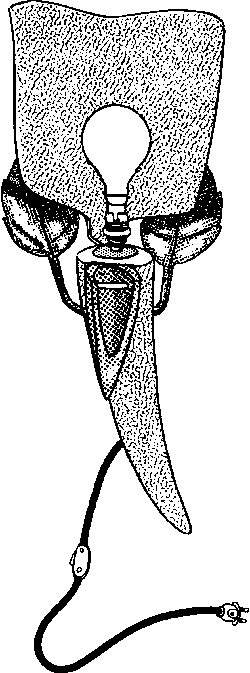
Figure IX.33: Rear view of the
assembled light

Figure IX.34: Wall fitting of the
light
|
| |||||||||||||||||||||||||||||||||||
Small-Scale Horn Processing (ILO - WEP, 1988, 104 p.)
CHAPTER X. MANUFACTURE OF DECORATIVE ITEMS
1. Bracelet
To make simple and decorative bracelets, it is preferable to use a variety of horn which resembles tortoiseshell in colour (figure X.1).
Bracelets are manufactured by cutting rings from the hollow section of the horn and splitting them to allow the hand to pass through. The external surface is bevelled during sanding and the edges are carefully trimmed.
Figure X.1:
Bracelet
2. Heron
The heron of the variety commonly known as the "cattle egret" is, in its stylised form, a very attractive ornament (figure X.2).
After ensuring a firm base by removing the irregular part of the base of the horn by cross-cutting, the head is fashioned from the solid section and the wings and feet are cut out. The wing markings and eyes are engraved.
Finally, the heron is sanded and polished.
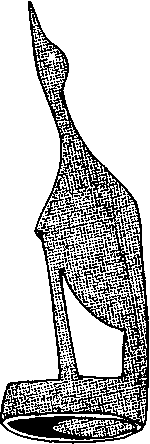
Figure X.2:
Heron
3. Crustacean
The crustacean shown in figure X.3 is an extremely decorative ornament. A single horn is sufficient to manufacture it. Some artisans may, however, prefer to use several horns, thus combining different colours in the same crustacean. Figure X.4 is an exploded view of the various parts of the crustacean, in position for assembling.
Claws "B" and "C", legs "D" and antennae "E" are bonded in holes drilled for this purpose in the body "A". The tail fan "F" is bonded into a slit cut at the rear of the body "A". The eyes "G" are generally made from round grains. If these are not available, they may be cut in horn, then bonded into depressions hollowed out in the front end of the body.
The diagrams in figure X.5 give the basic dimensions of the most complex parts.
It should be noted that the two claws "B" and "C" are symmetrical but not identical. They have the same dimensions.
The antennae are 5 mm in diameter at the point where they are bonded to the body. They become thinner towards the other end. Their overall length is approximately 250 mm. The legs have a diameter of 5 mm. Their total length is about 140 mm.
The veins and round markings on the tail fan and the rings on the tail are engraved in the horn.
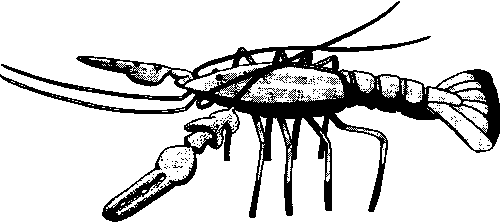
Figure X.3: Crustacean
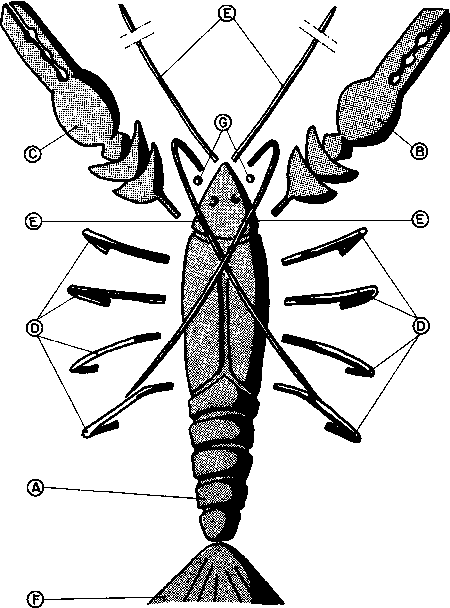
Figure X.4: Exploded view of parts of
the crustacean

Figure X.5: Dimensions of parts of
the crustacean - Part A
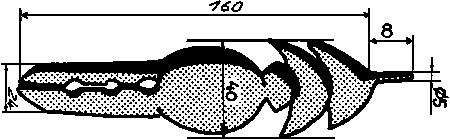
Figure X.5: Dimensions of parts of
the crustacean - Part B
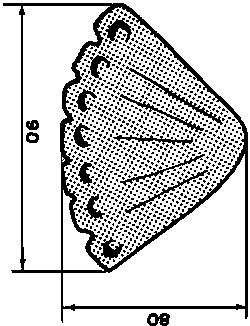
Figure X.5: Dimensions of parts of
the crustacean - Part
F
4. Arum lily
The arum lily shown in figure X.6 is fairly easy to manufacture.
The spathe is cut from both the solid and hollow horn sections, as shown in figure X.7. A hole is drilled at its centre to accommodate the flower end and the tip of the stem.
The flower in figure IX.8 is taken from the thick part of the hollow horn and is turned on a lathe. The leaves and stem are cut from hollow sections.
The stem is then rounded along its entire length. The diameter at each end should be 5 mm to allow for assembly. The leaf stalks are also rounded along their entire length. They should have a diameter of 5 mm at their ends for fixing to the base (figures X.9 and X.10).
As in the spathe, the base is made from both solid and hollow horn. Figure X. 11 shows the various stages by which it is made. The exploded view in figure X.12 illustrates the assembly of all components. All parts are bonded into their fixing holes.
5. Insects
Insects offer a range of subjects that can be very realistically reproduced in horn on a magnified scale.
Figure X. 13 shows a few examples of insects which, because of their forms, may provide inspiration to artisans wishing to offer their customers an original collection of horn articles. The collection can indefinitely be extended as 750,000 insect species have been identified in the world. Such a variety is an inexhaustible source of inspiration for homers.
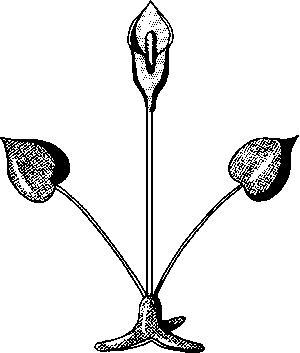
Figure X.6: Arum lily
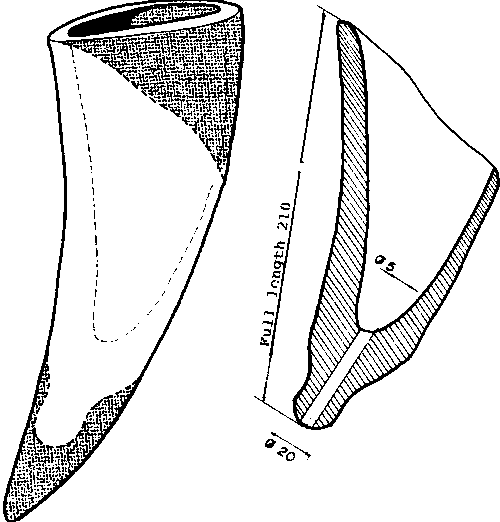
Figure X.7: Cutting the spathe
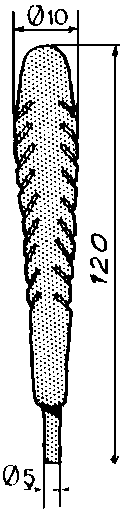
Figure X.8: Dimensions of the arum
lily flower

Figure X.9: Cutting the leaf and stem
of the arum lily

Figure X.10: Dimensions of the arum
lily stem

Figure X.11: Various phases in making
the base of the arum lily - Before bending

Figure X.11: Various phases in making
the base of the arum lily - Cutting
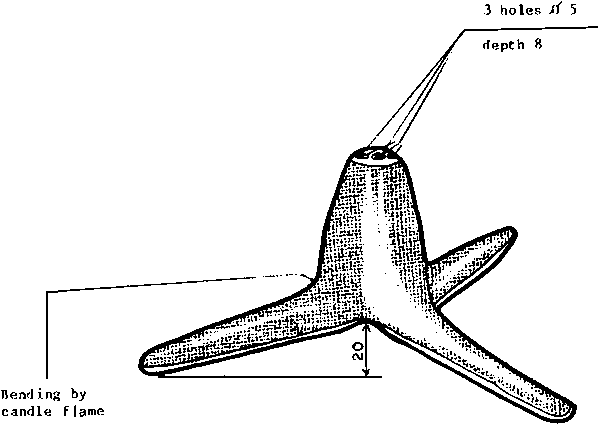
Figure X.11: Various phases in making
the base of the arum lily
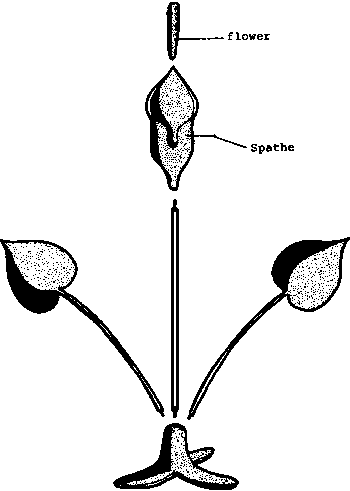
Figure X.12: Exploded view of the
parts of the arum lily
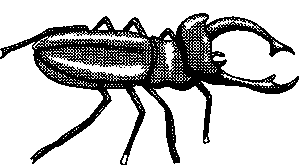
Figure X.13: Example of insect made
from horn - A
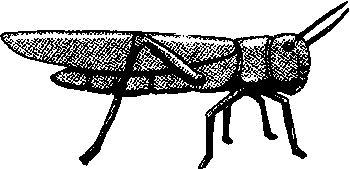
Figure X.13: Example of insect made
from horn - B
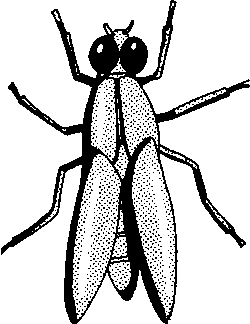
Figure X.13: Example of insect made
from horn -
C
|
| |||||||||||||||||||||||||||||||||||||||||||||||||||||||||||||||||||||||||||||||||||||||||||||||
CHAPTER XI. SOCIO-ECONOMIC IMPACT OF HORN PROCESSING
Whether for religious, cultural, economic or environmental reasons, horn has been considerably exploited and processed through the centuries by various civilisations.
Today, horn processing is still a widespread traditional activity in many countries, although on a very small scale. Paradoxically, there is no simple method of assessing the socio-economic impact of this craft partly because horn processing is usually a marginal activity and thus hardly perceptible in terms of revenue or job creation. An assessment still remains to be made.
The main purpose of this handbook is to introduce the technological aspects of horn processing in an easily understandable form, so as to facilitate the development of this activity. It has not been possible, owing to a lack of reliable data, to indicate the cost, price and sales price of the articles produced or the employment generated.
We believed it would be useful, however, to provide readers with a few basic data that would enable them to estimate the production cost of the articles described in this handbook. Machine time and labour requirements are given for small-scale manufacture of horn products (maximum 10 articles). For a non-mechanised workshop where all operations are manual, the times indicated in the table are to be multiplied by five to obtain the equivalent machine time.
To determine the cost price of electrical appliances (lamps, wall lights), the cost of electrical inputs (contact sockets, wires, plugs and switches) must be added to the production cost.
BASIC DATA FOR CALCULATING THE COST PRICE OF HORN PRODUCTS
|
|
REQUIREMENTS |
Machine time (hours) |
Work-hours | |||||||||||||||||||||
|
Product |
No. of horns |
Dry wood |
Hacksaw blade |
Abrasive disc |
Sheet of glasspaper |
Adhesive |
Candle |
Varnish |
Dilutant |
Polishing paste |
Water |
Electricity |
Sawing |
Turning |
Drilling |
Polishing |
Core extraction |
Marking |
Cutting |
Shaping |
Drilling |
Buffing |
Assembly, glueing |
Varnishing |
|
Lamp (fig. IX.14) |
9 |
4 |
1/2 |
1 |
3 |
20 |
1 |
1/10 |
1/10 |
20 |
20 |
1 |
1 |
2 |
1/2 |
2 |
2 |
1/2 |
2 |
1/2 |
1/2 |
4 |
1 |
1/4 |
|
Wall lamp (fig. IX.17) |
2 |
2 |
1/4 |
1/2 |
2 |
10 |
1 |
1/10 |
1/10 |
15 |
10 |
1/2 |
1 | |
1/2 |
1 |
2/5 |
1/2 |
3/2 |
1 |
1/2 |
2 |
1/2 |
1/4 |
|
Crustacean (fig. X.3) |
1 |
2 |
1/4 |
1/2 |
2 |
10 |
1 |
1/10 |
1/10 |
15 |
5 |
1/2 |
1/2 | |
1/2 |
1 |
1/5 |
1/2 |
3/2 |
1 |
1/2 |
2 |
1/2 |
1/4 |
|
Arum lily (fig. X.6) |
3 |
2 |
1/4 |
1/2 |
2 |
5 |
1 |
1/10 |
1/10 |
15 |
10 |
1/2 |
1 | |
1/4 |
1 |
3/5 |
1/2 |
3/2 |
3/2 |
1/4 |
2 |
1/4 |
1/4 |
|
Heron (fig. X.2) |
1 |
1 |
1/10 |
1/4 |
1 | | |
1/20 |
1/20 |
10 |
5 |
1/4 | | | |
1/4 |
1/4 |
1/4 |
1/2 | | |
1 | |
1/10 |
|
Salad servers (fig. IX.4) |
1 |
1 |
1/8 |
1/4 |
2 | |
1/2 | | |
10 |
5 |
1/4 |
1/4 | | |
1/4 |
1/5 |
1/4 |
1/2 |
1/2 | |
1/2 | | |
|
Syrup spoon (fig. IX.5) |
1/5 |
0.2 |
1/10 |
1/10 |
1/2 | |
1/10 | | |
5 |
1 |
1/20 |
1/3 | | |
1/10 |
1/25 |
1/10 |
1/3 |
1/20 | |
1/3 | | |
|
Comb (fig. IX.7) |
1/2 |
0.5 |
1/10 |
1/10 |
1/2 | | | | |
5 |
3 |
1/20 | | | |
1/10 |
1/10 |
1/4 |
1/2 | | |
1/4 | | |
|
Shoehorn (figs. IX. 9 and 10) |
1 |
1 |
1/10 |
1/2 | | | | | |
10 |
5 |
1/20 |
1/10 | |
1/20 |
1/10 |
1/5 |
1/10 |
1/10 | |
1/20 |
1/4 | | |
|
Bracelet (fig. X.1) |
1/4 |
0.25 |
1/10 |
1/2 | | | | | |
10 |
3 |
1/20 |
1/20 | | |
1/10 |
1/20 |
1/10 |
1/10 |
1/2 | |
1/5 | | |
|
| |||||||||||||||||||||||||||||||||||||||||||||||||||||||||||||||||||||||||||||||||||||||||||||||
ANNEX I: PRODUCTS AND MATERIALS REQUIRED TO EQUIP A HORN WORKSHOP
In general terms, the availability of spacious and well-equipped premises is always desirable and must systematically be sought by the artisan. In certain circumstances, it is not necessary to have large and sophisticated workshops to produce in quantity and quality. The manufacture of horn products is an example; in fact, horn processing is most often carried out by artisans working alone or with the help of a few apprentices, and much more rarely in small co-operative units. This is why we thought it would be useful to provide would-be horners with a list of tools and material required for the equipment of both a non-mechanised and a mechanised workshop.
LIST OF BASIC TOOLS AND PRODUCTS REQUIRED FOR THE EQUIPMENT OF A NON-MECHANISED HORN WORKSHOP
|
Item |
Description |
|
1 |
Joiner's workbench with wooden vice, bench clamp with eccentric protective closing device and fitter's vice |
|
2 |
Hacksaw |
|
3 |
Bow saw |
|
4 |
Pistol-grip handsaw |
|
5 |
Set of wood rasps, useful length 200 mm, sections; rectangular, half-round, round |
|
6 |
Scraper |
|
7 |
Bill-hook |
|
8 |
Wooden mallet |
|
9 |
Set of wood chisels, mortises and gouges |
|
10 |
Hand vices |
|
11 |
Hand drill |
|
12 |
Set of 25 metal bits, diameter 1 to 13 mm at 0.5 mm intervals, cylindrical stem |
|
13 |
Joiner's hammer |
|
14 |
Set of pin-punches, diameter 1.5-2-2.5-3-3.5-4-4.5-5 |
|
15 |
Set of screw taps, ISO system, diameter M3, M4, M5, M6, M8, M10 |
|
16 |
Tap wrench for taps diameter 3 to 10 mm |
|
17 |
Set of dies, ISO system, diameter M3, M4, M5, M6, M8, M10 |
|
18 |
Die stock for dies diameter 3 to 10 mm |
|
19 |
Batch of medium and coarse sandpaper for dry working |
|
20 |
Batch of fine sandpaper, coach-building type for use with water |
|
21 |
Soft leather for polishing |
|
22 |
Liquid metal polish |
|
23 |
Pot of height considerably greater than length of horns |
|
24 |
Cleaning brush |
|
25 |
Candle |
|
26 |
Adhesive |
LIST OF BASIC MACHINES AND ACCESSORIES REQUIRED FOR THE EQUIPMENT OF A MECHANISED HORN WORKSHOP
|
Item |
Description |
|
1 |
Jigsaw with blades for metal working |
|
2 |
Bench band-saw with blades for metal working |
|
3 |
Bench-mountable electric drill |
|
4 |
Power-driven parallel-jaw vice |
|
5 |
Wood lathe with 3-jaw mandrel and tail-stock |
|
6 |
Set of tools for use with wood lathe |
|
7 |
Centre drill |
|
8 |
Portable milling machine |
|
9 |
Set of cutters for portable milling machine |
|
10 |
Bench sanding lathe with batch of polishing pads of various grain sizes and felt pads |
|
11 |
Portable sanding and polishing machine with hard medium and coarse abrasive discs, coach-building type abrasive discs for use with water and polishing pads (fig. V.3) |
|
12 |
Butane burner and torch |
|
13 |
Hot air burner |
|
| |||||||||||||||||||||||||||||||||||||||||||||||||||||||||||||||||||||||||||||||||||||||||||||||
ANNEX II: EXAMPLES OF ARTISAN PRODUCTS IN HORN

Web-footed bird

Walking-stick

Gherkin tongs

Detachable

Oval ladle

African comb

Knife

Pipe - A

Pipe - B

Hair slides - A

Hair slides - B

Office stamp

Paper-knife
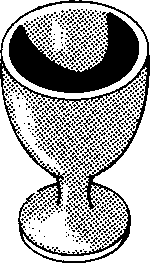
Egg-cup

Chopsticks

Wall
fitting
|
| |||||||||||||||||||||||||||||||||||||||||||||||||||||||||||||||||||||||||||||||||||||||||||||||
OTHER ILO PUBLICATIONS
Technology Series
The object of the technical memoranda in this series is to help to disseminate, among small-scale producers, extension officers and project evaluators, information on small-scale processing technologies that are appropriate to the socio-economic conditions of developing countries. Some publications in the series are described below.
ISSN 0252-2004
Tanning of hides and skins (Technology Series - Technical Memorandum No. 1)
Provides technical and economic information concerning the tanning of hides and skins at scales ranging from two hides per day (a typical rural tannery) to 200 hides per day. Six alternative tanning technologies are described, from a fully mechanised to a highly labour-intensive project. Subprocesses are described in great detail, with diagrams of pieces of equipment which may be manufactured locally. A list of equipment suppliers is also provided for those pieces of equipment which may need to be imported. This memorandum is, to some extent, complementary to that on the small-scale manufacture of footwear.
ISBN 92-2-102904-2
27.50 Swiss francs
Small-scale manufacture of footwear (Technology Series - Technical Memorandum No. 2)
Covers the small-scale production of footwear (shoes and sandals) of differing types and quality, providing detailed technical and economic information covering four scales of production ranging from eight pairs per day to 1,000 pairs per day. A number of alternative technologies are described, including both equipment-intensive and labour-intensive production methods. Subprocesses are described in great detail, with diagrams of pieces of equipment which may be manufactured locally. A list of equipment suppliers is also provided for those pieces of equipment which may need to be imported.
ISBN 92-2-103079-2
20 Swiss francs
Small-scale weaving (Technology Series - technical Memorandum No. 4)
Describes alternative weaving technologies for eight types of cloth (four plains and four twills) of particular interest for low- income groups in terms of both price and durability. The monograph provides information on available equipment (e.g. looms, pirning and warping equipment), including equipment productivity, quality of output, required quality of materials, and so on. A methodological framework for the evaluation of alternative weaving technologies at three scales of production allows the textile producer to identify the most suitable technology/scale of production. A chapter of interest to public planners compares, from a socio-economic viewpoint, the various weaving technologies described in the memorandum.
ISBN 92-2-103419-4
20 Swiss francs
Small-scale brickmaking (Technology Series - Technical Memorandum No. 6)
Provides detailed technical information on different brickmaking techniques and covers all processing stages, including quarrying, clay preparation, moulding, drying, firing and the testing of produced bricks. The techniques described are mostly of interest to small-scale producers in both rural and urban areas. The processes and equipment are described in great detail, including drawings of equipment and tools which may be produced locally, floor plans, labour and skill requirements, materials and fuel inputs per unit of output. A list of equipment suppliers from both developing and developed countries is also supplied with a view to assisting the would-be brickmaker to import the required equipment. A chapter of interest to public planners compares, from a socio-economic point of view, the various brickmaking techniques described in this memorandum.
ISBN 92-2-103567-0
27.50 Swiss francs
Small-scale paper-making (Technology Series - Technical Memorandum No. 8)
Provides technical and economic information on alternative paper-making technologies, describes the characteristics of various types and grades of paper products and gives guidance in the choice of paper machines. The information relates mostly to small-scale paper mills with a capacity of 30 tonnes of paper per day or less. The raw materials suggested for such mills include straw, bagasse, waste paper, rags and cotton waste, as well as other agricultural residues and imported wood pulp. Unlike other memoranda in the series, this memorandum is not a technical introduction to paper-making in general, nor is it a basic textbook on the subject. Instead, it provides people already in possession of the necessary back ground knowledge with criteria for choosing amongst different methods of paper-making.
ISBN 92-2-103971-4
22.50 Swiss francs
Small-scale manufacture of stabilised soil blocks (Technology Series - Technical Memorandum No. 12)
Provides technical and economic information on alternative technologies for the production of stabilised soil blocks. The information relates mostly to small-scale units producing up to 400 blocks per day It covers all aspects of block making: the quarrying and testing of raw materials; the choice of soil stabilisers; pre-processing operations; block-forming methods, including a detailed description of machines currently available for making soil blocks; the curing and testing of produced blocks; and the use of mortars and renderings in wall construction. The first and last chapters evaluate the technical and economic efficiency of stabilised soil blocks in comparison with other building materials, and give some guide-lines for government action in support of the use of earth as a building material.
ISBN 92-2-105838-7
20 Swiss francs
Prices subject to change without notice.
|
| |||||||||||||||||||||||||||||||||||||||||||||||||||||||||||||||||||||||||||||||||||||||||||||||
BACK COVER
Small-scale horn processing
Horn, a noble, abundant and low-cost raw material, can often serve as a substitute for plastics in the production of a variety of useful and decorative articles. The use of horn offers some socio-economic advantages to many developing countries, as it can yield employment and income. Traditional techniques are available - but they need to be rationalised, adapted in terms of appropriate technology, and made more widely known.
That is precisely the aim of this publication, which is the outcome of collaboration between horn-processing artisans and ILO technicians. The manufacture of a variety of objects from horn (including combs, spoons, wall lamps and ornaments) is explained in detail, with numerous illustrations. The book should be a useful tool for the training of horners, as it provides them with a simple and comprehensive manual of techniques used in the processing of horn.
ISBN 92-2-105358-X
Price: 15 Swiss francs