This section is not an exhaustive list of fuel-conserving
cookstoves; nor does it contain the solutions to all technical problems that
will arise in the field. It would be a mistake to apply any single design from
the section without first considering its appropriateness carefully. We ask,
rather, that people using this book look at each stove as an example of the
design process.
A note on measurement (rules of thumb, hand and arm)
The dimensions of the stoves in this section are given as metric
measurements. When teaching stove building in another culture (particularly to
illiterate people), convert these to the local units of measure. You could use
the thickness of a finger, the breadth of a hand or the length of a forearm as a
basis for
measurement.
Cooking with retained heat
In regions where much of the daily cooking involves a long
simmering period (required for many beans, grains, stews and soups) the amount
of fuel needed to complete the cooking process can be greatly reduced by cooking
with retained heat. This is a practice of ancient origin which is still used in
some parts of the world today.
In some areas a pit is dug and lined with rocks previously
heated in a fire. The food to be cooked is placed in the lined pit, often
covered with leaves, and the whole is covered by a mound of earth. The heat from
the rocks is retained by the earth insulation, and the food cooks slowly over
time (Fig. 7-1).
Another version of this method consists of digging a pit and
lining it with hay or another good insulating material. A pot of food which has
previously been heated up to a boil is placed in the pit, covered with more hay
and then earth, and allowed to cook slowly with the retained heat (Fig. 7-2).
The haybox cooker
This latter method is the direct ancestor of the Haybox Cooker,
which is simply a well insulated box lined with a reflective material into which
a pot of food previously brought to a boil is placed. The food is cooked in 3 to
6 hours by the heat retained in the insulated box. The insulation greatly slows
the loss of conductive heat, convective heat in the surrounding air is trapped
inside the box, and the shiny lining reflects the radiant heat back into the
pot.
Simple haybox style cookers could be introduced along with
fuel-saving cookstoves in areas where slow cooking is practiced. How these boxes
should be made, and from what materials, is perhaps best left to people working
in each region. Ideally, of course, they should be made of inexpensive, locally
available materials and should fit standard pot sizes used in the area.
Building instructions
There are several principles which should be kept in mind in
regard to the construction of a haybox cooker:
1. Insulation should cover an six sides of the box (especially
the bottom and lid). If one or more sides are not insulated, heat will be lost
by conduction through the uninsulated sides and much efficiency will be lost.
2. The box should be airtight. If it is not airtight, heat will
be lost through warm air escaping by convection out of the box.
3. The inner surfaces of the box should be of a heat reflective
material (such as aluminum foil) to reflect radiant heat from the pot back to
it.
A simple, lightweight haybox can be made from a 60 by 120 cm
sheet of rigid foil-faced insulation and aluminum tape. The insulation can be
cut with a hand saw or knife according to Figure 7-3.
Fig. 7-1; Fig. 7-2; Fig. 7-3
The pieces are taped together with 5 cm wide aluminum tape
(aluminum-faced tape sticks better and reflects more heat than duct tape) in the
manner shown in Figure 74 to produce a box with an internal volume of 35 x 30 x
20 cm. Other layouts can be used for pots of different sizes.
Use waste for edging the lid for a tight fit. Make sure no holes
are left for the air to escape through. You will need 20 meters of tape to make
the box.
A really simple haybox cooker can be made from a cheap styrofoam
cooler With aluminum foil taped to the inside walls (Fig. 7-5). It works fine.
Fig. 7-4; Fig. 7-5; Fig. 7-6
Haybox cookers can also be constructed as a box-in-a-box with
the intervening space filled with any good insulating material (Fig. 7-6). The
required thickness of the insulation will vary with how efficient it is (see the
table).
Good Insulating Materials
Suggested Wall Thickness
Cork
5 cm
Polystyrene sheets/pellets/drinking cups
5 cm
Other foam insulation
5 cm
Hay/straw/rushes
10 cm
Down/feathers
10 cm
Sawdust/wood shavings
10 cm
Rags/old woolen clothes/old sleeping bags
10 cm
Wool/fur
10 cm
Raw cotton
10 cm
Fiberglass/glass wool
10 cm
Shredded newspaper/coardboard
10 cm
Ash/pumice
15 cm
Chaff/rice hulls/nut shells
15 cm
The inner box should have a reflective interior: aluminum foil,
shiny aluminum sheeting, old printing plates, other polished sheet metal' or
silver paint will all work.
The box can be wooden, or a can-in-a-can, or cardboard, or any
combination; a pair of cloth bags might also work. Be inventive. Always be sure
the lid is air tight.
Instructions for use
There are some adjustments involved in cooking with haybox
cookers:
1. Less water should be used since it is not boiled away. 2.
Less spicing is needed since the aroma is not boiled away. 3. Cooking must be
started earlier to give the food enough time to cook at a lower temperature than
over a stove. 4. Haybox cookers work best for large quantities (over 4
lifers) as small amounts of food have less thermal mass and cool faster than a
larger quantity (Fig. 7-7). Two or more smaller amounts of food may be placed in
the box to cook simultaneously. 5. The food should boil for several minutes
before being placed in the box. This ensures that all the food is at boiling
temperature, not just the water.
Fig. 7-7
6. The boxes perform best at low altitudes where boiling
temperature is highest. They should not be expected to perform as well at high
altitudes.
One great advantage of haybox cookers is that the cook no longer
has to keep up a fire or watch or stir the pot once it's in the box. In fact,
the box should not be opened during cooking as valuable heat is lost. And
finally, food will never burn in a haybox.
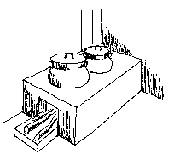
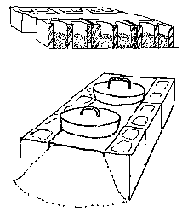
Sand/clay stoves: the Lorena system
The Lorena system involves building a solid sand/clay block,
then carving out a firebox and flue tunnels. The block is an integral sand/clay
mixture which, upon drying, has the strength of a weak concrete (without the
cost). The mixture contains 2 to 5 parts of sand to 1 part of clay, though the
proportions can differ widely.
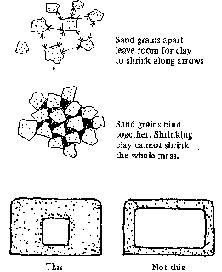
Pure clay stoves crack badly because the clay shrinks as it
dries and expands when it is heated. Sand/clay stoves are predominantly sand,
with merely enough clay to glue the sand together. The mix should contain enough
clay to bind the sand grains tightly together, but enough sand to prevent the
clay from shrinking as a mass (Fig. 7-8).
Fig. 7-8; Fig. 7-9
General characteristics of sand/clay stoves
The sand/clay mixture is strong in compression, but resists
impact poorly. It is adequately strong in tension if thin walls are avoided
(Fig. 7-9 up). Unlike concrete, which works well as a thin shell, the sand/clay
mixture relies upon mass for tensile strength.
Advantages:
- Sand and clay are available in most places, and cheap. -
The material is versatile; it can be used to build almost any size or shape of
stove. - The tools required are simple. - Construction of the stoves
requires simple skills. - Stoves are easy to repair or replace.
Disadvantages:
- Construction relies on heavy materials that are not always
available at the building site and are difficult to transport. - The stoves
are not transportable. - Sand/clay stoves are not waterproof. - Stove
construction can require several days of hard work. - Efficiency of the
stoves relies on the quality of the workmanship in their construction.
It is unknown how long sand/clay stoves will last, the oldest
Guatemalan Lorena being only three years old at the time of this writing
(September 1980). Normally, they can be expected to work well for at least a
year, after which they may need to be repaired.
General construction principles
1. Choose the clay. Pure clay is not necessary; any clay soil
will work if it contains little silt and if it fires well. Dig down; purer clay
tends to lie below 30 cm. Look at excavation sites (road cuts, wells).
Clays containing sand, even in quite high proportions, may be
excellent; too much silt, on the other hand, may cause real problems. Silt
particles (smaller than sand but larger than clay) are not large enough to be
bound by the clay. Avoid soils that contain a high proportion of silt. The best
clays are those used for making bricks, tiles or adobes; ask local potters or
brickmakers where they might be obtained.
To test for clay content: wet the sample until it is a stiff
mud. Roll a small amount into a worm the thickness of a pencil, 5-10 cm long.
Carefully pick up the worm at one end, using three fingers; hold it parallel to
the ground. If it bends or sags but doesn't break, it contains a lot of clay.
To test for firing qualities: dampen a handful of clay soil and
form a ball. When thoroughly dry, put the ball in a fire for l/2 hour. If the
surface doesn't crumble or flake away when scratched with a fingernail, the clay
should be suitable.
2. Choose the sand. Almost any sand will work well, though sand
with particle sizes between 0.5 and 4 mm will work best. Silty sand can cause
problems. If necessary, pass the sand through a 4 mm screen to remove the larger
stones and over a 1 mm screen to remove silt.
When you have selected your materials make a small trial mix for
building test blocks (see point 5).
3. Mixing. Your objective is to distribute the clay evenly
through the sand. The dry clay should be pulverized, the lumps removed by
passing it through a 4 mm or smaller screen. As if you were mixing concrete or
mortar, mix the dry ingredients well before adding water.
If the only available clay is damp, soak it in water for several
days, until there are no lumps and the clay will squeeze easily through your
fingers. Then mix it with the driest sand you can find.
4. Add water. If your mix is still dry, mix in water, a little
at a time, until the whole mix is moist. Mix it really thoroughly, making sure
there are no little lumps of clay left. Mixing may take a long time. The better
you have mixed clay and sand before adding water, the quicker the work will be.
Methods for mixing include:
a) stamping and grinding with bare feet, fuming the mix
occasionally with a large hoe or shovel, b) using a concrete mixer, if
available, containing a few head-sized boulders to smash up clay lumps.
To test whether it is mixed, slide the back of a wet shovel
across the surface of the pile. Clay lumps will show up as slightly shinier
patches on the flat shiny surface you have just created.
a) If you are using the Dry Method (see point 7): To test for
water content, take a handful of mix and form a hard pressed ball 5 - 7 cm in
diameter. Throw it about a meter into the air and catch it, letting it fall hard
into your hand -don't cushion it. If it cracks, the mix is too dry. If it
deforms, the mix is too wet. If it holds its shape, you are using the right
amount of water (Fig. 7-11).
b) If you are using the Wet Method (see point 7): Prepare a
stiff paste or mortar, soft enough to spread with a shovel or trowel, hard
enough to stand up and not slump.
5. Make test blocks. Before building a full-sized stove, make
test blocks large enough to simulate cracking conditions for your stove. These
are large bricks, at least 60 cm long, about 20 cm wide and 10 cm deep. Tamp the
mixture (made by the wet method) into a wet wooden mold (Fig. 7-12). Be careful
to avoid cracking the block when removing the mold.
Try several sand/clay mixtures, for instance 2 to 1, 3 to 1, 4
to 1, etc. Make duplicate or triplicate blocks for each mixture. Let them dry
thoroughly, turning them carefully so the sun can dry both sides. Choose the
block that cracks least and whose surface doesn't crumble when you scratch it
with something sharp; this is the best mixture (Fig. 7-13).
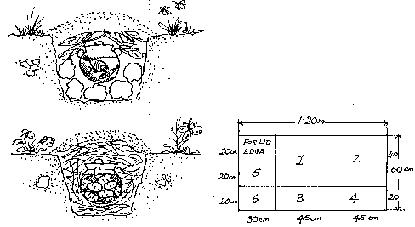
6. Layout. Before stove construction begins, the overall
dimensions, pot hole sizes, pot sequence and other design features must be laid
out. A stove plan can be drawn out on the floor where construction will take
place or a scale drawing can be done on paper (Fig. 7-14).
The schematic drawing under Point 9 illustrates those stove
dimensions which must remain fixed (such as distance of firebox from edge of
stove). Some basic design principles for the Lorena system are covered at the
end of this section. Refer to the Guatemalan Lorena and the Louga stove sections
for more design considerations and ideas.
7. Prepare the base. Build a solid base for the stove, either at
ground level or raised. Sand/clay stoves are very heavy, so the base must be
stable so it doesn't shift later, cracking the stove. Use concrete blocks, earth
bricks, fired bricks, rocks, or whatever is locally available to build the base
(Fig. 7-15).
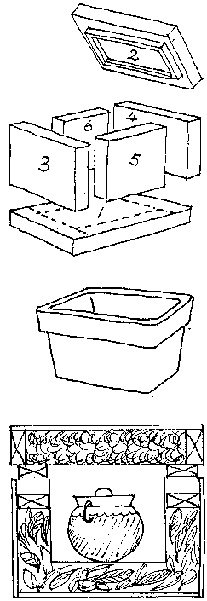
8. Build up the block. a) Dry Method. This technique is faster
and uses less water; it should be used whenever possible. If many identical
sized stoves are to be built, it may be worthwhile to make a wooden or metal
form or mold which can be used for every stove. For single stoves, use a simple
hand form, made out of two pieces of smooth plank for stoves with straight
sides, or of a piece of sheet metal for curved ones (Fig. 7-16). The form is
used as shown in Figure 7-17.
Fig. 7-16; Fig. 7-17
Shovel the ready made mixture onto the stove base, pounding it
into place with a small piece of wood about the size of a hammer handle.
Build up the sides and then fill in the center. Be sure to tamp
each shovelful down before adding another. Press your mold against the side when
you are building up the edge; make sure the edges hold firm.
If you stop work, cover the block. If it dries out, moisten it.
Don't build on a dry surface, or bonding will be poor and lines of weakness will
appear at those levels.
b) Wet Method. In some conditions, for instance if dry materials
are unavailable, you may want to use the Wet Method. Prepare the mixture as a
stiff paste or mortar, soft enough to spread, but dry enough not to slump when
piled up 10 cm. Lay the mixture down with a shovel, trowel| or piece of board,
in layers 3 - 8 cm thick. At this stage, don't bother to make the surface smooth
and regular; rough layers bind better. Additionally, overworking the mix can
weaken it. When each layer is just dry enough so you can't easily insert your
fingertip, add another layer. The sides of the stove must remain fairly straight
as you build up the block. Carving must wait until the whole block hardens to
the point where it is impossible to insert a fingertip more than 5 mm.
Fig. 7-18
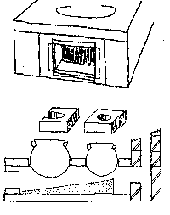
9. Damper slots. The Lorena system usually has one damper on
chimneyless stoves, two on chimney types, one front and one back. They can be
cut out of sheet metal, sliding up and down in runners attached to the front of
the stove (Fig. 7-19) or in a permanent groove cut into the body of the stove.
Cut a V-shaped notch the length of the damper slot into the surface of the
stove. Then cut the damper slot very carefully, sawing up and down with a big
knife or machete (Fig. 7-20). Keep the knife wet at all times to prevent the
block from cracking. The slot should be slightly wider than the tunnel which the
damper will close, and as deep as the floor of the tunnel. Sliding front dampers
work well as they channel air directly to the base of the fire. Alternatively, a
solid plug of brick, concrete or adobe set into the mouth of the firebox might
be used as a damper, or a brick or piece of pottery can be leaned against the
stove to cover the firebox entrance.
Fig. 7-19; Fig. 7-20
10. Rough excavation. Excavate using a big metal spoon (Fig.
7-21), a machete or a big knife, and your hands. Keep an your tools wet when in
use to minimize friction and crumbling of the block. Use a scooping action,
carefully carving away the space for the firebox and potholes and the tunnels
which connect them. The wet stove cannot withstand much stress. Don't lean on it
white excavating. Remember that the material is easier to remove than to
replace, so be cautious, carving away only a little at a time. Structural limits
as shown in Figure 7-22 must be observed in the excavation.
Fig. 7-21; Fig. 7-22
11. Fitting the pots. Unless space is deliberately left around
the sides of the pot (see building instructions for the Louga stove), pots
should fit snugly and the pot seats should be hard and smooth. Use the pots
themselves to achieve this tight fit, wetting the pot and revolving it carefully
in the hole, using it to smooth the seat. Set the pots deeply into the stove
(Fig. 7-23).
12. Baffles. Baffles are built up beneath each pothole to direct
exhaust gases to the pot bottom. Add a small amount of Lorena mix to the flue
tunnel beneath the pot so that the tunnel rises to within 5 cm of the pot bottom
(Fig. 7-24).
Fig. 7-23; Fig. 7-24
13. Repairing the stove. Structural cracking can occur during
construction and excavation. Inspect the stove block while under construction
for cracks so that they can be caught early. Cracks, holes and even seemingly
destroyed sections of a sand/clay stove can be repaired.
When repairing a large structural crack or crumbled section' cut
away enough material to leave a clean, solid shelf on which to rebuild. Dampen
and score the surface of the surrounding material. Rebuild the section in
layers, making sure that each layer is solid enough to accept more material. If
a cave-in has occurred where a flue tunnel is being excavated, the tunnel may
have to be partially filled to do the repair work and then re-excavated.
Surface cracks are not serious, they are only esthetic problems.
They can easily be repaired by wetting the crack and cutting a V-shaped notch
with a knife or machete. It is then filled with wet sand/clay mixture, and
smoothed.
14. Finishing the stove. Burnish the inside of the firebox and
tunnels with the back of a spoon or other rounded object. Smooth pebbles also
work well. The material will be more durable if it is smoothed in this way. Even
out the exterior of the stove by cutting off any lumps with a wet machete or
trowel and filling in holes on the. sides. Level the top with a machete or a
smooth, wet board. Round off sharp corners or edges; this reduces the likelihood
that they will be chipped off. The stove can be burnished with a trowel or
spoon, or rubbed with a damp cloth.
15. Surface coatings. For protection against rain and spilled
liquids, various coatings can be used. Try paint, whitewash, old motor oil,
varnish, starch or a thin cement/sand plaster.
16. Chimney (Fig. 7-25). Where earthquakes are no problem, the
chimney can be built of sand/clay blocks cast in a small mold and thoroughly
dried, using a mixture with slightly more clay for mortar. In earthquake prone
areas, chimneys should be constructed from materials that will not shatter, such
as sheet metal.
Fig. 7-25: Chimneys. A Bamboo
chimney; B Terra cotta drainage pipes; C Sand/clay blocks; D Ferro-mud (wire
netting and mud).
17. Recycling the stove. If after long use the bridge over the
firebox entrance wears out, or if you would like a new stove for some other
reason, break the. block apart, crush the pieces, add some water and begin anew.
Except for the material around the firebox and flue tunnels the sand/clay
mixture can be used over and over.
Designing with the Lorena system
The Lorena system, although it was developed in Guatemala, has
been adapted to conditions elsewhere. Building instructions are given for stoves
from Guatemala, Nepal and Senegal. You may be able to modify one of the examples
given to suit local conditions by using the principles to generate your own
design.
Principles:
- Keep the firebox as small as is practical. - Keep a high
proportion of solid to void in the stove. - Use dampers to control air
supply. - Sink pots as low as possible into the block. This will expose a
large surface area of all pots to the hot gases. - With multi-pot stoves, put
the pot needing the highest temperature or longest cooking time directly over
the fire. Pots needing less heat are placed close together along the tunnel.
They extract heat from hot gases passing to the chimney. - Baffles or bends
in the tunnel under a pot will create turbulence in the airflow; this will
transfer more heat to the pots. - You can utilize the last remnant of waste
heat to heat water before the warm gases escape up the chimney.
The Guatemalan Lorena stove
This was the first stove developed under the Lorena sand/clay
system.
It was developed at Estaci�n Experimental ICADA-Choqui in
highland Guatemala, where cooking is traditionally done over an open fire. The
stove was specifically designed for the following conditions:
- Fuel is scarce. - Wood is the primary fuel; other organic
wastes are available, but burn poorly in open fires at high altitudes. -
Cooking is done indoors; smoke from open fires is a health problem. - The
staple food, tortillas, is cooked over a hot fire on a hot plate, which is
usually 25 - 40 cm in diameter. - Other foods require slow heat for a long
time; several dishes are prepared for each meal, 2-3 times a day. - The pots
commonly used vary widely in size and shape. - There is a great need for hot
water for bathing.
The result was a stove responding to many of the above needs
(Figs. 7-26/27).
Fig. 7-26
Fig. 7-27
Building instructions
Basic building instructions for the Guatemalan Lorena are
outlined in the Lorena System's General Construction Principles.
Technical assessment
The great advantage of the Lorena stove is its design
flexibility. Each stove can be easily adapted to suit a wide range of individual
needs. This is because of the plasticity of the material; sculptural excavation
techniques permit the carving of diverse forms. Fluid interior shapes and
custom-fit pot seats make the best use of heat in the stove.
Other advantages:
- The high thermal mass of the material (a Lorena may weigh 500
kg) retains heat for a long time; this stored heat permits long slow cooking
with minimal fuel. - Stored heat -can also be used for baking; the fire is
removed from the stove, and food is cooked in the firebox. - The damper
system allows fine control of 'combustion rate. - The stove can be
owner-built with simple skills and tools.
Disadvantages:
- Learning building skills may require several days' training.
To build stoves well takes practice. - The stove may be inefficient for
cooking with only 1 or 2 pots. - The stove doesn't keep people warm unless
specially modified to do so.
Ideas for variations
Since it was introduced in Guatemala in 1976, the basic Lorena
design has been adapted to many diverse situations. Some of the adaptations
developed in Guatemala are described in Chapter 3. They include concrete
reinforcing, nailed-on exterior dampers, nailed-on wooden rails with hooks for
kitchen utensils, a 60 cm hot plate, and many different interior and exterior
shapes.
For further information on Lorena stoves, see:
Lorena Owner-Built Stoves by Ianto Evans, available from
Appropriate Technology Project Volunteers in Asia P.O. Box 4543 Stanford, CA
94305 USA or write to Estaci�n Experimental ICADA-Choqui Apartado 159
Quezaltenango Guatemala C.A.
Lorena stove variations
Nepal
The new Nepali Chulo was developed at the Research Center for
Applied Science and Technology, Tribhuvan University, Kathmandu, The Nepali
stove combines features of the improved chulas of India with the Lorena building
technique. The stove is built of the sand/clay mixture and has the same basic
interior design as the Lorena stove. However, it is much smaller and lower, as
the wood used by the Nepalese is of small size and Nepali cooks prefer to squat.
It also features a grate to improve combustion efficiency.
Fig. 7-28; Fig. 7-29
Advantages for Fig. 7-28: - small size; low to the
ground - simple design; easy to build
Advantages for Fig. 7-29: - fuel efficient - damper system
for air control - carved flue tunnels with baffles - stronger construction
than Chula
The New Nepali Chulo
Fig. 7-30
Advantages of the new Nepali Chulo:
- fuel-efficient design, including dampers and baffles - pots
are sunk in low to reduce, heat loss - chulo is low to the ground to suit
cooking customs - strong and durable - keeps the kitchen smoke-free
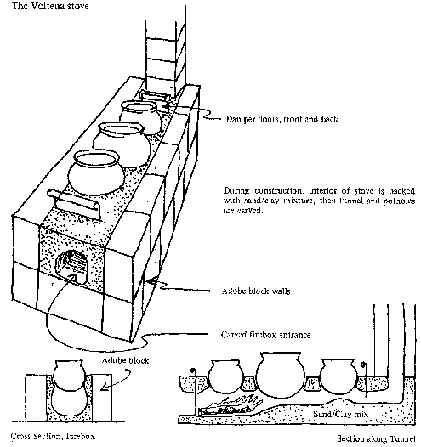
Upper Volta
In Upper Volta, yet another modification was tried at the Stove
Demonstration Center of the German Forestry Mission in Quagadougou. It combines
the simple shape and block walls of a stove currently being introduced in Mali,
and the structural strength and fuel-efficient design of a Lorena stove. To
build it, a frame of mud blocks is filled in with sand/clay mix, then a tunnel
system is carved out, baffles are built and dampers cut (see General
Construction Principles in the Lorena System for build. ing instructions).
Malian mud stove
Advantages: - simple to build - quick construction
Disadvantage: - top surface tends to deteriorate
Fig. 7-31; Fig. 7-32
Guatemalan Lorena
Advantages: - baffles to improve heat transfer -
fuel-efficient - damper system for air control - durable
The Voltena stove
Fig. 7-33
The Voltena stove combines the advantages of both parent
stoves: - It is strong and durable. - It includes dampers and baffles as
fuel saving devices. - It takes less material to construct than a Guatemalan
Lorena. - It takes less time to construct than a Guatemalan Lorena.
United States
In the northwestern United States, the Lorena has been modified
for home heating. The long flue tunnel through the Lorena allows much of the
heat of the fire to be absorbed in the body of the stove; this heat is
eventually released into the room. However, the high thermal mass of the
material transfers this heat very slowly; the outside surface of the stove never
gets very hot, but stays warm for a long time. Thus the Lorena provides constant
heat even from an intermittent fire, as opposed to traditional metal heating
stoves, which provide intense radiant heat only while the fire burns. The stove
has been modified to increase its radiant heat emission' while retaining heat
storage, by incorporating metal panels into the side of the firebox and flue
tunnels (Fig. 7-34).
This stove tended to crack badly due to the expansion with heat
of the plate steel panels (Fig. 7-35).
Another design used a buried metal pipe to circulate cool room
air through the interior of the stove (Fig. 7-36).
A simpler adaptation uses an inverted metal can over the first
pot hole (Fig. 7-37).
Another application of the heat storage capacity of the Lorena
is for contact heating(Fig 7-38).
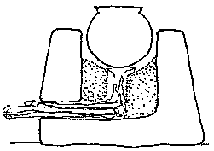
The Louga stove
The Louga stove was designed in northern Senegal where people
cook outdoors with only one pot. It differs substantially from the Guatemalan
Lorena and the new Nepali Chulo in that it is a one burner stove with no
chimney; it has, instead of a chimney, a space all around the pot where the
smoke escapes. Since the pot is set in deeply, hot gases heat the sides of the
pot as they leave the stove. The pot is supported by three pillars set into the
base of the firebox. They steady the pot at the ideal height for building a fire
underneath. Stove walls are built fairly thick, thicker at the base for
strength.
A Louga stove has at least one firebox entrance (sometimes two
or three), large enough to allow pieces of firewood to cross under the pot. It
may include a damper door at each firebox entrance; these improve the stove's
performance.
The chimneyless Louga stove was designed to be used outdoors. It
should therefore have a waterproof coating to protect it from the rain, or be
built under an overhang or have a roof constructed over it. Louga stoves can be
built at ground level or on a base, according to cultural or individual
preferences.
Fig. 7-39
Background
The Louga stove derives its name from the region of northern
Senegal where it was developed by villagers in the spring of 1980 (see case
study in Chapter 3). In this area, meals, typically a grain steamed over a
sauce, are cooked in a single pot.
This cooking method uses a minimum or fuel in an area which is
desperately short of firewood. The Louga stove works well, burning wood,
grainstalks and dung. In field trials, it has saved over half of the fuel
compared with an open fire. Its use is spreading very rapidly at the time of
this writing (September 1980).
Building instructions
Follow the general instructions for sand/ clay stoves. Here are
specific instructions for the Louga:
1. Establish which pot the stove will be used for.
2. Level the space where the stove will be built. Make sure the
ground is solid, tamp it hard if necessary.
3. If you need one, build a solid base, 2 ½ times the width
of the pot, using bricks, adobe or rock. Fill in the spaces with soil, sand or
debris, and pack it down hard (Fig. 7-40).
4. The block of the stove should be at least twice the width of
the pot (Fig. 7-41).
To determine the correct height for the stove walls, allow 5 cm
beneath the fire, plus 10 - 15 cm for the fire, plus 2/3 the height of the pot.
Using the Dry Method, build up the block of the stove. Use the
pot itself as a form around which to mold the sides, gradually raising the pot
as you build up the sides (Fig. 742). The sides can be tapered inward as long as
they are not less than 10 cm thick at the top.
5. If you decide to use sheetmetal sliding dampers, cut a damper
slot for every firebox entrance with a wet machete or long knife (Fig. 7-43).
Cut the slot slightly larger than the firebox entrance will be, using the method
described in the Lorena System instructions.
Fig. 7-40; Fig. 7-42; Fig. 7-41; Fig.
7-43
Other damper systems may be used, ea. a brick or a specially
shaped plug can be inserted into the firebox entrance, or runners for an
exterior sliding damper can be nailed on once the stove is dry.
6. Before the stove dries, carve out the pothole slightly wider
than the pot, using a wet spoon. There should be one or two fingers' width of
space between the pot and the stove wall (Fig. 7-44). Leave a 5 cm layer of
mixture at the bottom of the firebox, between the fire and the base.
Fig. 7-44; Fig. 7-45; Fig. 7-46; Fig.
7-47
7. With the wet spoon, carve out the firebox entrance. If only
one entrance is made, it should be wide enough to allow sticks to cross inside
the stove. If two for three entrances are carved, each one can be much smaller.
The bridge above - the firebox entrance should be at least l5 cm high
If the fuel to be used is long, build a slab in front of the
firebox entrance (Fig. 7-46).
8. Build three pot supports, 10 - 15 cm high (the height of the
firebox), into the firebox walls. The supports can be rocks imbedded in the
stove walls, or can be molded from the sand/clay mix with rocks set into the top
surfaces for durability. The pot, when it rests on the supports, should extend
about 5 cm higher than the stove surface; if the pot is lower, there tends to be
a problem with smoke flavoring the food. Alternatively, a three-legged metal
stand can be placed in the firebox to hold the pot (Fig. 7-47).
9. Smooth the interior and the exterior of the stove with the
back of a spoon to harden it.
Make dampers to fit the damper slots. Cover finished stove with
a weatherproof coating if it will be exposed to rain. A protective coating used
in West Africa is made from an oily substance (e.g. old motor oil) mixed with
clay and water, and smeared on in a thin coat.
Technical assessment
Advantages: - Burns less fuel than an open fire. - Well
adapted to outdoor cooking - wind protection. - Protects the cook from
radiant heat. - Cheap - costs little or nothing for materials. - A
multi-entrance stove requires no change in traditional fire building techniques
and is therefore easy to use.
Disadvantages: - Smoky - must be used outdoors. - Not
transportable. - One stove cannot accommodate a wide range of pot sizes. -
Can cook only a single pot at a time.
Ideas for variations - Multi-pot designs could be tried. -
Louga stoves could be built as special occasion stoves for the very large pots
that do not fit on an improved stove regularly used in a household. - An
insulant cover dropped over the pot and the top of the stove could make use of
retained heat for slow cooking long after the fire is dead (Fig. 7-48).
Fig. 7-48
For further information on the Louga stove, see Improved
Cookstoves in Rural Senegal, report by Ianto Evans, Elisabeth Gern, and Laurence
Jacobs, available from:
Volunteers in Technical Assistance (VITA)1815 N. Lynn
St.Arlington VA. 22209USA
or write to: Programme Ban ak Suuf C.E.R.E.R.B.P. 476 Dakar
Senegal
Concrete stoves
Concrete is a mixture of cement, sand, gravel and water. The
strength of concrete depends on the quality and proportions of the materials,
the way it is mixed and handled, and the way it is cured.
Cement is a finely pulverized mixture of lime, silica, and
aluminum and iron compounds. When cement is mixed with water, a paste is formed
which first sets (or stiffens) and then hardens into a solid mass. Setting and
hardening involve hydration (curing), a chemical reaction between cement and
water.
The sand used should contain particles varying in size up to 6
mm. The fine particles help fill the spaces between larger particles, so that
the finished concrete is non-porous and strong. Fine particles are also
necessary to provide good workability and a smooth finish. Too many fine
particles increase the proportion of cement needed, and so increase the cost.
Gravel is between 6 mm and 30 mm in size. Gravel is used to
economize on cement.
Concrete can be cast to form a single unit. This is the way the
Kaya store is constructed. In a Nouna stove, concrete is used as a binder for
inexpensive bricks.
Here are the characteristics of concrete as a stove building
material:
Advantages:
- Concrete is very strong. It is, however, questionable whether
the strength of concrete is really needed to build a solid stove. - Concrete
is weatherproof. - Concrete can be worked to a smooth finish, or coated with
a cement slurry. This may improve a stove's esthetic appeal and facilitate
kitchen hygiene. - In some areas or social strata, concrete is considered a
"modern" material. This may enhance a stove's popularity. - A concrete stove
of sufficient strength can be built light enough to transport it by truck or
handcart: this permits central manufacture. - Concrete is suitable for mass
production. Identical forms can be cast rapidly, assembly-line style.
Disadvantages:
- Cement, concrete and reinforcing steel are expensive. Because
they are such heavy materials, transportation costs add substantially to the end
price. This discriminates especially against hard to reach rural areas. -
Cement is. often imported. Its price and its supply may therefore be subject to
the fluctuations of international markets. It must be paid for in precious
foreign exchange; this. creates a drain on the country's resources. - To
produce strong concrete, builders must have a knowledge of proper mixing and
curing. Since construction requires mason's skills, concrete stoves are less
suited to be owner built. - Concrete stoves are difficult, to repair. It may
be necessary to completely rebuild a broken stove. - Concrete cannot be
recycled. - Properly curing concrete takes several days. If proper attention
is not given, an inferior product will result.
Durability: It is not clear how well concrete holds up under
long-term heat stress. Expansion cracks are common in both the Nouna and the
Kaya stoves. Further work is needed to find a concrete mixture suitable to
temperature extremes in a stove.
Working with concrete
A concrete of suitable strength may be composed of cement, sand
and gravel in a ratio of 1:3:4.
1. Mix the dry ingredients thoroughly on a board or concrete
surface.
2. Add the minimum amount of water necessary to make a workable
mixture. Excess water decreases the strength of concrete.
3. Wet the surface to which the concrete will be bonded. This
prevents too much water being extracted from the concrete' hampering the curing
process.
4. As it is laid, compact the concrete into place.
5. Concrete does not dry, it cures. Its strength derives from
the crystalline structure established during hydration. The curing process
requires moisture. If the concrete dries too fast, it may be weak and tend to
powder or crack. To ensure proper curing, cover the finished concrete with gunny
sacks or a sheet of plastic to slow down the evaporation process. Keep the
concrete moist for a minimum of three days, and up to a week.
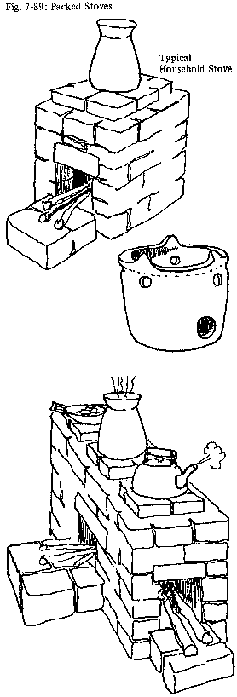
The Nouna stove
Fig. 7-49
The Nouna stove (Fig. 7-49) is built chiefly from fired bricks,
using cement mortar as a binder. A reinforced concrete surface layer is added
for strength. Currently, Nouna stoves are built in the user's home, usually by
specially trained stove masons. Curing is the responsibility of the owner.
Nouna stoves began as simple mudbrick boxes to enclose the fire
(see case history, Chapter 3). They have evolved into several designs that are
well adapted to cooking customs in Upper Volta, keep kitchens smoke-free and
save fuel.
Background
Nouna stoves were developed by Rosemarie Kempers, a German
volunteer, first in Chad, then in Nouna in the northwest of Upper Volta. They
are designed to suit cooking conditions in Upper Volta, where: - wood is the
main fuel, but it is getting increasingly scarce and expensive, - smoke is a
problem wherever cooking is done indoors, - the basic meal is a grain (millet
paste or rice) and a sauce, although two sauces are not uncommon, - millet
paste must be stirred vigorously; the pot must therefore be held firmly, -
the cook sits on a low stool while preparing millet paste, - hot water is
needed for bathing, especially early in the morning.
In response to these needs, the Nouna stove features deep-set
pots, is 30-40 cm high, has a chimney, saves wood and can keep water warm
overnight with the heat retained in the mass of the stove.
Building instructions
1. Wet down the ground and lay a slab of mortar (l part cement:
6 parts sand) the size of the stove (Fig. 7-50). The stove's width should be the
diameter of the largest pot plus two brick widths.
2. Soak the bricks well, then set them to form the walls and
mortar them together.
Where the chimney will be, the bricks are cut to provide a smoke
exit. A space is left open for the firebox entrance, not more than 20 cm wide
(Fig. 7-51).
Fig. 7-50; Fig. 7-51
3. Mortar is laid on top of the wall bricks. The pots are wedged
in place between the walls with thinner fired bricks, so no more than a third
will be above the stove surface (Fig. 7-52). Fired bricks should cover as much
of the stove surface as possible.
The brick between the pots should be trimmed to a width of 8 cm.
Make sure all bricks are well soaked before using them (Fig. 7-53).
4. A 3 cm layer of concrete is applied over the fired bricks.
Set in a loop of reinforcing metal, then build up the concrete to a layer of 5
cm (Fig. 7-54).
5. The chimney is built of fired brick and mortar, or of
specially molded chimney bricks (see Kaya stove). The chimney should penetrate
the roof and be covered (see Chimneys, Chapter 5).
6. The floor of the stove is raised so there is a 10-15 cm space
for the fire under the first pot and 3 cm under the second pot. This forces the
hot gases to pass directly order the second pot (Fig. 7-55).
7. The interior and the exterior are smoothed with a trowel, and
a thin coat of mortar is applied to the outside. If long firewood is to be used,
a slab is added to support the pieces that stick out of the firebox (Fig. 7-56).
8. The stove is kept moist for seven days to cure.
Technical assessment
Advantages:
- Nouna stoves use less fuel than an open fire. - They hold
pots steady for cooking that requires vigorous stirring. - They free kitchens
from smoke. - They can be custom built to fit individual needs. - They can
be partially rebuilt, should the area around the firebox deteriorate with
prolonged use.
Disadvantages:
- Nouna stoves are expensive: in spring of 1980, they cost
between $ 15 and $ 25 in Upper Volta. - They tend to crack over the firebox
entrance if fired up before they have cured. - They are not
transportable. - The stoves use concrete inefficiently; i.e. they do not take
advantage of its structural strength, but use it as binder or filler.
Ideas for improvement
- A special seat could be made over the firebox to set in a
large water pot, or an additional pot hole could be used for a permanent hot
water reservoir (Fig. 7-57).
- Where more than two dishes are cooked simultaneously, a
multipot stove could be built' possibly with two pot holes the same size so pots
can be switched (Fig. 7-58). - A damper system could improve the stove's
performance significantly. A simple front damper could be made by mortaring
runners on either side of the firebox entrance and inserting a sliding damper
(Fig. 7-59). A back damper could be inserted sideways through a slot left
between two. of the rear bricks (Fig. 7-60).
Fig. 7-57; Fig. 7-58; Fig. 7-59; Fig.
7-60
For further information on the Nouna stove, write to:
Improved Stove ProjectGerman Forestry MissionB.P.
13QuagadougouUpper Volta
The Kaya stove
The Kaya stove (Fig. 7-61) is a semi-transportable concrete with
a cast topplate. It is designed to be prefabricated in a central location where
it can be properly cured, and later installed in the user's home. Central
manufacture allows a quality control not possible when stoves are custom-built
and curing is left to the owner.
Fig. 7-61
Stoves have two holes to accommodate two pots cooking
simultaneously, and a chimney to draw smoke out of the kitchen. A feature worth
noting is the very small firebox door which prevents the cook from building too
big a fire, and which limits air intake. By means of this small firebox entrance
and of a relatively short chimney, draft is regulated without the use of
dampers.
Background
The Kaya stove was developed in 1979|80 by Jonathan Hooper, a
Peace Corps forestry volunteer based in the town of Kaya in north-central Upper
Volta. His concern was not only to design a stove appropriate to cooking
conditions in Upper Volta (see Nouna stove) which saved significant amounts of
firewood, but to develop a method of production suitable for small local
stove-building businesses. He began operating out of a central workshop, which
allowed him to make use of the advantages of mass production. Special tools
simplify the production process and speed it up. These tools include:
- specially cut sheetmetal templates in the shape of the fire
chamber to align the base bricks and to serve as a foundation on which to cast
the top plate. - concrete molds the size of different pots, used to cast the
pot-holes in the top-plate (Fig. 7-62). - a special mold to form chimney
bricks (Fig 7-63), - a metal bending stand to shape the reinforcing iron.
Fig. 7-62; Fig. 7-63
With these specialized tools, stoves can be rapidly manufactured
by workers skilled-in basic masonry.
Building instructions
1. Concrete blocks are set up around a metal template. The
template is propped up with sand or wooden blocks so it is level with the blocks
(Fig. 7-64).
Fig. 7-64
2. The concrete blocks are filled halfway with sand, and the
sand wet thoroughly (Fig. 7-65).
3. Concrete pot molds of the desired size are set on the
template (Fig. 7-66).
Fig. 7-65; Fig. 7-66
4. Concrete is applied in and over the bricks and around the pot
molds to a thickness of 2 - 3 cm (Fig. 7-67).
Fig. 7-67
5. A reinforcing steel loop with two cross pieces, tied with
wire, is formed and set in (Fig 7-68).
Fig. 7-68
6. The concrete layer is built up over the reinforcing rod, to a
total thickness of 5 cm.
The surface is then smoothed, making sure the concrete around
the pot molds is well worked.
7. After 2 hours, the pot molds are removed. After 24 hours, the
metal template is pulled out. A prefabricated door frame (consisting of a metal
angle-iron frame set into concrete) is then mortared into place (Fig. 7-69).
8. The finished stove is kept moist for five days. It is then
installed, against a wall, in the user's home. Chimney blocks are stacked to
form an exterior chimney. A specially molded block allows the smoke to pass from
the stove through the wall into the chimney (Fig. 7-70).
Fig. 7-69; Fig. 7-70
9. The floor of the stove is made of packed sand. It rises
gently towards the back of the stove, ending in a baffle of scrap metal.
Technical assessment
Advantages:
- The Kaya stove uses less fuel than an open fire. - It holds
the pots steady, permitting vigorous stirring. - It eliminates smoke from the
kitchen. - The Kaya stove is simple, suited for small business production. It
requires relatively little labor. - The prefabricated stove can be
transported by trailer to the user's home. - As with any mass stove, the Kaya
stove's retained heat can be used long after the fire is dead.
Disadvantages:
- The Kaya stove is expensive: in 1980, it cost about $ 15 in
Upper Volta. - A mason's skills are necessary for construction. - A Kaya
stove cannot be partially repaired. Once the top-plate deteriorates' the whole
stove has to be replaced.
Fig. 7-71
Ideas for improvements - A damper system might further
improve fuel efficiency. - A baffle directly under the second pot would
increase the amount of heat transferred to that pot. - Multi-pot models could
be tried (Fig. 7-71).
Clay brick stove: The Singer
This stove is built of sun-dried or fired clay bricks. Fired
bricks are more durable and may be easier to work with; however, a stove of
sun-dried bricks may last for years, is less expensive, and can be built
anywhere there is suitable clay and sand.
A stove of brick construction has these advantages: - It is
well adapted to small business enterprise, using the widely available skills of
brick makers and masons. - Manufactured bricks are available in most places.
Sun-dried bricks can be produced with only clay, sand and shore boards for
forms. - Clay bricks shrink as individual units; large cracks through the
stove are unlikely. - A good clay mix. is nearly as strong as concrete. -
Surface plates custom made to fit pots can be replaced to fit new pots. -
With pre-fabricated bricks, construction requires little time.
Disadvantages: - Brick stoves are not suited to centralized
production and distribution. - The stoves are not portable. - Well built
stoves may require a mason's skills and tools.
Making clay bricks
Making suitable clay bricks will involve some experimentation
and considerable time; if locally made bricks are already available, use them.
You will, however, need to use the clay brick material to form the surface
burner plates and firebox door for the stove. Pure kaolinitic (well weathered)
clays when used alone make suitable bricks. However, other more easily available
clays often require additives to reduce shrinkage and cracking.
Sand is used to reduce shrinkage. The clay in a clay/sand brick
shrinks only in the interstitial spaces; sand particles that touch each other
prevent overall shrinkage of the entire brick.
Chopped straw, rice hulls, or other fibrous organic matter added
to the mix have two effects: they add structural reinforcement, and, by
providing channels for moisture flow, facilitate uniform drying, thus reducing
cracks (Fig. 7-72).
Fig. 7-72
Some combination of clay, sand, and organic material will
probably make a strong brick. You might try proportions, by volume, of 3 clay: 6
sand: 2 chopped straw; 3: 3: 1; etc. Experiment with different mixtures. 100 -
300 bricks may be used in building a stove, so 20 trial bricks of different
mixtures would be a good investment. Test trial bricks for relative strength and
firing characteristics.
Some other additives: - Cement in the mix might be necessary
if sufficient clay is not available. (Try 1 part cement: 20 parts sandy
soil.) -Ashes sometimes improve the. mix by emulsifying the clay.
Mixing:
With dry clay:
1. Pulverize and sift the clay through a 4 mm screen. 2. Mix
the other dry ingredients in thoroughly. 3. Add just enough water to make a
mix that is pliable enough to work easily, but firm enough to hold its shape
If clay is wet:
1. Break the clay into pieces, and soak it thoroughly, When the
clay has dissolved, the mix should be not quite liquid. 2. Mix the clay with
the other ingredients, and add more water if necessary.
Mixing can be done with the hands, or more quickly with the
feet.
Background
The Singer stove was developed by H. Singer for use in
Indonesia. In a 1961 FAO report to the government of Indonesia Singer outlined
the problems associated with deforestation there.
The report went on to describe the traditional open-hearted
Indonesian stoves. In tests conducted by Singer, the indigenous stoves were
found to be very wasteful of fuel. By his measure, only 6-7% of the fire's heat
was transferred to the cooking pots.
Finally, Singer designed and built a prototype fuel-saving
cookstove. His improvements on the traditional stoves included: - An enclosed
hearth and limited air intake, - A flue for flames and smoke, - A chimney
to provide draft. Singer's cooking simulation indicated over 20% efficiency for
the new design.
See, for further information:
Improvement in Fuelwood Cooking Stoves and Economy in Fuelwood
Consumption, Report to the Government of Indonesia by H. Singer, FAO Report No.
1315, 1961, available from
Food and Agriculture Organization (FAO)Rome, Italy
Building instructions
Three molds will be needed:
1. Surface plates: using straight, smooth boards, construct a
mold to form the plates for the cooking surface. Suggested dimensions for-a
finished plate are 5.5 cm thick, 27 cm wide, and 34 cm long. This will be
adequate to support a pot up to 20 cm in diameter. The pots intended for use
with the stove can be used as interior molds to form the cooking holes (Fig.
7-73).
Fig. 7-73: Pots may be sunk through
the plate by digging them into the ground before casting.
Place the mold on a flat surface with the pot in the center.
Sprinkle the inside of the mold with ash to prevent sticking (a sheet metal
lining also works well). Fill the mold with the clay mixture, tamp it down
firmly, and level. the surface. Remove the mold carefully; if the consistency of
the mix is right, the plate should slump only slightly. Cast a plate for each
pot to be used and let them sun dry for several days.
2. Bricks are formed the same way as surface plates. A suggested
size for the brick mold is 5 cm thick, 10.5 cm wide, and 22.5 cm long. However,
many of the bricks will need to be cut to accommodate the internal dimensions of
the stove. If more than one stove is to be built, it may be simpler to make
brick molds of several sizes. Approximately 100 bricks will be needed to build
the 3-pot stove illustrated.
3. The firebox door mold should be 14 cm high, 16 cm long, and 5
cm thick. Along one 16 cm edge, place a 4 cm by 6 cm interior mold to form an
opening for the damper.
A handle and a damper are fitted to the firebox door while the
clay is still damp (Fig 7-74)
Fig. 7-74
To make the damper, cut a piece of sheet metal into a rectangle
approximately 8 cm by 10 cm. Bend the metal as shown in Figure 7-75 to form a
hand grip. The damper will get hot ; nail thin wooden strips on either side of
the 2 cm fold to protect the fingers. With a large nail, punch a hole in the
damper near the top edge. Push the nail through the damper, then press it into
the damp clay so that the damper completely covers the opening. The damper
should pivot on the nail, yet fit snugly against the block.
For the handle, cut two holes half way through the block. These
holes should be made to fit the handle. The handle can be a smooth forked stick,
or a metal rod bent to shape.
For a permanent handle, make two bolt holes all the way through
the clay block. When the clay has dried hard, attach a wooden handle with bolts
(Fig. 7-76).
Fig. 7-75; Fig. 7-76
Construction
The 'schematic illustrations of the Singer stove (Fig. 7-77)
indicate very precise measurements; it may be difficult to exactly reproduce the
design shown. You may also need to deliberately alter this design to better suit
local requirements. However, it is . important to retain the essential design
features discussed under Technical Assessment.
Fig. 7-77: Cross Section along Flue
& Plan of Tunnel System
Mark on the ground the outline of the base of the stove. Lay the
bricks one layer at a time, overlapping joints whenever possible. The same clay
mixture used for making the bricks may be used as mortar.
The bricks will need to be cut or shaped while forming the
interior of the stove. Sun-dried bricks can be wetted and shaped; fired bricks
can be split fairly precisely with a chisel or mason's hammer
Mortar the surface plates into place just as you would another
layer of bricks. The cooking holes should be sanded or cut so as to allow each
pot to extend 3 cm into the flue below.
The chimney could be made of metal, clay tile, masonry, or
brick. It could be fitted to a surface plate in the same way; as the pots, or
built into the back of the stove.
Technical assessment
The Singer stove was carefully designed for fuel efficiency.
- The relatively small interior size of the firebox contains the
fire directly beneath the first pot. The first pot is also well exposed to the
flames because of the high exit from the firebox. For these reasons, the Singer
stove probably uses considerably less firewood than other multipot stoves,
especially when cooking with only one pot. - The wide, shallow flue is also a
good design feature. A maximum amount of heat is extracted from hot flue gases
as they squeeze past each pot. - The strength of the molded surface plates
allows close spacing of the pots along the flue; relatively little of the
interior surfaces of the stove is heated at the expense of the cookpots.
The main difficulty with the Singer probably lies in building
techniques. Neatly reproducing the design is tricky if you're not a trained
mason. Other limitations of the Singer stove are:
- The small firebox will not hold firewood pieces longer than 25
cm. - Lumber for brickmaking forms may be unavailable in some places. -
The first pot receives most of the useful heat from the fire. It might be hard
to provide enough heat to downstream pots without burning the contents of the
first pot. - The stove is heavy and cannot be moved, and must therefore be
built in place. - Making the bricks involves a lot of hard work.
Possible modifications
- Rather than using modular block construction, the stove could
be molded directly of clay. A single piece molded clay stove could be built
faster. Alternatively, the Singer design could be constructed of sand/ clay (see
The Lorena System). - Sheet metal could be used to 'provide additional
support for the surface plates, if needed. Metal reinforcement is used in
building the Hyderabad Chulo, a similar Indian stove. - Fired clay or metal
rings ;that would accommodate. smaller pots to the cooking holes would be a good
accessory. - A large proportion of finely chopped organic matter could be.
incorporated into the bricks to produce insulating air spaces. An insulated
stove would retain more heat in the firebox, losing less to the body of the
stove. - A sliding metal damper door, such as described for the Lorena stove
might be best for long firewood pieces, which could then protrude from the front
of the
stove.
Charcoal stoves
In areas where charcoal is the predominant fuel, simple stoves
have evolved to take advantage of its special burning characteristics. They are
usually one pot cookers and usually include a grate on which the charcoal is
placed, an opening for air intake below the grate, and supports for the pot. A
good charcoal stove places the pot as close to the burning embers as possible
without actually touching them. In this way maximum advantage can be taken of
the fire's radiative heat. Since burning charcoal emits no smoke and little hot
gases, most heat is transferred by radiation and conduction.
Charcoal tends to pack tightly. To supply the fire with adequate
oxygen for combustion, air intake is best assured from below through a grate
(Fig. 7-78).
Fig.
7-78
Metal stoves
Advantages of the material:
- Metal is durable, impact-resistant and weatherproof. -
Sheet metal is relatively light and therefore lends itself to portable
stoves. - Local craftspeople in poor countries are likely to be skilled in
metal work; it would be easy for them to manufacture stoves. - Metal objects
are commonly traded in the market places; metal stoves could be bought and sold
through the same channels. - Scrap metal (e.g. old oil cans, scrap corrugated
steel, aluminum cans) provides a cheap source of material if available.
Disadvantages of the material:
- Metal is an excellent conductor: therefore heat is lost
rapidly through all sides of a metal stove. Cooking on a metal stove may be
uncomfortably hot for the cook. - Where metal has to be imported, metal
stoves may be expensive. - In some areas, the technology for manufacture may
be unavailable.
Feu Malgache
The feu malgache or malagasy stove (Fig. 7-79) is widely used
wherever charcoal is burned in West Africa. These stoves are either welded or
riveted out of steel sheet or recycled metal. They are sold in various sizes to
accommodate teapots as well as family size kettles.
Advantages:
- These stoves are within the means of most poor people. -
They provide some wind shelter for the fire. - The slanted firebox walls
automatically move charcoal onto the grate: "automatic" stoking. - The square
stoves especially are strong and durable.
Disadvantages:
- There are no pot supports. - The square stove does not
correspond to a pot's round shape: the heat of some of the burning coals is
wasted. - The round stove is difficult to manufacture out of heavy steel
sheet: because they are thinner, round stoves tend to be less durable. - The
small bases make the stoves unstable and therefore dangerous. For this reason
they are badly suited for foods that require vigorous stirring.
Ideas for improvement
The stove could be partially buried to reduce heat loss, this
would also make it more stable (Fig. 7-80).
Fig. 7-79; Fig. 7-80
The metal walls could be lined with clay to reduce heat loss.
Materials such as charcoal bits or organic matter could be added to the clay to
further increase its insulating properties (Fig. 7-81).
Wind shields could reduce heat loss from the pot's sides (Fig.
7-82).
Fig. 7-81; Fig. 7-82; Fig. 7-83
East African metal stove
This stove (Fig. 7-83) is the East African counterpart of the
feu malgache. It is common in urban areas, where charcoal is the predominant
fuel. It differs from the feu malgache in that it has straight firebox sides and
uses three iron rods to support the pot. The air inlet has a damper door to
regulate the airflow for combustion.
Advantages:
- The stoves are within the means of most people - They
provide some wind shelter. - They feature a damper door to control air flow.
If well used, a damper door can save fuel, and regulate heat intensity.
Disadvantages:
- Construction requires at least some imported iron (rods for
the pot supports) which may make the stove relatively expensive.- It is
necessary to rearrange and stoke the charcoal occasionally to keep it burning.
Ideas for improvement
Work on improving the East African metal stove has been done by
Keith Openshaw and his collaborators in Tanzania. They found that by lining the
inside of the firebox and the ash chamber with a 3 cm clay layer and increasing
the air space in the grate to 25%, charcoal consumption could be reduced (Fig.
7-84).
The Tanzanian team recommends modifying the East African stoves
only as an interim measure. To get substantially better performance, a stove of
the Thai bucket type should be used (see Thai bucket, this Chapter).
For further information see:
A Comparison of Metal and Clay Charcoal Cooking Stoves, a paper
by Keith Openshaw; available from
Division of Forestry Faculty of Agriculture, Forestry and
Veterinary Science University of Dar es Salaam Box 643 MOROGORO Tanzania
Fig. 7-84; Fig. 7-85
Central American metal stove
Charcoal stoves exist in Central America. They differ from
African charcoal stoves in that they have a shallow firebox and a large grid to
support the pots. This allows more than one pot to cook at the same time (Fig.
7-85).
Advantages:
- They are within the means of most people. - They provide
wind protection for the fret - More than one pot can be heated at the same
time on these stoves.
Disadvantages:
- Because the shape of the firebox does not correspond to the
shape of the pots, some of the charcoal burns uselessly. Much heat is lost
around the pots. - The cook is not protected from the
heat.
Terra cotta stoves
Advantages of the material:
- Good clay is available in many places, usually free. - Clay
can be molded to almost any shape. - Simple firing techniques can turn clay
into terra cotta. - Terra cotta is more durable than unfired clay. - Terra
cotta is weatherproof. - Terra cotta is a much better insulant than metal, so
less heat is lost from a terra cotta stove. - There are local channels for
trading terra cotta goods. - Terra cotta is fire resistant and relatively
light; it is therefore a suitable material for transportable stoves.
Disadvantages of the material:
- Terra cotta stoves are heavier than metal stoves. - Terra
cotta is less durable than metal: terra cotta stoves will not last as long.
Ideas for improvement:
Including organic matter (fibers, charcoal) with the clay makes
terra cotta a better insulant.
Indonesian terra cotta charcoal stove
In southeast Asia, terra cotta charcoal stoves (Fig. 7-86) are
more common than sheet metal stoves. They are made by local craftspeople and
traded in local marketplaces.
Advantages:
- These stoves save considerably more fuel than metal
stoves. - They can be made by local craftspeople, using cheap, local
materials. - They are affordable, usually cheaper than metal stoves. -
They provide some wind shelter. - Fuel slides into the center due to the
slanted firebox walls. This acts as an "automatic" stocking device.
Fig. 7-86
Fig. 7-87
Disadvantage:
- The stoves are fragile; their walls are very thin.
Ideas for improvement
The Ceramics Institute of Bandung, Indonesia, has experimented
with ways to improve on the Indonesian terra cotta charcoal stove. These changes
were made:
- The walls were built thicker. - The grate was made out of
refractory (high heat resistant) clay rather than terra 'cotta. ; - A small
iron damper was added to regulate air intake (Fig. 7-87).
For further information see:
Improvement of Fuelwood Cooking Stoves and Economy in Fuelwood
Consumption, Report to the Government of Indonesia by H. Singer, FAO Report No.
1315, 1961, available from
Food and Agriculture Organization (FAO) Rome, Italy
The Thai bucket
Thai buckets (Fig. 7-88) consist of a terra cotta stove set into
a metal shell (often a bucket). The space between stove and shell is packed with
ash, sealed in with a little cement. This stove combines the durability of a
metal stove with the insulating qualities of terra cotta, further enhanced by
the ash layer. A metal damper door may be added for draft regulation.
Fig. 7-88
The terra cotta part of the Thai bucket is also sold without its
metal ceasing as a cheaper version of the stove.
Advantages:
- A Thai bucket uses less fuel than either a metal stove or a
terra cotta stove. Heat loss is minimal. Although it is only suited for a narrow
range of pots, it is very efficient because the fuel is used with very little
waste. - They are compact, transportable stoves. - They are less fragile
than terra cotta stoves. - They are made largely from local or recycled
materials: clay and ash are commonly available, and the metal used is generally
recycled. - The stoves are produced by local artisans and sold in local
markets. - They provide some wind shelter. - The slanted walls assure that
charcoal is continually fed into the fire.
Disadvantages:
- The Thai bucket is heavier than either a metal or a terra
cotta stove. - It is more expensive than either. - More skill is needed to
make the stove. - Metal and cement may have to be imported.
Ideas for variations
Any two containers could be insulated with a layer of ash, or
other insulating materials. This would be an easy way to improve metal stoves.
For further information see:
A Comparison of Metal and Clay Charcoal Cooking Stoves, a paper
by Keith Openshaw; available from
Division of ForestryFaculty of Agriculture, Forestry and
Veterinary ScienceUniversity of Dar es Salaam Box 643
MOROGORO
Tanzania
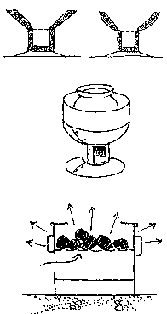
Rice hull stoves
Characteristics of the fuel:
Rice hulls are a difficult fuel to burn; if piled in a heap and
lit, they will smolder but not burn. However, if enough oxygen can be provided,
they will ignite. Two solutions to this problem have been developed in
Indonesia: Packed stoves and natural draft stoves.
Packed stoves
Background
Packed stoves are hollow containers, usually built of brick and
mud, or fired clay. There is a door at the base and a pothole, slightly smaller
than the cookpot to be used, at the top (Fig. 7-89).
Fig. 7-89: Packed Stoves
A common type of packed stove for-use in households and small
restaurants in Bali is made of brick, holds about 1½ kg of rice hulls and
burns for about 6 hours on one filling of fuel. In central Java, similar stoves
are used when boiling coconut sap to make sugar.
There is a wide range of stoves that burn packed rice hulls.
Probably the simplest is a fired clay bucket, a type that has been used in the
city of Jogjakarta and the areas of Indonesia surrounding it for at least 30
years. It holds, when packed, about 1/2 kg of rice hulls and burns about 2
hours. Multiple pot packed stoves are usually several separate stoves combined
into a unit. Villages in Bali reportedly prepare food for festivals on larger
versions of the household and restaurant stove described above. These hold
between 1 and 2 gunny sacks of rice hulls (10 to 25 kg) and burn continuously
for 4 to 7 days; they are disassembled after the festivals.
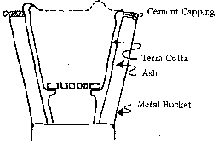
Packing the stoves as shown in Figure 7-90 makes a flue up the
center which provides the necessary flow of oxygen for combustion. The stoves
are lit by shoving 2 or 3 burning sticks in through the door at the base. As
long as the burning sticks are inside, the stove burns with a vigorous, smoky
flame; if the sticks are removed, the flame goes out and the rice hulls smolder
until they are completely consumed. A packed stove burning rice hulls will use
about 20% of the wood used by an open fire. Small sticks and twigs are good
enough for this purpose.
Fig. 7-90: Packing the Stoves
Construction
Construction is simple and involves, at most, basic masonry
work. It should be possible to make packed stoves out of fired bricks, unfired
bricks, fired clay, sand/clay mixture, concrete, or any other material capable
of withstanding heat and the slight amount of pressure exerted on the walls by
the packing. Cans, oil drums, and other already existing containers can be used
for packed stoves.
Technical assessment
Advantages:
- Packed stoves can be made very quickly and inexpensively. -
A wide variety of containers is suitable, without major alteration, for use as
packed stoves. - Construction, if necessary, is extremely simple. A mason or
other craftsperson will probably not be necessary, Packed stoves are suitable
for owner-building. - Rice hulls are cheap; they may be available without
cost in some areas. - Small packed stoves (e.g. terra cotta bucket) are
easily portable. - Small packed stoves are suited to mass production and
distribution. - A packed stove can, if rice hulls are temporarily
unavailable, burn wood by itself. - Rice hulls surrounding the fire insulate
it and retain heat.
Disadvantages:
- Packed rice hulls, once lit, cannot be extinguished, but
continue to smolder until consumed. - Packed stoves smoke a great deal. -
Removing the ashes and repacking the stove can be very messy. - Rice hulls
pack best if they are of a powdery consistency. Old mills, previously used in
Indonesia and other parts of Asia, ground the hulls off rice into suitably fine
fragments. Unfortunately, modern milling equipment passes rice between rubber
rollers and cracks the hulls off as large half shells. These large pieces do not
pack well in stoves and the mass of packed hulls collapses into the bottom of
the stove before burning completely. Because of this, it is necessary to add
equal amounts of expensive rice polishings to the rice hulls in order to make
them pack well. This adds to the cost, but the resulting fuel mixture is still
much cheaper than wood.
Ideas for variations
- Other agricultural wastes and lowgrade fuels may be burnable
in packed stoves. Sawdust, wood shavings, straw, and chaff are all
possibilities. Try mixtures of fuels. - It may be possible to find
inexpensive binders for fuels that do not pack well. This would eliminate the
need in some areas to use rice polishings as a binder. On the other hand, it
might be better not to pack such fuels, but to consider using, instead, a
natural draft stove similar to those described later in this section. -
Dampers would improve control of the fire. - It should be possible to easily
fit a chimney to packed stoves. It would be permanently attached, as shown in
Figure 7-91, above the packed fuel and below the pot. A chimney would improve
the draft and also diminish the smoke problem common with these stoves. - The
ideas incorporated in the Louga stove should be very useful in packed rice hull
stoves. Try sinking the pot into the surface of the stove to improve heat
transfer, gain wind shelter, and make better use of residual heat. The Louga
stove, itself, might be directly adaptable to burning rice hulls if packed as
shown in Figure 7-92.
Fig. 7-91
Fig. 7-92
Natural draft stoves
Background
Smoke and hot gases rising through a flue create a strong
suction that draws air through a slanted grate located at the front of this type
of stove. Rice hulls burned in this fashion burn rapidly with a clean, hot flame
producing almost no smoke.
Natural draft stoves in Indonesia are generally large and used
for commercial processes that require long, vigorous boiling. They incorporate a
hopper that feeds a steady supply of rice hulls to the grate. The pots are
usually fixed and sealed in place; pots that are removable must be carefully
resealed with a mixture of mud and rice hull ash, or the draft will be spoiled
and the stove will not operate. The grates are usually fiat iron bars set in as
steps, though one stove seen used a slanted sheet of perforated iron for a grate
that seems to work well. They are commonly made of fired bricks, cement mortar
and plaster.
Natural draft stoves have been in use in some parts of Java for
more than 20 years and are a well developed technology. It is generally accepted
there that tie following design criteria are important:
- The wider the grate, the hotter the fire. - The grate
should be steeper than 45°. - The taller the flue, the stronger the
draw, meaning a longer flame, more heat, and greater fuel consumption. - On
stoves employing more than one cookpot, the floor should slant slightly upwards
towards the stack end.
"Tahu" (soy cord) stove (Fig. 7-93) of a type commonly used in
Jogjakarta and Central and East Java. This stove is used to boil between 800 and
1400 lifers of soy milk daily, in 150 lifer batches. This consumes about 10
gunny sacks (125 kg) of rice hulls. During cooking, the hulls in the hopper are
stirred and pushed down onto the grate about every 10 minutes. The 4 meter stack
produces a strong draft, resulting in a powerful, yellow flame. The stove has
been in use for 15 years and the only maintenance has been to replace the iron
grate after 3 to 5 years of constant use.
"Gula Jawa" (coconut sugar) stove (Hi". 7-94) used in Blitar,
East Java. This stove boils about 50 lifers of coconut sap down to 7 kg of sugar
cake daily. This requires 4 hours cooking time and uses half a gunny sack of
rice hulls (6 kg). The process of boiling the sap makes full use of the range of
temperature in the three pots; all three pots boil, and, as the sap is reduced
in volume, it is transferred to the slower boiling pots. Clay mortar is used in
this stove rather than cement. This stove was inexpensive, costing only Rp. 3500
(about U.S. $ 8).
"Ipa" stove. A 3 pot natural draft stove called the Ipa stove is
being disseminated throughout the Philippines. It is constructed from adobe
blocks, except for the top, which is cement.
Technical assessment
Advantages:
- Natural draft stoves make efficient use of a low-grade fuel
that is difficult to burn, but very cheap and readily available in the region
where they are employed. - They are capable of producing a great deal of heat
for extended periods. - Natural draft stoves are well-suited to burning the
hulls left by modern rice milling machines. They do this better than do the
packed stoves. - They can be built from inexpensive materials. Although most
of the stoves are built from fired bricks, both unfired bricks and sand/clay
mixture should be suitable materials.
Disadvantages:
- Natural draft stoves usually require a mason for their
construction. - Natural draft stoves are relatively complex stoves and take a
long time to construct. - Of the two types of rice hull stoves natural draft
stoves are by far the more expensive. - Natural draft stoves require the use
of metal for the grates. This can, in some places, be expensive.
Fig. 7-93: "Tahu" Stove
Fig. 7-94: "Gula Jawa" Stove
Ideas for variations
- Dampers to adjust the burning rate would probably make stepped
grate stoves more versatile and efficient. - Centralized manufacture and
distribution of any components requiring critical accuracy in manufacture would
expedite dissemination. - Cost of natural draft stoves would be reduced and
constructions simplified if, in their construction, .sand/clay mixture or
unfired bricks were substituted for fired bricks. Use of sand/clay mixture,
however, would make measuring and layout crucial, use of standard-sized bricks
is one way to assure dimensional accuracy in construction. - Natural draft
stoves are probably capable of burning such other fuels as chaff, sawdust, and
wood shavings. Consider them for use with fuels to which it is difficult to
supply oxygen. - Tunnel design principles from Lorenatype stoves are, to some
extent, applicable to these stoves. Baffles under the pots to direct the hot
gases against the pots are a good thing to consider. A winding flue with
potholes situated at the turns is also possible. One might easily end up with a
stove looking like a Guatemalan Lorena or Nepali Chulo, but with a stepped grate
built into the firebox.
For more information about rice hull stoves see
Technologies for the Utilization of Rice Hulls as a Fuel in Java
and Bali, report from a survey conducted by the Development Technology Center of
the Institute of Technology, Bandung, for the ASEAN Food-handling Subcommittee.
The drawings were originally by Craig Thorburn. This report is available from
Volunteers in Asia, Box 4543 Stanford, CA 94305
U.S.A.