
| Village Level Brickmaking (GTZ, 1989, 124 p.) | ||||
| Moulding | ||||
| (introduction...) | ||||
| Slop Moulding | ||||
| Sand Moulding | ||||
| Principle Elements Of Sand Moulding | ||||
| How To Mould Bricks | ||||
| Transporting bricks to drying area | ||||
| Drying | ||||
| Problems | ||||
|
| ||||||||||||||||||||||||||||||||||||||||||||||||||
Moulding is the process where the prepared clay is placed in a mould which forms it into the shape of a brick. There are two methods of hand moulding bricks: the slop moulding method and the sand moulding method.
Slop moulding is the traditional method of brickmaking. The brick is formed in a rectangular mould which has no bottom or top. The mould is wetted and placed on the ground and filled with a very wet clay mixture. A stick is used to remove the excess clay and smooth the top of the brick. The mould is then lifted off, leaving the brick on the ground to dry.
Often this method produces poor quality bricks because of the excess water used both in the mixing of the clay and the wetting of the mould. The clay mixture becomes so wet and soft that the newly made brick begins to deform under its own weight. Once placed on the ground, it cannot be moved because it is so soft. Often the brick is marked or deformed if accidentally touched or moved before the brick dries properly. The excess water can also cause the brick to crack and break during drying.

Figure
Sand moulding is a drier method of shaping bricks which helps prevent many of the problems found in traditional slop moulding.
Sand moulding uses a drier stiffer clay mixture. The clay is formed into a wedge shape and all its sides are covered with a "releasing agent" which prevents the clay from sticking to the sides of the mould. The most common releasing agent is sand, and hence the term sand moulding. However, some brick units use sawdust, ashes or even dry powdered clay as their releasing agent. The wedge, covered with the releasing agent, is thrown into a simple hinged bottom mould which sits on a table. Rather than use a wet stick to level off the top of the mould, a "bow cutter" is used to remove the excess clay and smooth the top of the brick. The newly formed brick slides easily out of the mould onto the table top.

Figure
Because the clay soil used to make the brick has very little water in it, the newly moulded brick is much harder. It is possible to pick up the brick with small pallets and take it to the drying area where it is placed on its side without damaging it.
Sand moulding resolves many of the problems which occur with slop moulding. Because the newly formed bricks contain less water, the bricks are hard and do not deform easily. They also dry faster with much less cracking and breakage.
Note: If you are accustomed to slop moulding, at first the drier sand moulding many seem slower and more difficult, but with a little experience, the production rate can easily match that of slop moulding. In fact, more bricks will be produced because of the much lower breakage.

Figure
In summary, sand moulding has the following advantages over the slop moulding method:
- Sand moulded bricks have a better shape because they are harder and suffer fewer deformities when placed on uneven ground. Loose lumps of clay or pebbles that may be on the ground tend to not stick to a sand moulded brick.- Sand moulded bricks dry more quickly with less cracking because less water is used during the clay preparation stage.
- It uses less water. This is advantageous for brick sites which suffer from a shortage of water.
- Fewer moulds are needed because the mould is immediately removed from the brick and the brick is transported to the drying area by itself, leaving the mould available to make more bricks.
- Sand moulding is a "cleaner" way of making bricks because wet clay is not splashed about the moulding area.
- Sand moulding is more comfortable because the worker stands upright at a moulding table. Usually with slop moulding, the worker crouches or kneels on the ground to mould the bricks.
- The fired bricks are more regular in size and shape and therefore are easier to use when building a wall. In general, a wall built with sand moulded bricks will be more attractive than a wall built with slop moulded bricks and may actually use less mortar.
- You can print the brickmaking unit's name in the "frog" of a sand moulded brick. A frog helps the brick dry and fire better. Stamping the brick unites name into the brick also is a means of advertising.
There are seven principle elements which you will need to understand before beginning to make sand moulded bricks. The seven elements are the:
1. quantity of water
2. throwing wedge
3. releasing agent
4. cleaning agent
5. hinge mould and moulding table
6. bow cutter
7. handling pallets
Quantity of Water
Adding the correct amount of water during clay preparation is critical for making good quality bricks. The less water used, the better the quality.
If you have too much water in the clay, the brick will:
- deform easily under its own weight after moulding;
- deform when placed on uneven or bumpy ground;
- crack during drying;
- take much more time to dry.

Figure
There is a simple test that can be done to check if the clay has the correct amount of water.
With your hands, form the clay into a wedge shape and stand the wedge on top of the moulding table with the narrow edge down. If the wedge does not change its shape, the amount of water is correct. If the wedge begins to deform, there is too much water in the mixture.

Figure
If the clay is too wet and soft, you can mix in dry powdered clay or simply leave it to dry until the clay reaches the correct moisture content and stiffness.
Throwing Wedge
The throwing wedge is formed with the clay mixture on top of the moulding table which has been covered with the releasing agent. When the wedge has been coated with the releasing agent, it is thrown into the mould.

Figure
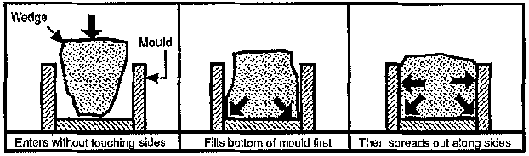
The shape of the wedge is very important. When thrown, it should enter the mould and strike the bottom of the mould first without touching the sides. To be able to do this, the length and the width of the throwing wedge must be slightly less than the length and width of the mould.
Releasing Agent
The releasing agent is a fine, dry material which coats the throwing wedge. It prevents the clay from sticking to the sides of the mould and helps the brick to slide easily out of the mould.

Figure
Normally the releasing agent is sand, but sawdust, ashes and even dry powdered soil have been used. It is spread in a 5 mm layer on top of the moulding table so that when the wedge is formed, it is coated with the releasing agent.
When the wedge is made and thrown correctly, the clay will spread out along the bottom of the mould first before filling the sides of the mould. The releasing agent will prevent the clay from sticking to any part of the mould and as a result will allow the brick to slide easily out of the mould.
Figure
When the wedge is poorly made or thrown, the brick will not slide out of the mould easily. This happens because the mould has cut off the releasing agent from the side of the wedge causing the exposed clay to stick to the mould.

Figure
Forming and throwing the wedge is a skill. Experience has shown that it may take 100 practice throws before a new brick moulder is able to make and throw a wedge correctly. If the brick does stick to the mould, clean the mould well with a cleaning agent before attempting to throw a new wedge.
Cleaning Agent
If the wedge is not well covered with the releasing agent, or if it was not thrown correctly into the mould, the clay will stick to the sides of the mould. It will then be necessary to clean the stuck clay from the mould with a cleaning agent after you have removed the brick.
A good cleaning agent not only cleans but will also help to release the brick from the mould. One of the best cleaning agents is a mixture of burnt engine oil thinned with diesel fuel. The mould is cleaned by simply wiping the sides with a rag moistened with the oil/diesel mixture.

Figure
The oil and diesel mixture is best, but water can also be used to clean the mould if no engine oil or diesel fuel is available. However, if water is used, it will be necessary to sprinkle the inside of the mould with the releasing agent before the next brick is made to prevent the clay from sticking to the wet sides of the mould.
Remember that is necessary to clean the mould with the cleaning agent only if the clay sticks to the inside of the mould, and not every time a brick is made.
Hinge Mould and the Moulding Table
Hinge Mould
This is the device that gives the brick its shape. There are three major parts to it:
1. The mould box is where the brick is formed. The mould is made larger than the finished size of brick to allow for shrinkage during the drying and firing of the brick. The major wear areas are covered with sheet metal and the corners are reinforced with steel.
2. The hinged bottom allows the production of frogged bricks and the easy removal of the brick from the mould. The bottom is hinged on one side and the hinge is made from 3 mm thick sheet steel.
3. The frog is made from wood and is used to form a cavity or indentation on one side of the brick. The frog makes the brick weigh less, allows it to dry and fire faster (saving firewood) and gives the brick a form which improves its adherence when laid in a wall.

Figure
Information on how to make the mould can be found in Appendix 2.
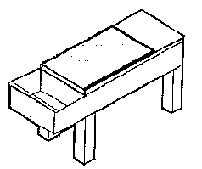
Moulding Table
The moulding table is where the clay is formed into a wedge shape and thrown into the mould. On one side of the table is a box where the releasing agent is stored. In the middle area of the table, the clay is formed into the wedge shape and thrown into the mould. On the far side of the table the brick is removed from the mould. Information on how to make the table can be found in Appendix 2.
Figure
Bow Cutter
After the wedge of clay is thrown into the mould, you need to remove the excess clay and smooth the top of the newly made brick. The bow cutter cuts and smooths at the same time as it is pushed along the top of the mould.
The excess clay that is removed is placed to one side of the table where it will be used to make the next brick.
The bow cutter is made of four pieces of wood, some cord and a fine strong piece of wire. If suitable wire is not available, wire can be obtained from an old car tire. Simply cut away the "bead" or inner rim and burn it in a fire. The rubber will burn away leaving a coil of fine wire.

Figure
Handling Pallets
Pallets are hard thin hand-sized boards used to pick up and carry the brick (usually short distances) after it has been removed from the mould. The handling pallets distribute the pressure of the fingers over the surface of the brick. Without them, the moulder's fingers would make, dents in the freshly made brick. Pallets should always be used when picking up a newly made brick or when placing it on the ground to dry.

Figure
The length of the pallets should be 10 mm longer than the length of the mould and 30 mm wider than the width. The thickness of the board should be between 4 and 6 mm, depending on the type of wood used.
The method presented in the next few pages describes how to form the wedge and cover all its sides with the releasing agent. It is but one of many possible methods and after working with the system for a while, good brick moulders will begin to develop their own particular style.
Other releasing agents can be used but for simplicity's sake, sand has been used as the releasing agent in the following description.
Note: Although steps 1 through 21 may seem to take a long time when you are first learning, a skilled and experienced brick moulder will do these steps in a matter of a few seconds.
1. Cover the top of the moulding table with a 5 mm layer of sand. If using water as the cleaning agent, dust the inside of the mould with some sand.

Figure
2. Take a lump of clay equal in size to half a moulded brick.

Figure
3. Place the lump of clay on the left side of the table as shown in the drawing.

Figure
4. With the palms of the hands, flatten out the clay as shown in the drawing until the width of the clay equals the length of the mould.
5. Take another lump of clay equal in size to that of a whole brick and place it on top of the flattened clay.

Figure
6. Using the palms of the hands, form the clay into a triangular or wedge shape.

Figure
7. Roll the clay forward as shown in the drawing until the point of the triangle meets the edge of the clay, forming a wedge shape.

Figure
8. Roll the wedge shape to the left until it is standing on edge. This will cover that one side of the wedge with sand.

Figure
9. Roll the wedge to the right, back to its original position.

Figure
10. Continue to roll the wedge to the right until the wedge is standing on its edge. This will coat that side with sand.

Figure
11. Roll the wedge backwards towards you onto its base.

Figure
12. Roll the wedge to the right.

Figure
13. Continue rolling the wedge to the right until it is standing on its point and coated with sand.

Figure
14. Check that all the sides of the wedge, especially the point, are well coated with sand, and that the wedge is able to enter the mould without touching the sides.

Figure
For the following steps (15 to 21), it is very important that the time between throwing the wedge into the mould and removing the brick be as short as possible in order to help prevent the brick from sticking in the mould.
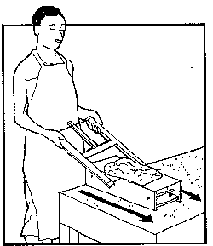
15. Standing in front of the mould, throw the wedge into the mould so that the point of the wedge enters first.

Figure
16. Cut off the excess clay by pushing the bow cutter along the top of the mould.
Figure
Note: Steps 18 to 21 can be done by an assistant moulder. .
17. Remove the excess clay from the top of the mould and place it with the sand-covered side down, on the left hand side of the table (as in step 3). It will be used to make the next brick.

Figure
18. To help release the brick from the sides of the mould, knock the mould on top of the table once quickly on each its four sides.

Figure
19. Turn the mould over and open the hinged bottom.

Figure
20. Carefully begin lifting the mould. The brick should begin to ease out.

Figure
21. Remove the mould and put to one side.

Figure
22. With the pallets, carefully lift the brick as shown. Try not to squeeze the brick too hard with the pallets.

Figure
Note: Steps 22 to 27 can be done by a "runner" or assistant moulder.
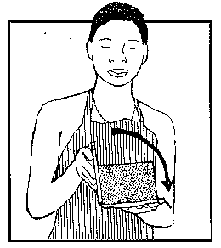
23. Rotate the brick as shown.

Figure
24. Remove the top pallet and place it along one of the brick's larger sides as shown.

Figure
25. Rotate the brick as shown in the drawing.
Figure
26. Place the pallet on top of the brick.

Figure
Note: While the brick is being rotated with the pallets, check that all the sides of the brick are well made. If the brick has been badly formed, reject it.
27. The brick can be carried directly to the drying area with the pallets, or placed on a special carrying board to be transported later. In either case, the brick must be handled with care and should always be placed down on its narrow side.

Figure
28. If the clay has stuck to the mould, clean it with a rag dampened with a mixture of burnt engine oil and diesel fuel. If engine oil and diesel fuel is not available and you must use water as a cleaning agent, dust the mould with sand before using it again. Dusting the mould with sand is not necessary if you are using the oil mixture.

Figure
29. Check that there is enough sand on the table; add more if necessary.

Figure
30. Flatten the excess clay in the same way as shown in step 4.

Figure
31. Continue to make bricks, beginning with step 5.
After the brick comes out of the mould, it must be transported to the drying area. There are several methods for doing this:
1. Simply pick up each brick and carry it directly to the drying area. This method requires quite a few pallets and people to carry the bricks to the drying area, especially if the distance is large.
Figure
2. Pick up each brick as it is made and put it on a special carrying board. The board can carry 8 to 10 bricks at a time. When full, two people carry this board, which weighs about 50 kg, to the drying area. For each moulding table, you will need at least two carrying boards.
3. Make a special brick cart by re-designing an ordinary wheelbarrow. This allows one person to transport 20 newly made bricks at a time to the drying area.

Figure
During the preparation of the clay, water is added to make it soft and easier to shape into bricks. But, before the bricks can be fired, it is essential to remove this water. It is during the drying stage that the majority of this water is removed.
If we were to measure and weigh a brick as it came out of the mould and then repeat this two weeks later, we would find that the brick would weigh less and have smaller dimensions. This is caused by the water leaving the brick during the drying process.
After coming out of the mould, the brick is carefully picked up and placed down on clean, level ground. It is placed on its edge to save space and to help the brick dry better with less cracking.
Do not place the brick on the flat side to dry; it will not dry correctly in this position. Always lay the brick on edge for proper drying.
The bricks are left in this position and usually covered with grass. The grass will help the bricks from drying too quickly, and therefore will reduce cracking and breaking.
After one or two days, the bricks are turned up on end which is the best position for a brick to dry evenly. They are left to dry for two or three days more standing upright, still covered with grass. After this period of time, the grass is not needed and the bricks can be left uncovered for two more days.

Figure
After a total drying time of about six days, the bricks should be hard and dry enough to place them in long open drying stacks.
The stacks are four bricks wide and the bricks are stacked up to ten rows high. The bricks are laid in rows perpendicular to the row below it. A space of about the thickness of your finger is left between the bricks. These spaces are important as they allow air to enter the stacks and continue to dry the bricks.
The bricks should remain drying in the stacks for several weeks before they are used to build the field kiln. To test if a brick has dried completely, break one open and see if it looks dry in the centre. It's important to remember that all the bricks must be well dried before placing them into the kiln. If the bricks are still not dry, firewood or coal will be wasted drying out the brick in the kiln during the firing process.
Save any bricks that crack or break during drying; they can be used later to insulate the kiln.

Figure
A good quality brick should be strong, regular in shape and size, with smooth even sides and without cracks or defects. If the quality is not satisfactory, it may be necessary to change the way you are making bricks. The following is a list of problems that might occur during brick production, what could be the cause of the problem, and some suggestions on how to correct it.
Problem
Brick sticks to the mould making it difficult to remove from the mould.
Reasons
- wedge was not well coated with the releasing agent and the clay stuck to the sides of the mould.
- the wedge was not thrown well and a part of it was cut off when it entered the mould. The exposed clay stuck to the side of the mould.
- the mould was not cleaned well before throwing the wedge and a part of the wedge stuck to the side of the mould.
- water is being used to clean the mould.
- the wedge was thrown with too much force.
Suggestions
- put more releasing agent on the moulding table and try to cover the wedge completely with the releasing agent.
- check that the wedge can enter the mould without touching the sides of the mould and then throw it correctly into the mould.
- always check that the mould is clean before throwing the wedge into the mould.
- it is better to use a mixture of burnt engine oil and diesel fuel rather than water to clean the mould. If you have no choice and must use water, sprinkle or dust the mould well with the releasing agent.
- use a little less force when throwing the wedge into the mould.
Problem
The brick does not have sharp, distinct, well made corners.
Reason
- the wedge was not thrown into the mould with enough force to fill the corners of the mould.
Suggestion
- throw the wedge into the mould with more force.
Problem
The bricks are disfigured with marks, dents or scratches.
Reasons
- the clay is too soft because too much water was mixed in during the clay preparation stage.
- too much water was used to clean the mould; the wedge absorbed the water making the clay softer at those-sides.
- bricks were not handled or carried correctly with the pallets.
- the handling pallets are dirty with dried clay causing marks to be pressed into the sides of the brick.
Suggestions
- use less water in the preparation of the clay.
- it is better to use a oil mixture to clean the mould; if not available, use less water and dust or sprinkle the mould with sand before throwing the wedge.
- more caution or training is needed in using the pallets.
- clean the pallets.
Problem
The bricks crack during drying.
Reasons
- the clay is not the best type for making bricks.
- there is
too much water in the clay mixture.
- the bricks are drying too rapidly.
Suggestions
- experiment with other clays. If none are available, try adding sand to the clay, experimenting with different proportions.
- use less water when preparing the clay.
- if you are drying the bricks in the open, cover them with more grass If you have a drying shed, try closing the openings in the walls to reduce the wind blowing through the shed.
Problem
Pieces of clay have fallen off the sides of the brick.
Reason
- when the wedge was being formed on the table, some sand entered inside the wedge causing a joint or fault to form in the clay.
Suggestion
- re-read how to form the wedge on the moulding table and try to be more careful.
Problem
The brick is misshapen with the base slightly larger than the top.
Reasons
- the prepared clay used to make the brick was too soft and the
brick distorted under its own weight.
- the newly-made brick was squeezed too
hard with the pallets when it was picked up.
Suggestions
- use less water when preparing the clay mixture.
- more
caution or training is needed in using the
pallets.